How To DIY Elastic Waist Skirt Pattern - FREE Pattern + Tutorial

Add a breezy and flowy silhouette to this elastic waist skirt pattern cut at a flowy maxi length. Not only does this go with everything in your wardrobe, but it's also comfortable. A picnic-ready piece of clothing that definitely belongs on your sewing wishlist.
If you're anything like me, you love the look of a casual, effortless vibe. There's something about it that just makes you feel good. Maybe it's the way it looks so relaxed and comfortable, or maybe it's because it seems like the kind of outfit that would be perfect for running around all day without a care in the world. Whatever the reason, I'm a big fan of the effortless vibe.
And the best part, this is a free sewing pattern you can download on georgettepatterns.com!

Difficulty
Our Jasmine simple skirt pattern with elastic waist is great for anyone who wants an easy sew. It's a great maxi skirt suitable even for beginners.
Sewing Your Perfect Size Pull On Skirt Elastic Waist Pattern
The skirt is a loose and comfortable design, perfect for hot summer days, that will make you feel effortlessly stylish. By the end of this easy-to-follow tutorial, you will know how to sew a tiered skirt pattern and have a beautiful new piece for your closet.
Ready for some fun?
You'll need:
- Your 3 tier skirt sewing pattern
- Preferred fabric
- Color matching thread
- 3.5 cm wide elastic band
- Sewing machine
Seam Allowances
- 1 cm seam allowance
- 2 cm hem
Fabric Suggestion:
Choose a lightweight woven fabric for your elastic waistband skirt pattern. Some examples of lightweight fabric you could use include silk, viscose, cotton poplin, linen, voile, and chiffon. The prototype was made out of poly charmeuse but ultimately the choice is yours and it depends on what you're most comfortable using.
How Much Fabric Do You Need For Your DIY Elastic Waist Skirt?
Please take fabric width into account when using the following requirements, as they apply for 140-150 standard fabric width. If you are working with a striped or plaid design, please be aware that you might need to rearrange the pattern. To avoid any inconvenience, we recommend buying extra fabric for your project.
Fabric Shrinkage Is Important!
To avoid your final garment from being a different size than expected, you should wash the fabric before cutting it. This will also help to remove any excess colouring and preshrink the fabric.
Finished Garment Measurments
The ideal size is the one that fits you flawlessly. But how can you be sure what size to make? Though body measurements can give you a general idea of what size clothing to buy, they don't always provide an accurate picture. This is because different styles often fit differently - even when they're the same size.A finished garment measurements table is always helpful to determine the best size when sewing. The table below displays the dimensions of the skirt in its completed state, so you can more accurately understand how it will fit. This information will enable you to sew clothes that perfectly fit your body.
How To Make An Elastic Waist Skirt- Instructions
With our easy step-by-step guide, we'll show you how to sew an elastic waistband skirt in no time with newfound confidence.
Let's break out the sewing machine and whip up your new go-to skirt today.
With our easy step-by-step guide, we'll show you how to sew an elastic waistband skirt in no time with newfound confidence.
Let's break out the sewing machine and whip up your new go-to skirt today.
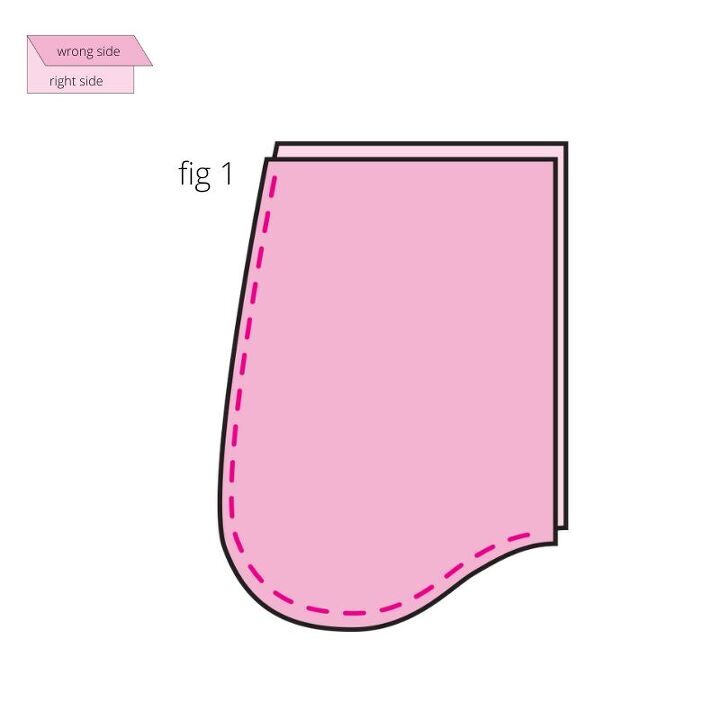
Pin the right sides of the pocket pieces together. Using a 1 cm seam allowance, sew around the pocket to join the two pieces. Overlock and press the seam. fig 1
Overlock the sides of ruffle 1 pieces
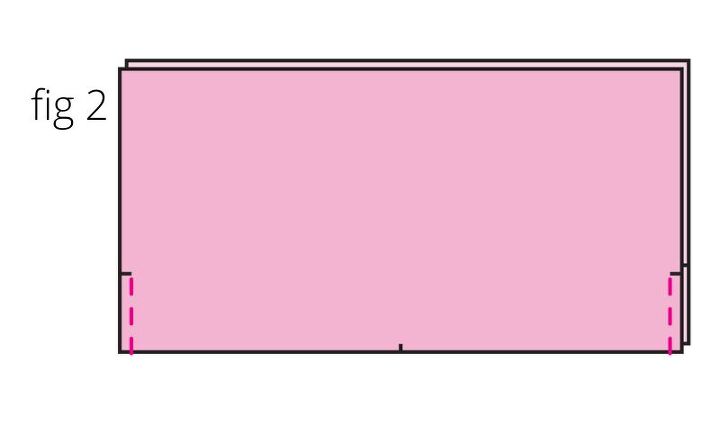
Sew the Ruffle 1 pieces, right sides together, starting from the side notch - down. Press the seam open. fig 2

Place the pocket bag in the pocket opening on ruffle 1 pieces, right sides together and sew at 1 cm. Clip the seam allowance at the end and press the seams so that the pocket stays nicely on the inside.Top stitch at 0.1 cm on the right side of the pocket, catching the seam allowance in the seam . fig 3
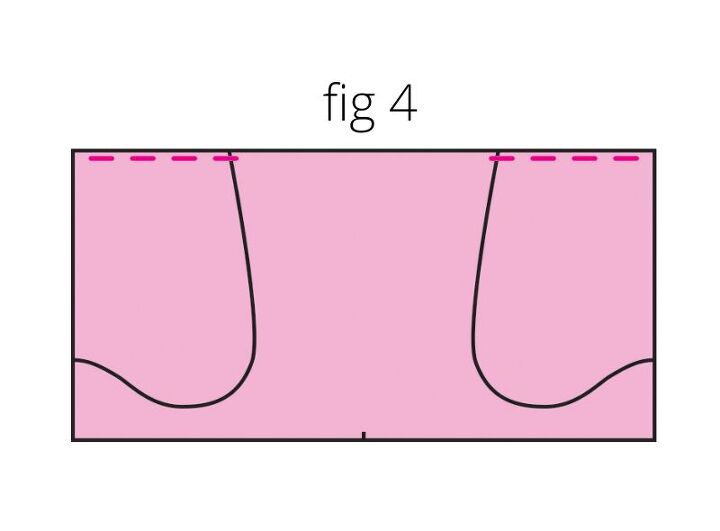
In order to keep the pocket in place, top stitch the pocket and the first tier at 0.5 cm. fig 4
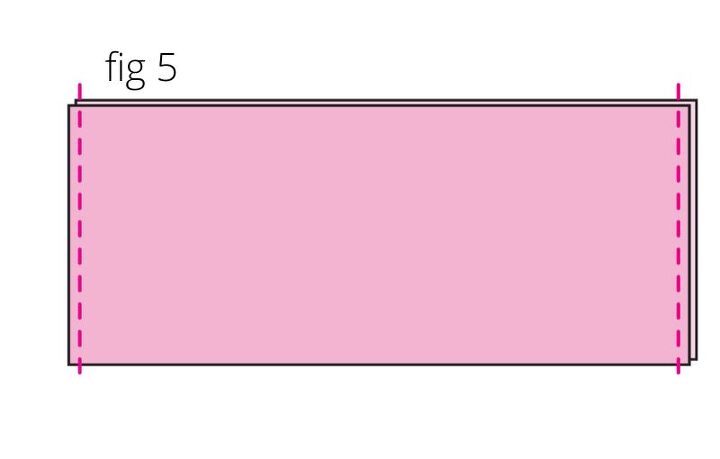
To create the second tier, sew the ruffle two pieces together on the sides, right side to right side. Overlock the seam after pressing it open. fig 5
Using a gathering foot, gather the top part of the 2nd tier and the 3rd tier at 0.5 cm from the raw edge.
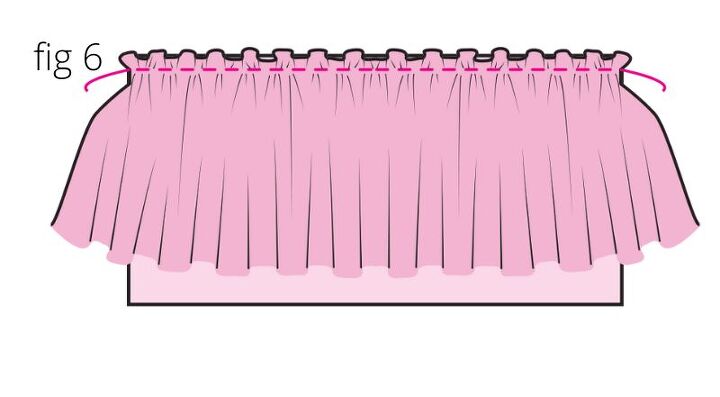
Right sides together, sew the top of the 2nd tier to the bottom of the 1st tier, taking care to meet the notches. Overlock the seam after pressing. fig 6
Attach the top of the 3rd tier to the bottom of the 2nd tier, right sides together. Ensure that the seam is pressed and overlocked.
Right side to right side, sew the short sides of the waist band together at 1 cm intervals. Press the seam open.
The skirt waistband should be sewn right side to right side on the skirt's waist, leaving 5 cm open for the elastic.
Cut a piece of non-roll elastic the right length to fit your waist comfortably (see the fabric requirements table above for the right measurement).
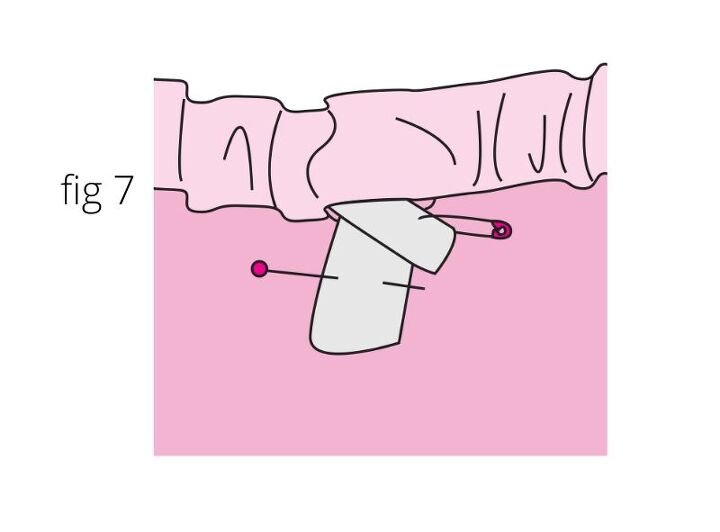
Just below the opening, pin one end of the elastic to the fabric. Attach a safety pin to the other end and thread it through the casing. fig 7
Pull the two ends of the elastic together and machine to join in a square shape with an X for strength. Push the elastic into the casing and sew across the gap. Overlock the seam.
Sew the raw edge of the hem allowance using a 3-thread serger stitch. When you are satisfied with the skirt length, turn up the hem 2 cm to the wrong side. Sew at 1.8 cm after pressing in place. If the skirt is too long, turn up the hem to the length you need.
This is it! You new skirt is ready to wear
The author may collect a small share of sales from the links on this page.


Comments
Join the conversation
Very pretty! Thanx for sharing!