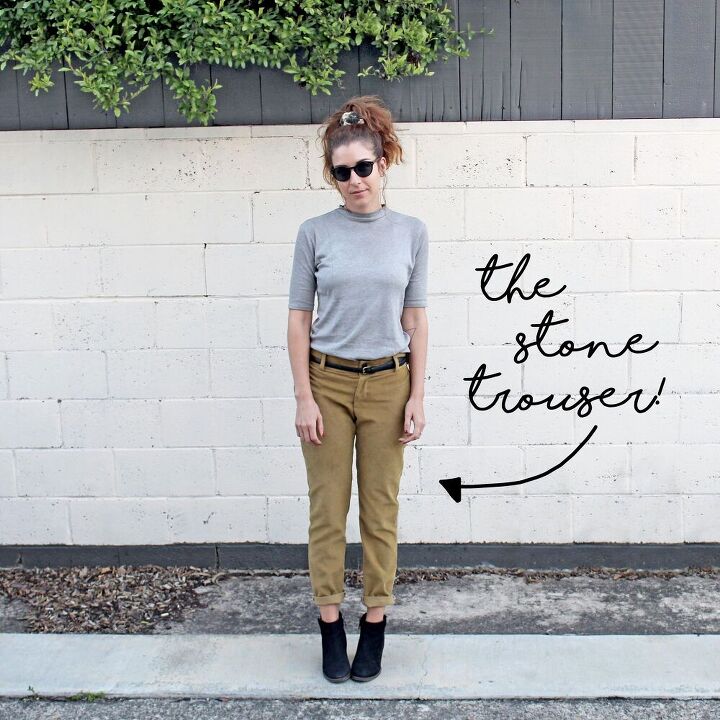
How To Sew A Double Welt Pocket: The Stone Trouser Sewing Tutorial
Aaaand we have a brand new sewing tutorial up on the blog! There are seriously so many different construction details that I could pull from this month's sewing project, the Stone Trouser. But the tutorial I ended up going with is all about how to sew a double welt pocket.
Because, pockets. Need I say more?
If you have been following The Flora Modiste for any length of time, then you KNOW I love my pockets. Because it is seriously just the saddest thing, to go stick your hands in a pocket.. And realize that there isn't one.
So far on the blog, we have covered how to sew two different types of pockets: Inseam pockets & patch pockets. And this week, we can add double welt pockets to that list.
Double welt pockets are actually incredibly easy to sew, once you know how to do it. Which definitely isn't always the case when it comes to sewing. While I KNOW how to sew a pant fly together, I have done it many times. Yet, every time I go to sew a pant fly, it isn't any easier.
That is definitely not the case when it comes to sewing double welt pockets.
(Ready to learn how to sew a double welt pocket? While it may seem daunting, I promise it isn't. Grab your downloadable, printable sewing tutorial below! And you will have some fancy new pockets in no time.)
Before drafting & sewing the Stone Trouser, I actually hadn't sewn a double welt pocket since my days at FIDM. So I did need to look up in my schoolbooks how to properly draft one, as well as how to sew one up.
I followed my schoolbook to a TEE on how to sew a double welt pocket.. And failed. Miserably. Twice. It was SO incredibly frustrating.
Then after my schoolbooks failed me, I went online and searched for other sewing tutorials on how to sew a double welt pockets.
Which is actually the reason why I ended up choosing to focus on double welt pockets for this month's sewing tutorial. All of the online tutorials were either WAY too long (like 20+ steps) or WAY too complicated.
Like--It does not need to be that difficult my friends.
So. If looking to add a double welt pocket into your next sewing project, look no further. This sewing tutorial will be your new BFFL!
But first. What IS a double welt pocket?
I'm so glad you asked! Let's talk about what a double welt pocket IS. And when they can & should be used in a sewing project.
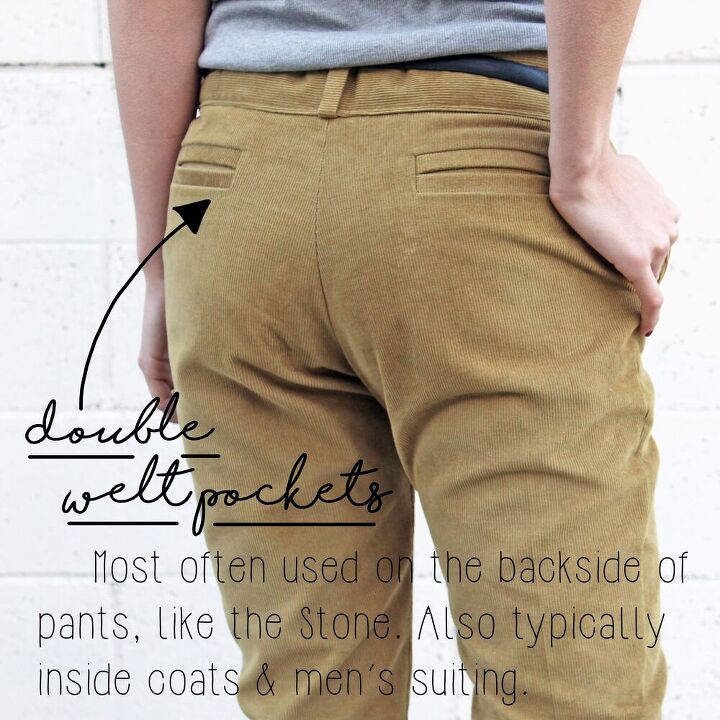
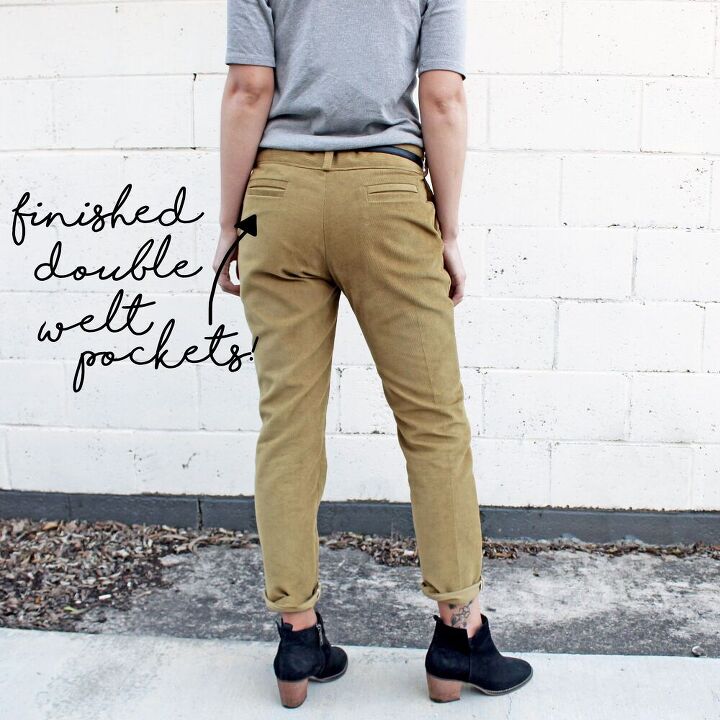
Double welt pockets are most often used on the backside of pants, like on the Stone Trouser. But they can also be used on the inside of coats. And they are almost always included in the lining of men's suiting, along the breast.
The only visible part of a double welt pocket are the two welts that provide the opening for the pocket. (Also: Welts can also be referred to as "lips", but that kind of grosses me out. So I prefer to use the term welt.)
In pants, like the Stone Trouser, the pocket bag just hangs loose. But on coats & men's suiting, the pocket bag is sandwiched in between the lining and the self of the coat. The "double" in a double welt pocket refers to the fact that there are TWO welts to the pocket. (i.e. One above and one below the pocket opening.)
Single welt pockets (i.e. A pocket that includes only a single welt below the pocket opening) are also a popular option to use in both pants & outerwear.
BUT I still prefer the look of a double welt pocket. I think it looks more professional, more complete, and just provides an overall cleaner finish.
(Ready to learn how to sew a double welt pocket? While it may seem daunting, I promise it isn't. Grab your downloadable, printable sewing tutorial below! And you will have some fancy new pockets in no time.)
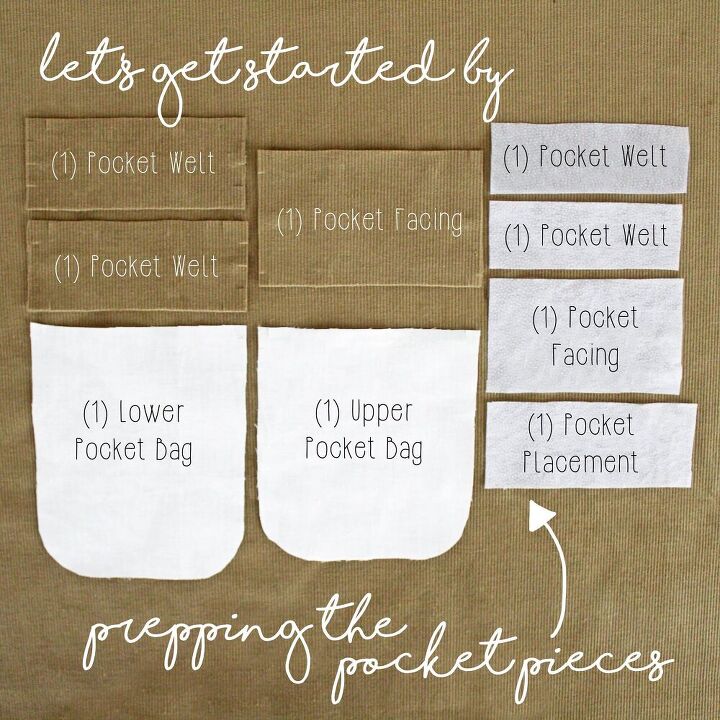
Got it? Now let's prep the pocket pieces.
Alright! So you're ready to get learn how to sew a double welt pocket, right? Cool. First, we need to prep the pocket because there are quite a few pieces involved.
I have listed out all of the different pieces needed for one double welt pocket:
- SELF FABRIC: (2) Pocket welts & (1) Pocket facing.
- LINING FABRIC: (1) Upper pocket bag & (1) Lower pocket bag.
- INTERFACING: (2) Pocket welts, (1) Pocket facing, & (1) Placement for the pocket.
Now keep in mind: The list above is just for ONE double welt pocket. If sewing two double welt pockets then you will need to double the pieces above.
Measurements for each of the pieces is completely dependent on the designer. I believe that my welt pockets were slightly smaller than is typical, but I like it that way. (And they are the perfect size to slip an iPhone into, which is all I really need a double welt pocket for.)
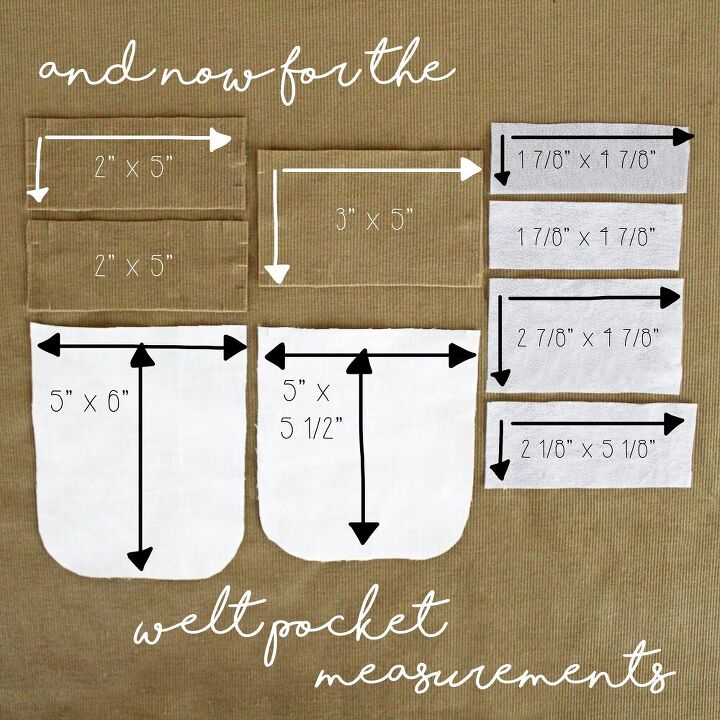
For reference, my measurements for each pocket piece are listed below:
- POCKET WELTS: 1" X 4", + 1/2" Seam allowances all around. Total cut measurement equals 2" x 5".
- POCKET FACING: 2 1/4" x 4 1/2" + 1/2" Lower seam allowance & 1/4" Seam allowance for all other seams. Total cut measurement equals 3" x 5".
- UPPER POCKET BAG: 4 1/2" x 4 3/4" + 1/2" Upper seam allowance & 1/4" Seam allowance for all other seams. Total cut measurement equals 5" x 5 1/2".
- LOWER POCKET BAG: 4 1/2" X 5 1/2" + 1/4" Seam allowances all around. Total cut measurement equals 5" x 6".
- INTERFACING: All of the interfacing pieces, with the exception of the placement for the pocket, are simply 1/8" smaller (on all sides) than the corresponding pocket pieces. My pocket placement interfacing measured 2 1/8" x 5 1/8".
NOTE: I rounded out the corners of my pocket bags. You can do square or round corners, but again, the choice is up to you.
These measurements all worked well for me, but of course, you can tweak your own double welt pocket accordingly. The most important part is just to make sure everything fits together well.. And this was the perfect measurement combination for my pocket. Now.. Let's get started with the sewing!
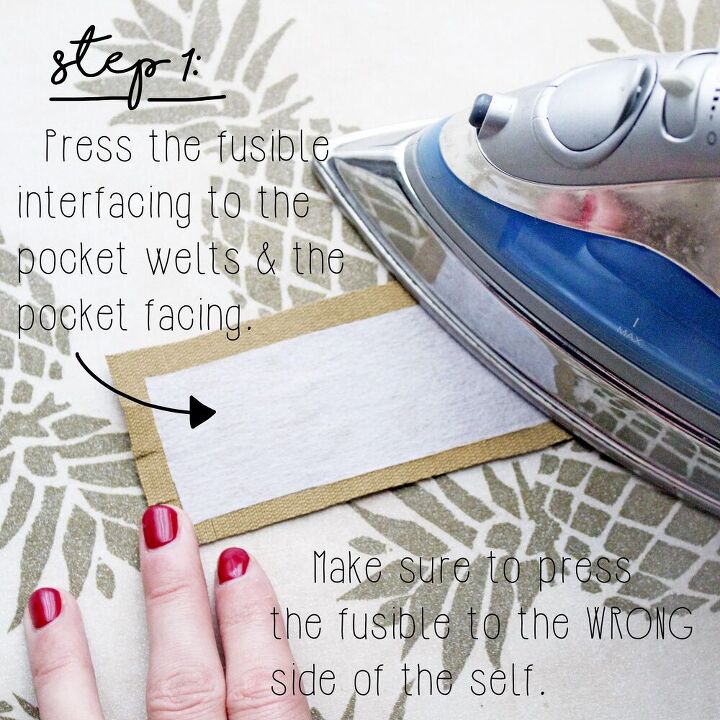
How to sew a double welt pocket sewing tutorial: Step 1
Alright! So you have all of the pieces for your double welt pocket cut out.
Grab the pocket welts & pocket facing in both the self fabric & fusible interfacing. On the WRONG side of the fabric, press the fusible interfacing to each corresponding piece.
NOTE: Remember, the wrong side of the fabric is the side that nobody sees when the garment is being worn.
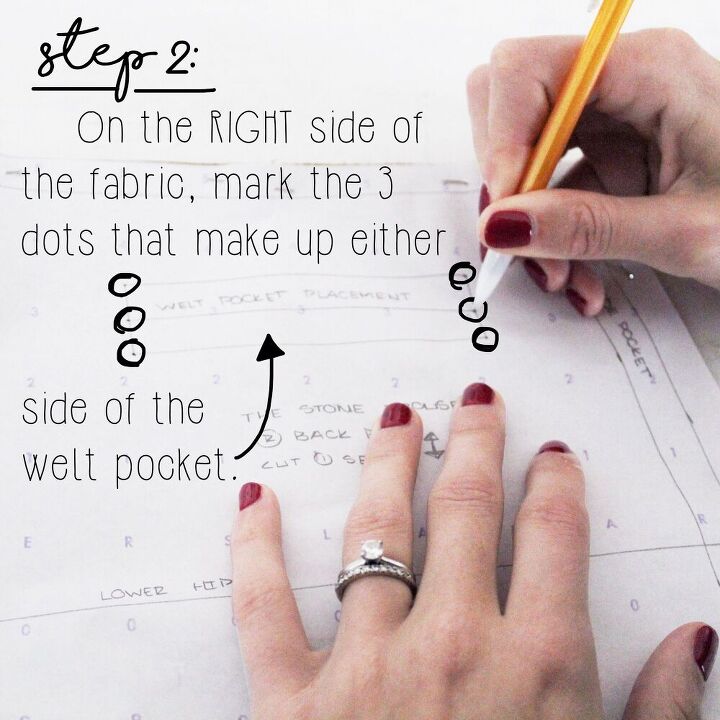
How to sew a double welt pocket sewing tutorial: Step 2
Grab the piece that the double welt pocket will be sewn on to. (i.e. The backside of a pair of pants.)
On the RIGHT side of the fabric, mark three dots that make up either side of the welt pocket: The upper left/upper right hand corner, middle left/middle right of the pocket, and the bottom left/bottom right hand corner.
TIP: Use your sewing pattern to mark the dots, with the double welt pocket pre-measured & drawn out. This essentially provides the framework for your welt pocket. The dots represent the placement & size of the finished double welt pocket.
I would recommend using a pencil for this step. If the dots/placement looks off, then you can always adjust before any actual sewing takes place.
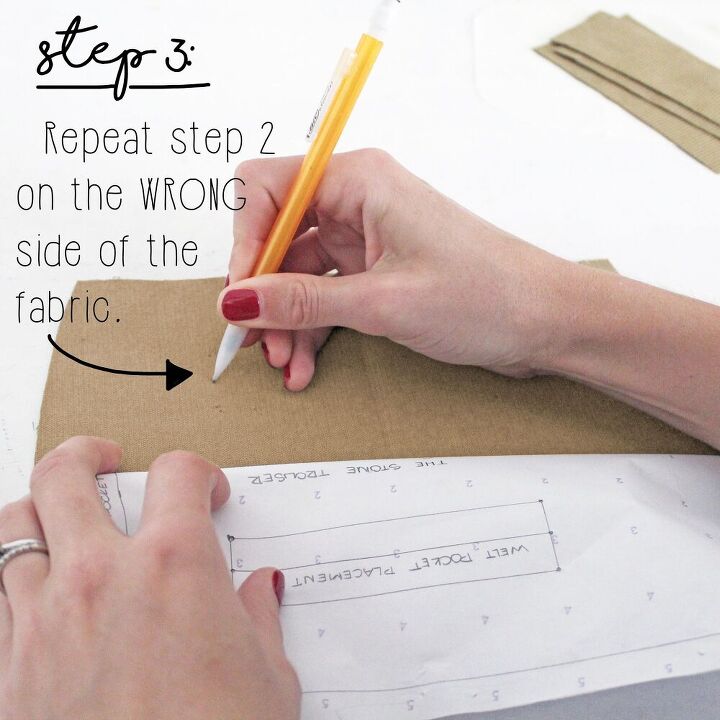
How to sew a double welt pocket sewing tutorial: Step 3
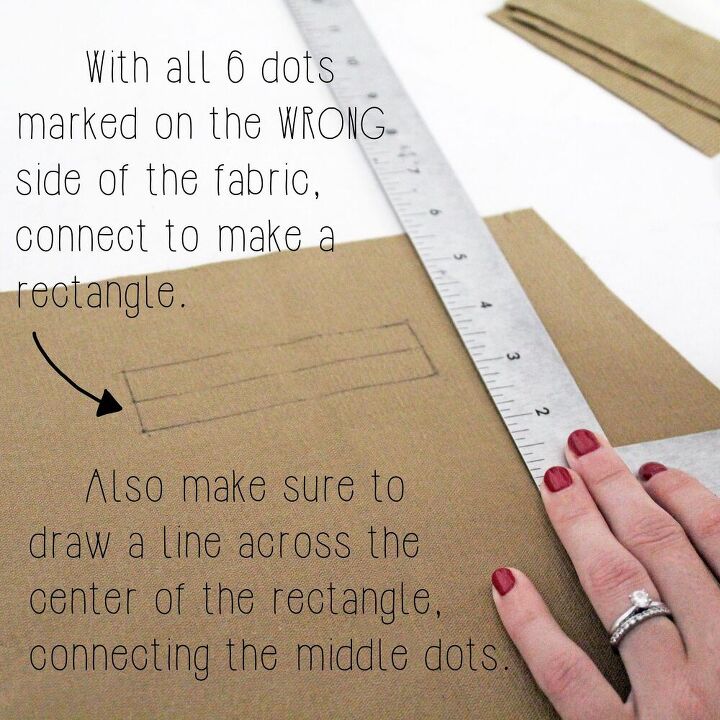
Repeat the process of step 2, but on the WRONG side of the fabric.
Try to ensure that the dots, front and back, match as closely as possible. Once the dots on the WRONG side are marked, draw straight lines connecting the dots, from left to right. Then also connect the three dots on each side, top to bottom.
Make sure to use a ruler, unless you are very comfortable with drawing straight lines free hand.
Once the dots are all connected, you should have a rectangle with a line running across the exact center of the rectangle.
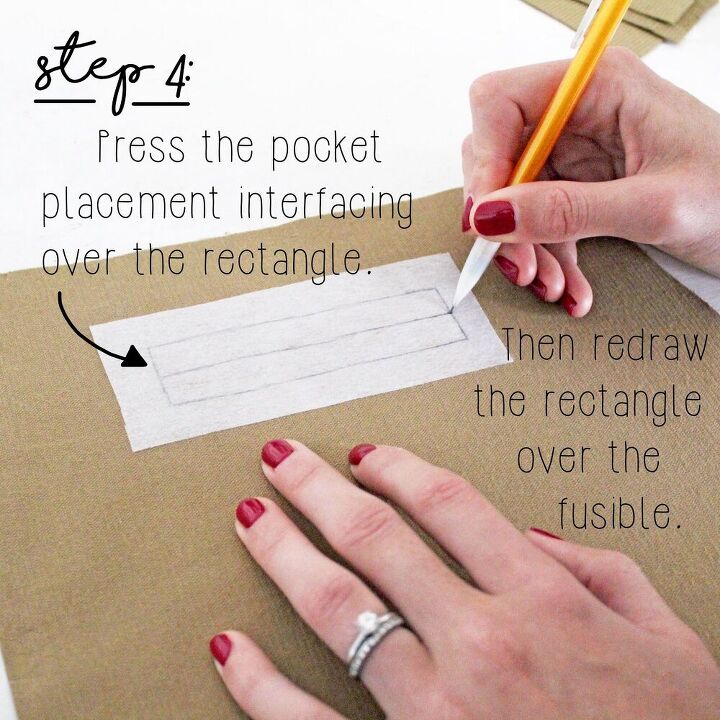
How to sew a double welt pocket sewing tutorial: Step 4
Grab the pocket placement interfacing, and press the fusible over the rectangle just drawn in step 3. The fusible should be slightly larger than the rectangle, so make sure it's even on all sides before pressing. (Again, this is on the WRONG side of the fabric. Don't forget!)
Once the fusible is firmly pressed over the rectangle, redraw the rectangle OVER the fusible.
You should be able to still see the drawn lines from step 3. But if not, just grab the sewing pattern and repeat the process from steps 2 & 3.
Once again, you should have a rectangle with a line drawn across the center. But this time, it's drawn ON TOP of the fusible, on the WRONG side of the fabric.
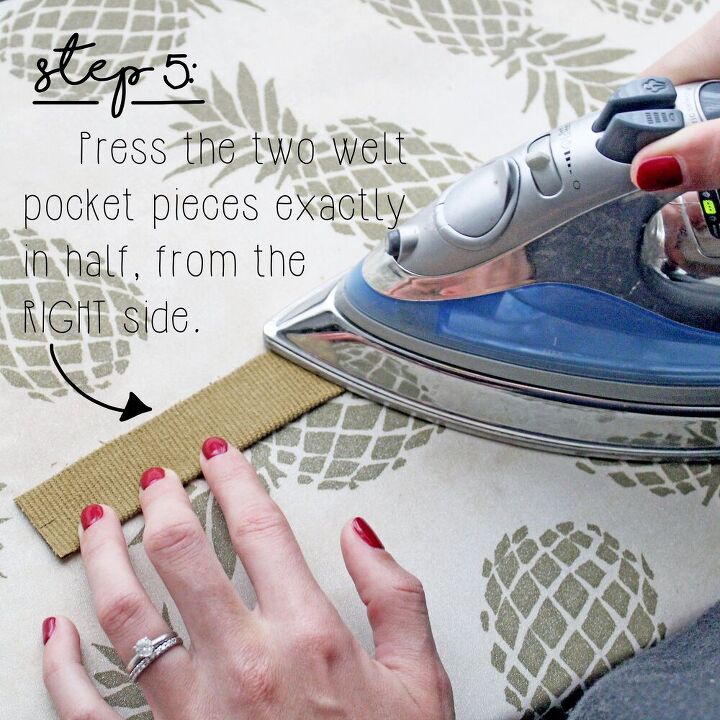
How to sew a double welt pocket sewing tutorial: Step 5
Next, grab the welt pocket pieces. (With the fusible already pressed to the wrong side of the welts.) Press the welts exactly in HALF, from the RIGHT side of the welt.
NOTE: If working with a sensitive fabric (like the corduroy I used for the Stone Trouser) you may need to grab a piece of muslin. Certain fabrics (like corduroy) will burn if too much heat is applied, so sandwiching a fabric in between while pressing will help preserve the fibers.
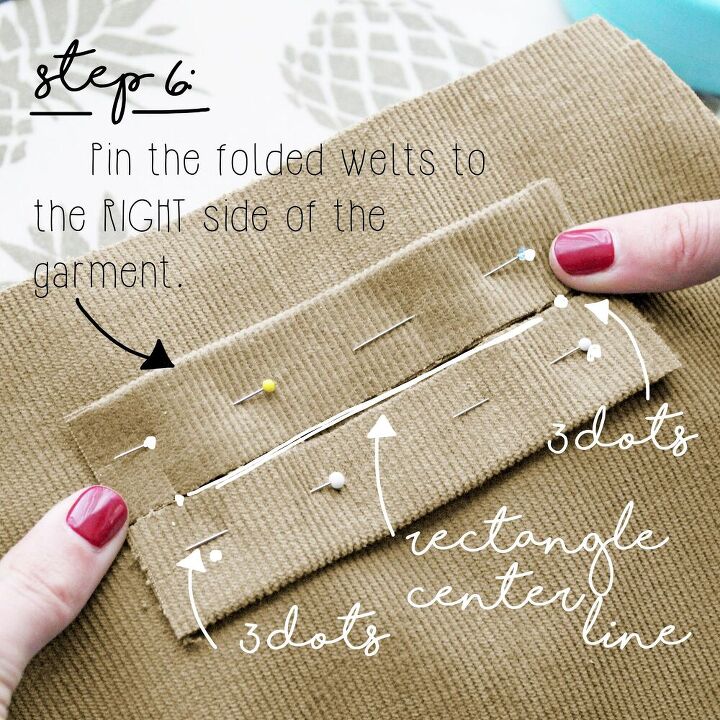
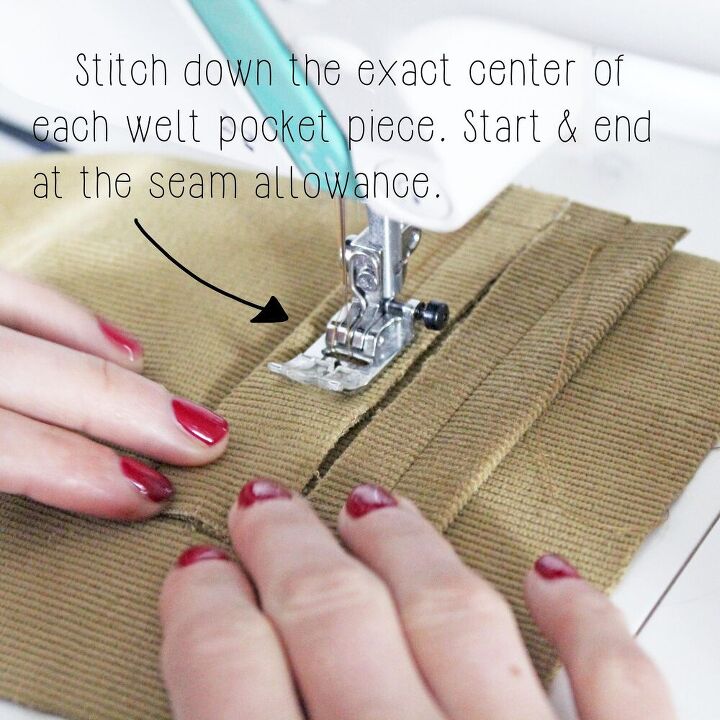
How to sew a double welt pocket sewing tutorial: Step 6
Pin the folded welts to the RIGHT side of the garment.
The raw edges of the folded welts should meet in the exact center of the welt. (i.e. The middle line, drawn across the center of the rectangle.) And the seam allowances should match up with the three dots, on either side of the drawn out welt.
To be clear: The seam allowance of the welts extend PAST the three drawn dots, on both sides. This is VERY important.
Stitch the welts to the garment, down the EXACT MIDDLE of each welt. Start & end stitching where the dots/seam allowance are, and DO NOT extend into the seam allowance. Again, VERY important.
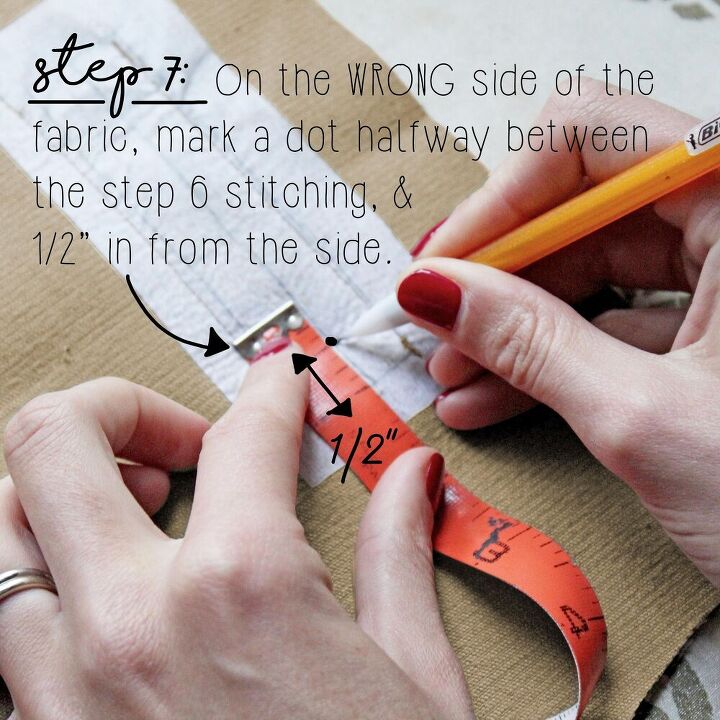
How to sew a double welt pocket sewing tutorial: Step 7
On the WRONG side of the fabric, mark a dot halfway between the stitching from step 6 & 1/2" in from the line connecting the three vertical dots. Theoretically, the dot SHOULD be along the middle line of the rectangle.. But it isn't always exact. You can see that my lines were close, although not perfect. And this is totally fine.
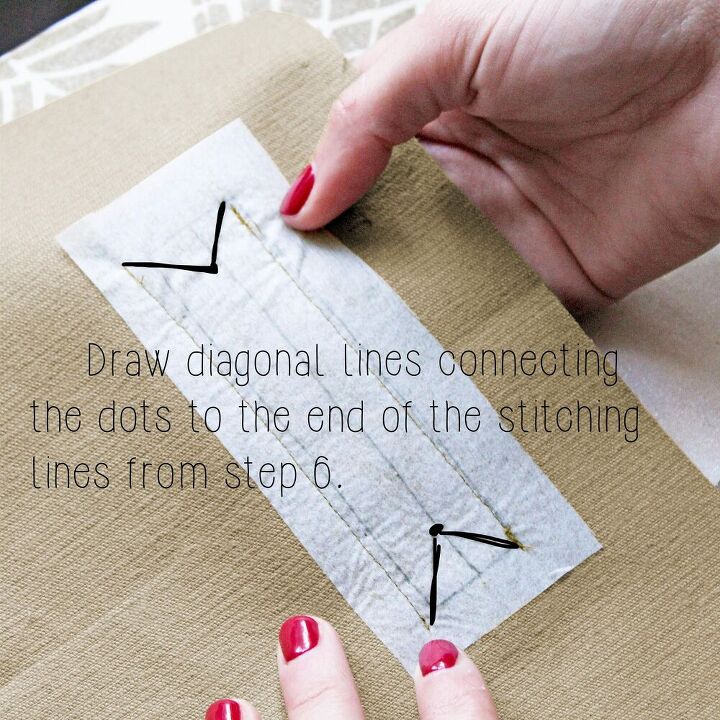
From that dot, draw diagonal lines that connect the dot to the ends of the stitching lines from step 6.
Do this on both sides of the welt, and you will end up with little triangles on either side of the rectangle.
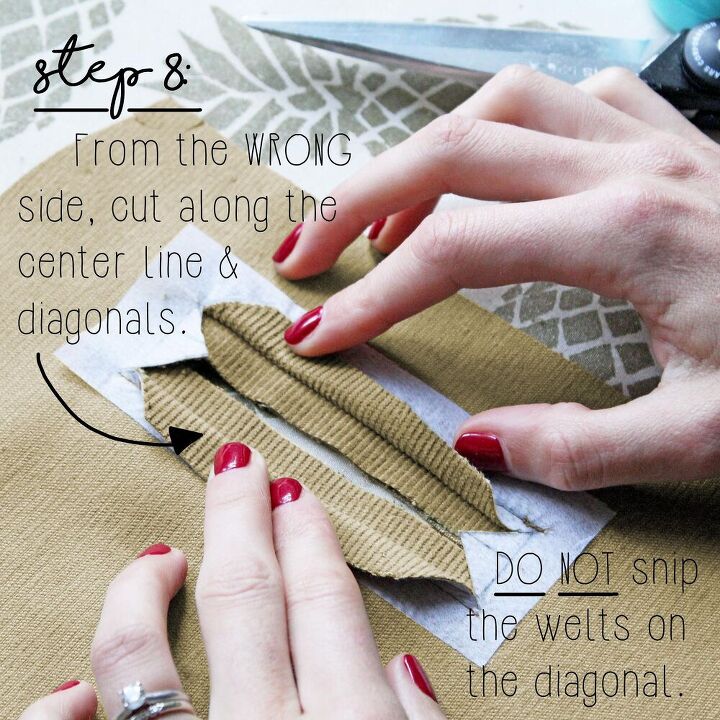
How to sew a double welt pocket sewing tutorial: Step 8
Now it's time to start cutting!
Grab your fabric scissors, and from the WRONG side of the garment, cut along the center line of the rectangle, from one triangle tip to the other. DO NOT extend past the tip of the triangles drawn in step 7.
Also cut the diagonal lines that make up the triangles, but ONLY make sure to snip the diagonal line of the garment. DO NOT diagonally snip the welts.
If you do, then the welt pocket will not work, and you will have to start over. Make sure to snip all four diagonal lines, getting as close to the stitching lines as possible. DO NOT extend snipping past the stitching lines.
This step is all about accurate cutting. Be careful, otherwise your pocket will fall apart.
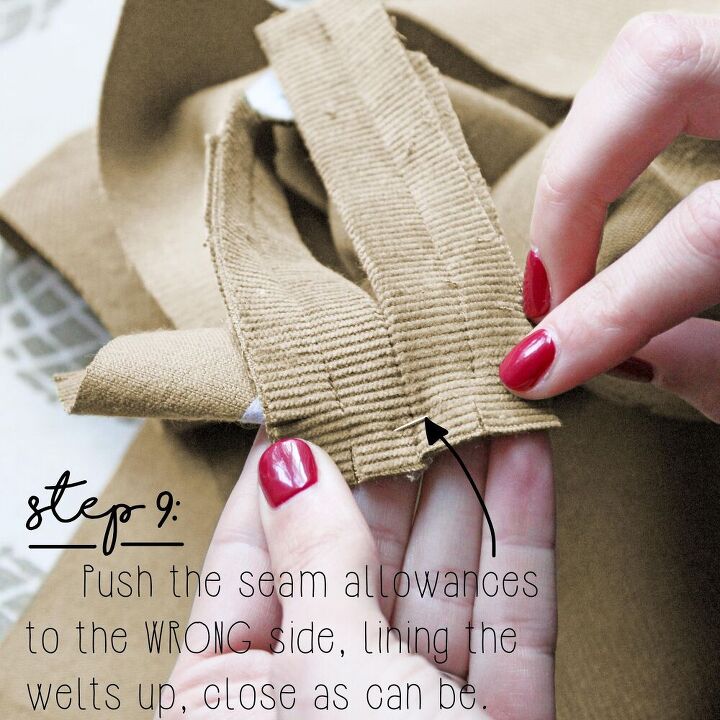
How to sew a double welt pocket sewing tutorial: Step 9
Push the seam allowances of the welt to the WRONG side of the garment. Ensure the welts are lined up right next to each other. Make sure to get them as close together as possible, lining up the edges of the welt. (But make sure not to overlap the welts either!)
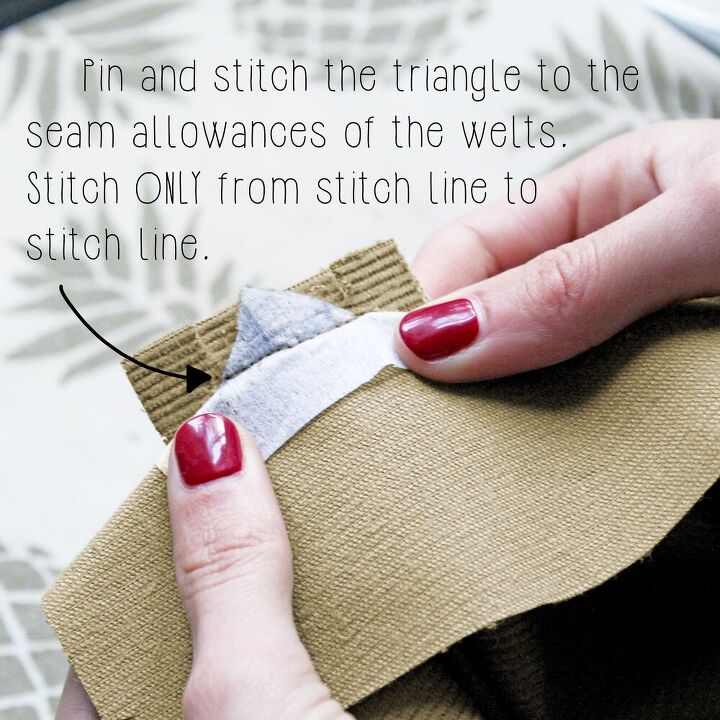
Pin and stitch the triangle to the seam allowance of the welts. Stitch ONLY from stitch line to stitch line.
DO NOT stitch over the stitch lines, otherwise you will have puckering at the corners of your double welt pocket. Because nobody likes puckering.
This step is all about careful, accurate stitching. So go slowly, and go carefully. Repeat for the other side of the welt pocket.
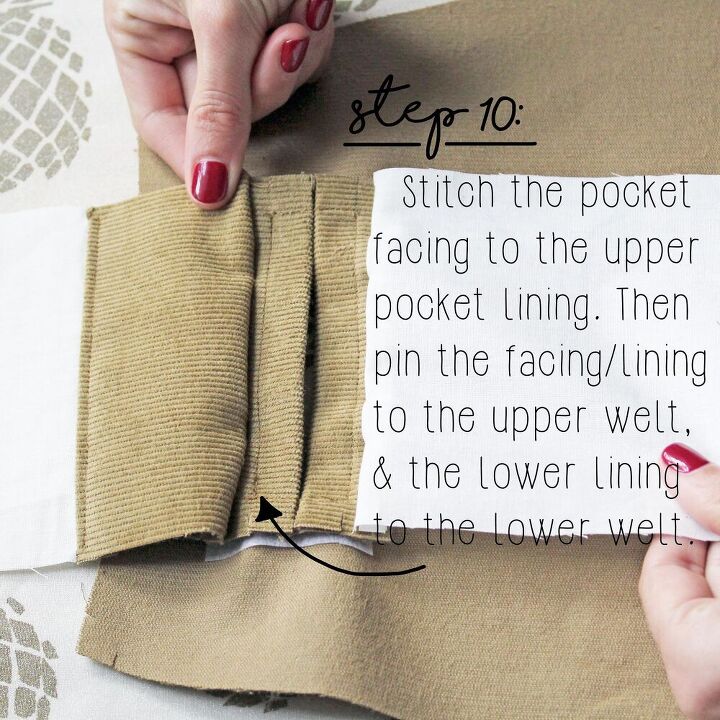
How to sew a double welt pocket sewing tutorial: Step 10
Now it's time to move on to the pocket bags. Stitch the pocket facing to the upper pocket lining. Press the seam open, then stitch the seam allowance to the pocket facing.
Pin the facing/upper pocket lining piece to the UPPER welt. And pin the lower pocket lining to the LOWER welt.
Make sure the raw seam allowances are pointing AWAY from the opening in between the pocket welts.
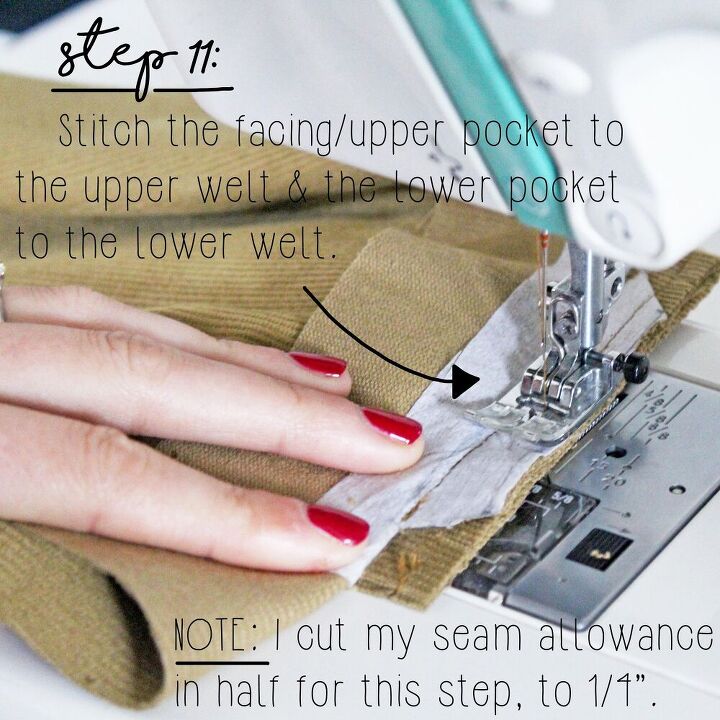
How to sew a double welt pocket sewing tutorial: Step 11
Stitch the facing/upper pocket lining piece to the upper welt, including stitching through the side seam allowance. Then stitch the lower pocket lining to the lower welt. Again, including the side seam allowance.
When originally stitching my welts to the garment in step 6, I used a 1/2" seam allowance. So, for this step, I cut that in half and used a 1/4" seam allowance.
That way I didn't have to worry about my stitches overlapping, and creating some kind of issue on the right side of the garment. I highly recommend it.
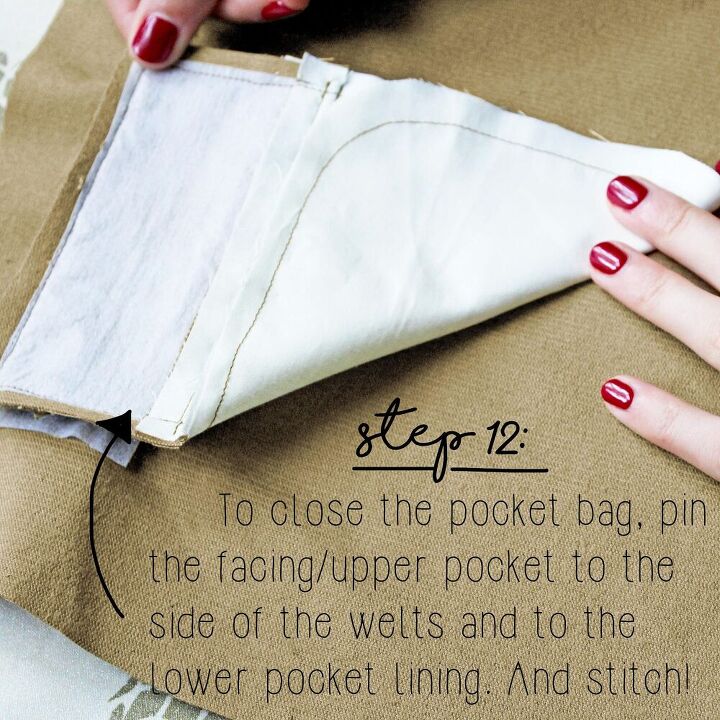
How to sew a double welt pocket sewing tutorial: Step 12
And finally, it's time to close up the pocket bag.
Pin the facing/upper pocket lining to the side of the welts, and to the lower pocket lining. Stitch together. (Again, I only used a 1/4" seam allowance for this step, for the same reasons as in step 11.)
And with that.. Your double welt pocket is complete!
I chose to seal my seams with my overlock machine, but of course, that is totally up to you. And definitely isn't necessary if sewing a double welt pocket into a coat lining. (Helloooo, you won't even see it.) It really just depends on your project!
A few more tips on double welt pockets!
So. Not too bad, right? I know, it probably seems a bit complicated and overwhelming. I also felt like that when I was using this technique for the first time with the Stone Trouser.
However.. It's really not that bad! Once you use the technique successfully once.. I promise you will never use another one again when it comes to sewing double welt pockets.
A few more tips, if sewing double welt pockets for the first time (or for the first time in a long time):
- Sew a sample first: 100%, without a doubt. I made the mistake of just thinking I would be able to sew a double welt pocket on the first try.. And it was so so frustrating. But once I gave myself the leeway to mess up, and to sew a few samples before moving on to the real deal.. There was so. much. less. pressure. And the steps just came so much easier once I actually knew what I was doing.
- One pocket at a time: When it comes to sewing two pockets, like on the Stone, I know that there are people out there who like to sew each step for each pocket before moving on to the next one. However, I don't really recommend this.. I think completely finishing up a pocket before moving on to the next one is really the way to go. You can go slow on the first pocket, allowing yourself to learn from your mistakes.
- Always be patient: As with anything & everything when it comes to sewing. If you don't get it right the first time, try again. And if you reeeally can't get it right, email me. I would love to help out! There is no point in suffering all on your lonesome.
Would looove to see any sewing projects you guys may be working on that involve double welt pockets. And of course, let me know any questions below!
The author may collect a small share of sales from the links on this page.


Comments
Join the conversation