How to Sew a Beautiful Cecilie Bahnsen Dress Out of An Old Bedsheet

This beautiful tiered billow frock was inspired by a Cecilie Bahnsen dress with puffy sleeves. I love the summery, cottagecore style and recently recreated this tiered dress tutorial to include updated dress patterns for size XXS-XL.
To make this gorgeous billow frock Cecilie Bahnsen dress, download the pattern in your size and follow the instructions. You can use any fabric, but I decided to upcycle my old bedsheet! Ok, let's get started...
Tools and materials:
- Queen-sized bed sheet
- Elastic
- Thread
- Pins
- Bias tape (or extra fabric, ruler, rotary cutter and board, iron, and a bias tape maker)
- Scissors
- Chalk
- Sewing machine
- Pattern
1. Cut out the pattern
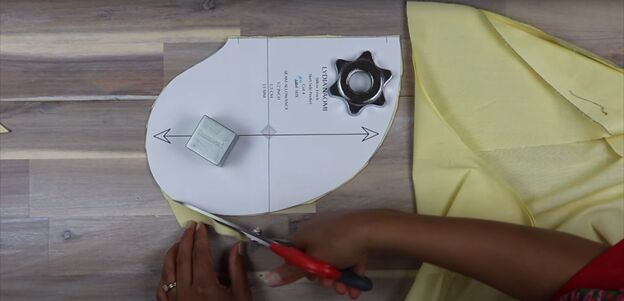
Fold the sheet in half and lay all of the pattern pieces. For the tier pieces, put the pattern on the cross grain. Cut out the fabric pieces.
For the tier and bodice pieces that are cut on the fold, snip a little notch at the fold to mark the center of the piece.
The tier pieces are very similar in size and shape, so keep them organized by marking the top of those pieces, and whether it’s a front or back piece on the wrong side of the fabric of each piece.
Note that all seam allowances on the pattern pieces are a half inch except for the neckline, which is a quarter inch. Follow the pattern guide to understand how to overlock the edges of seams.
2. Make the bias tape
You can use store-bought bias tape or make your own. If making your own, cut your fabric in strips at a 45° angle to the selvage. Then, layer the pieces together at 90 and sew diagonally.
Cut off the excess seam allowance, iron it flat, and feed your long strip through a bias tape maker, to iron the folds in place. The result should look like a nice pile of linguine!
3. Sew the sleeves
Fold each of the sleeve hem binding pieces down the center, lengthwise. Now, fold in one edge 3/8 of an inch. Sew a double row of basting stitches along the sleeve hem.
Gather the sleeve hem to match your hem binding.
Place the unfolded hem binding on the sleeve hem, right sides together, and sew it on. Repeat for the other sleeve.
4. Attach sleeves to the front bodice
Pin the front of the raglan sleeve, as indicated by a single notch in the armhole, to the front bodice piece, right sides together, and sew. Repeat for the other sleeve.
5. Attach sleeves to the back bodice
The back of the raglan sleeve has a double notch in the armhole area. Follow the same method for attaching the sleeves to the back bodice as you did for the front bodice.
6. Sew the neckline
Lay the bodice open. Unfold the bias tape and line it up with the edge of the neckline. Sew the bias tape to the neckline leaving 2 inches at the starting end of the tape, so you can join the ends. Stop sewing 2 inches before the end.
Now, pinch the ends of the bias tape together, mark where they line up using a small snip, then sew the ends of the bias tape together.
Trim the excess and sew up the little gap you previously left. Under stitch the seam allowance to the edge of the bias tape, really close to the seam.
Create the casing for the elastic in the neckline by sewing down the folded side of the bias tape. Leave a little gap for inserting your elastic, then feed the elastic through the neckline casing.
Try on the bodice to ensure the neckline elastic fits and adjust if necessary. Sew the ends of the elastic together and sew up the gap.
7. Sew the skirt tiers
Sew the side pocket pieces to the sides of the top tier. Then, fold back the pocket and understitch the seam.
Place a pin at the center top of the top tier and double baste stitch along the top. Stop and start your basting stitches at the center point.
Now, pin the center of your top tier to the center of your bodice front, and gather the tier to match the width of the base of the bodice. Flip the tier so the right sides of the fabric are facing, then sew the tier to the bodice. Serge the raw edge of your finished seam.
Add the bottom tier to the top tier using the same method as before, minus the pocket step. Repeat the process for attaching the tiers to the back of the dress.
8. Sew the side seams and pockets
With the right sides of the fabric facing in, sew the side seams from the bottom of the sleeve hem, down the side, around the pocket, and down to the hem.
Backstitch at the top and bottom of the pocket for strength. Repeat on the other side.
9. Sew the hems
Double-fold the bottom hem at a quarter-inch and sew to finish. On the sleeves, trim the excess gathered seam allowance. Then, fold in the binding twice to just past the original stitch, then sew down on the right side of the fabric.
Press all the seams and hems for a crisp look and you’re done!
What do you think of this Cecilie Bahnsen dress style? Let me know your thoughts in the comments!
Enjoyed the project?
Suggested materials:
- Queen-sized bed sheet
- Elastic
- Thread
- Bias tape
- Scissors
- Chalk
- Sewing machine
- Pattern
- Pins
The author may collect a small share of sales from the links on this page.


Comments
Join the conversation
I love the dress and your black cat I have a black cat that has double paws and thinks he is the big boss.
Awesome creation !!!