How to Sew a Cute DIY Ruffle Dress With Puff Sleeves & a Tiered Skirt

Ruffles on a dress are super feminine and flirty. If you’ve been looking to learn how to make a ruffle on a dress or for a ruffle dress sewing pattern, this is the tutorial for you.
If you know how to sew, this DIY ruffle dress can be made in just a few hours. Let me show you how to make a layered ruffle dress you can make today!
Tools and materials:
- 3 Yards fabric
- Ruler/measuring tape/curved ruler
- Tailor’s chalk
- Scissors
- Sewing machine
- Clips/pins
- Elastic
- Safety pin
1. Make the pattern
Measure your bust.
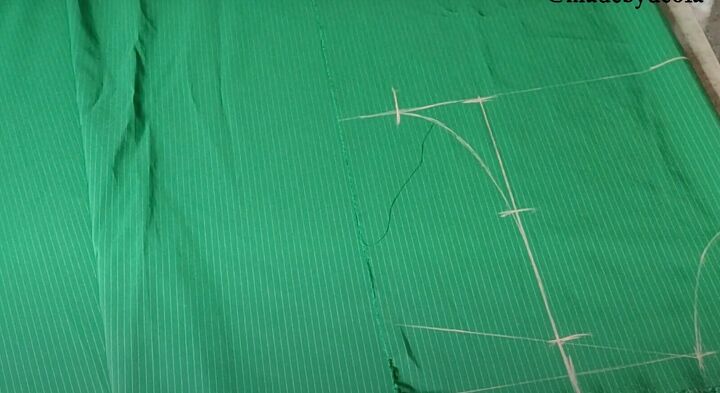
Fold the fabric in half. Begin marking the fabric at the top to measure the shoulder line, bust, armhole, and neck depth. For the width, use your bust measurement divided by 4 and add 3 inches.
Mark down 1 inch on the fabric from the edge to mark the starting point. Measure down 3 inches on that line for the neck width and 3 to 4 inches own for the neck depth.
Mark the shoulder measurement on that line to 7 inches.
From that mark, drop another mark 1 inch from that. Connect those points on a slant to the neck measurement. Draw the neck curve.
From the shoulder slant, measure down 9 inches for the armhole.
From the armhole, measure the bust measurement divided by 4 plus 2 inches. Square out all the lines.
For more clarity on the neckline, watch my boxy crop top tutorial.
Find the armhole midpoint, then draw the armhole curve.
Once you’ve plotted the shoulder, neckline, bust, and armhole, measure the dress length. This tutorial uses a 36-inch length.
Before cutting your front pattern, add a ½-inch seam allowance. Cut the front pattern out.
2. Make the back pattern
Fold the fabric again. Lay the folded front pattern directly on top. Change the back neck depth to 2 inches. Cut out the back pattern. Cut a slight curve to the sides of the back pattern.
3. Mark the ruffle positions
Use the measuring tape down the front panel in the center.
Mark down 10 inches from the bottom of the neckline curve. Mark that spot. Use a straight ruler to mark a line across horizontally.
Now it’s time to measure the end of the ruffle line. Measure from the bottom of the dress up 2 inches. Mark this spot and use the ruler to draw a horizontal line across.
Then mark the second ruffle. Measure 10 inches from the first 10 inch mark and draw another horizontal line across.
4. Cut the ruffles
Measure the width of the front. Whatever the measurement is, your ruffles need to be doubled that width. Cut the ruffles to be 10 inches and 2 X your width. In this tutorial, they are 44 X 10 inches.
5. Cut the sleeves
Fold the fabric in half. Measure the sleeve width to be 12.5 inches and the sleeve length 26 inches.
Mark down 5 inches from the top and 5 inches in from the folded edge. Draw the top of the sleeve edge curved.
Cut the sleeve out and use it as a template for the second one.
6. Make the ruffles
Hem the 2 ruffles at the bottom. Then, sew a gathering stitch at the top.
Place the first ruffle on the horizontal line right sides together. Pin in place and then sew using a straight stitch.
Repeat this technique for the second ruffle.
7. Sew the dress together
Lay the front and back pieces right sides together and pin in place along the shoulder and side seams. Sew in place. Keep the dress right sides together.
8. Sew the sleeves
Hem the sleeve bottom with a double fold. Cut a piece of fabric to sew as a casing for the elastic. Pin and sew the casing to the wrong side of sleeve.
Place a safety pin at the edge of the elastic to feed through the casing.
Create gathers by pulling the fabric around the elastic. Match up the sides of the elastic and sew. Sew the sleeve seam. Sew a gathering stitch at the top of the sleeve.
Gather the sleeve head to fit the armhole. With the dress still right sides together, place the right side facing out sleeves into the dress.
Match the seam of the sleeve to the side seam of the dress. Distribute the gathers evenly at the top and sew. Clip and pin in place. Sew down.
9. Finishing touches
Pin facing to the neck and sew in place.
Snip the seam allowance all around so it lays flat. Understitch the facing in place.
Hem the bottom of the dress with a double fold.
DIY ruffle dress tutorial
Wear with or without a belt! I hope this tutorial on how to sew a tiered ruffle dress helped you make this beautiful dress! Please let me know in the comments if you made this lovely DIY ruffle dress.
Enjoyed the project?
Suggested materials:
- 3 Yards fabric
- Ruler/measuring tape/curved ruler
- Tailor’s chalk
- Scissors
- Sewing machine
- Clips/pins
- Elastic
- Safety pin
The author may collect a small share of sales from the links on this page.


Comments
Join the conversation
Your dress is lovely.