Glam Nail Art Design Tutorial With Foil

If you’re looking for a really standout look for your nails, I have just what you want with this gorgeous foil nail art design.
If you haven’t used foil on your nails before, perhaps now is the time for you to start! Grab your nail foils and let’s jump on in.
Tools and materials:
- Nail polish remover
- Nail pads
- Gel polish
- UV light
- Foil flakes
- Nail pen
- Liner paint gel
- Nail glue
- Rhinestones
- Nail pen
- Top coat

1. Clean nails
Start by rubbing your nails with nail polish remover or alcohol to get rid of any old polish that might be on them.

2. Apply gel polish
Now, apply a gel polish to your nails. I’m going for one in a medium pink shade.
Don’t bring the gel all the way down to the bottom of the nails, but leave a bit of a gap there.

3. Cure nails
Proceed to cure your nails under a UV light for a minute.

4. Apply foil flakes
Next, apply foil flakes to your nails with a nail pen. I went for pink foils to match the pink base.

5. Apply foil over the top
Now, you can go in with some more foil in a different color over the top - I opted for silver.

6. Press foil down
Press the foil down onto your nails so that it all stays nice and flat.

7. Create nail design
Now, use liner paint gel to design the nails. This is gel with a very thin brush that allows you to paint fine lines.
I am using the gel to outline the bottom of the design.
Once done, proceed to cure your nails for a minute.

8. Apply nail glue
Apply nail glue to the bottom part of the nails where we haven’t applied any polish.

9. Apply rhinestones
Pick up some gold rhinestones with a fine nail pen and apply them to the bottom of your nails.
Proceed to cure your nails for a minute.

10. Apply top coat
Finish off by applying a top coat and curing your nails.

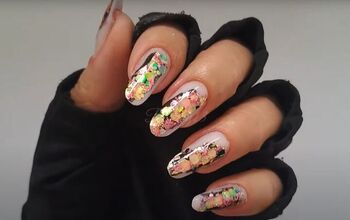
Foil nail art design
Here is the finished look. As you can see, I also applied some gold flakes and black flakes as well.
I love how the design of each nail is different due to the different placement of the foils - it creates a really unique finish.
I hope you like this nail art as much as I do, and you’ll give it a go for yourself!
Next, check out my DIY Hailey Bieber-inspired Pearl Chrome Nails Tutorial.
The author may collect a small share of sales from the links on this page.


Comments
Join the conversation