Polymer Clay Cake Jewelry

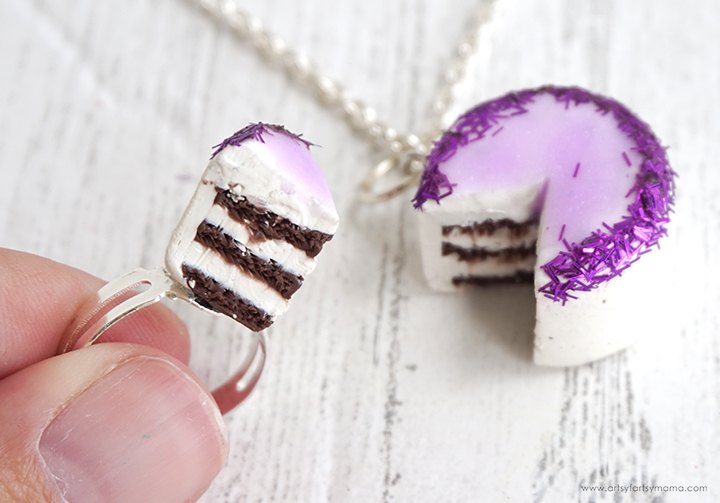
There are so many things you can make with polymer clay, but one of my favorites is miniature food! It's a fun challenge for me, and this Cake Jewelry Set was no exception. I love how this cake slice bracelet and cake necklace turned out. Even if you are new to working with clay, this is a pretty simple project and can be customized to fit your personal style. I hope you love this project as much as I do!
To make your own Polymer Clay Cake Jewelry, you will need these supplies:
Lay out an oven-safe work mat or some parchment paper to work on. Remove the top section of the white clay and press it out flat with a roller tool. Use the circle cutter to cut 4-5 circles out of the clay. Remove the excess clay and set it aside.
Stack the circles of clay together, alternating between the white and brown. Top the stack with a white piece. Gently tap the top of the stack to press the layers together. Turn the stack on its side and roll it gently to even out the edges.
Knead the excess white clay and roll it out flat. Lay the stacked clay cylinder down on top of the clay. Use the clay blade to carefully cut a long rectangle that is the same height as the stacked clay.
Wrap the rectangle clay around the side of the stack and gently tap it to press the clay together. Use your finger to blend the seam between the top layer and the side piece of clay.
Remove the cover from one end of the clay blade. CAREFULLY cut a slice out of the "cake" (whatever size you want) and separate the pieces. Put the cover back on the blade when you are done.
Use a craft knife or the needle pointer (from the clay tool kit) to poke little holes into the brown clay stripes. This will add texture to the clay, making it look more like cake! Be careful not to cut yourself while poking the clay.
Open the amethyst pearl Liquid Sculpey and add a small amount to the top of the cake and the cake slice. Use the point tool to spread the liquid evenly across the cake, like icing. Be careful not too add too much or to get it over the top edge, otherwise it will run down the sides of the cake and make a mess. If you do have this happen, don't panic. Gently wipe the Liquid Sculpey away with a paper towel and start again.
For some extra cake decor, I poured out some purple tinsel glitter to match the purple color of the Liquid Sculpey. Gently roll both the top edge of the cake and the cake slice through the glitter, making it stick to the Liquid Sculpey.
Place the cake and cake slice onto the oven-safe work mat or on a baking sheet lined with foil. Bake the clay charms according to package directions. Let the pieces cool completely before handling.
Use jewelry pliers to place an eye screw in the side of the cake. Add a jump ring through the eye screw and thread a jewelry chain to wear it as a necklace.
The cake slice is the perfect size to wear as a ring. Simply use some strong adhesive and attach the slice to a ring blank. If you make two slices of cake instead of one, you could turn them into earrings!
Making charms and miniature items out of Sculpey is a lot of fun, and this cake jewelry set was no exception. The way the amethyst pearl Liquid Sculpey looks as an icing for the cake is probably one of my favorite things about this project, and it was so easy to do! If you ever make some miniature charms or any other clay crafts, I would love to see them! Leave me a comment, or tag a photo on Facebook, Twitter, or Instagram!
Enjoyed the project?
The author may collect a small share of sales from the links on this page.





Comments
Join the conversation
Awww! This ring and pendant cake jewelry set (two charms from one cake) is adorable. Thank you!