How to Turn Pants Into Joggers an Easy Refashion Sewing Project
Sewing Tutorial: How to Turn Pants into Joggers an Easy Refashion Project
Currently, jogger style pants are extremely popular. They’re comfortable, casual, and you don’t have to worry about dragging long pant legs across the ground! Plus, joggers look great made from a vast range of fabrics – cozy knits, casual wovens, high-end leather, and much more.
If you have a pair of pants in your closet that you rarely wear, but you love the fabric – try turning them into joggers! It’s an easy and quick sewing project to refresh your wardrobe.
What are joggers?
Joggers are pants that are usually ankle-length and are elasticated at the ankle. The elastic pulls in the ankle of the pants and creates a cool, relaxed gathering effect. Joggers typically have tapered legs, so the fullness at the ankle is limited.
Traditionally, joggers were athletic pants made from comfortable knit fabrics perfect for sports and other forms of exercise. However, these days jogger style pants are available in a vast range of styles, fabrics, and silhouettes.
What kind of pants can you turn into joggers?
If you want to turn your pants into joggers, there a few things you’ll want to keep in mind to make sure your pants can be turned into joggers successfully.
- Choose pants that extend beyond the ankle so that you have enough fabric to turn a hem when creating ankle-length joggers.
- Select pants with some fullness at the ankle so that you can create that gathered effect. Slim fitting pants with no excess fabric at the ankle won’t work well.
- Make sure that the pants you choose aren’t made from an ultra-stiff or heavy fabric. It will be hard to insert elastic and get that nice, gathered look if the fabric is extremely thick.
What you need to turn pants into joggers
Ready to turn your pants into joggers? Here are the supplies you’ll need.
- pants to refashion
- 1- or 2-inch elastic (Less than 1 yard)
- sewing pins
- safety pin
- scissors or rotary cutter and mat
- ruler
- measuring tape
- fabric marker
- iron and ironing board
- thread matching the pants
- sewing machine needle
- sewing machine
- optional: serger
Steps to turn pants into joggers
You can give your pants a jogger style refashion in just 5 simple steps.
- Mark where to shorten the pant legs to.
- Cut the bottom of the pant legs off.
- Hem the pant legs and create elastic casings.
- Insert elastic into the ankle casings.
- Sew the openings in the hem closed.
Step-by-step tutorial: how to turn pants into joggers
I have a (troublesome) tendency to pick up items of clothing at the thrift store if I fall in love with the fabric, even if the style or fit isn’t quite right. These items then get thrown into my “refashion someday” pile, where they often languish for many weeks or months before I get to them.
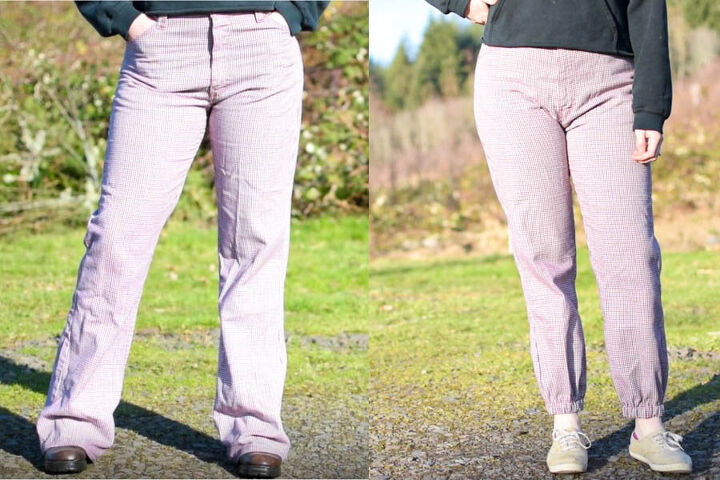
Today, I pulled out this wonderfully quirky pair of houndstooth pants that had pant legs that were way too long – I had to wear boots with 3-inch heels and the pant legs still drug on the ground! They also needed a more casual look for me to wear them, since I don’t often wear dressy items, especially in such bold prints.

I thought that this pair of pants would be perfect if I altered the legs to a jogger style with elastic at the ankle. Below I will take you step-by-step through how I refashioned these pants, and how you can turn a pair of pants from your closet into joggers as well!
Step One: mark where to shorten the pant legs to
Before you can mark your hem, press the pants. You want to remove any wrinkles that may affect your marks or finished look. Once the pants have cooled, try them on. While wearing them, pin up one of the pant legs to the ankle level where you want your finished joggers to sit. It works best if you pin the pant leg up to the outside of the pants rather than folding the excess to the inside.
Once you are happy with the hem line, remove the pants and take them to your sewing table. You can see I needed to take a good 4 inches or more off the hem of my pants.

Next, use a fabric marker or tailor’s chalk to mark the folded edge of the pant leg. This will mark where you need to shorten the pants to.


You can then unpin the pant leg and turn the pants inside out so that you can see your markings. Carefully align both layers of the original hem and use a ruler to draw a straight line across the pant leg going through your marks. If your markings aren’t quite at the same level, just choose one of them as a reference and make sure the line is parallel to the original hem.

Next, we need to add the seam allowance by drawing another line below the first line. If you will be using 1-inch elastic, draw your second line 1.25 inches below the first. If you will be using 2-inch elastic for a wider ankle casing, your line will need to be 2.25 inches below the original line.

Step Two: cut the bottom of the pant legs off
Finally, it’s time to cut into these pants! Use your scissors or rotary cutter to cut along the second, lower line that you drew on the first pant leg.

Next, measure how many inches you cut off the first pant leg, measuring from the original hem up to the cut edge of the piece you cut off.
Carefully line up the two layers of the hem on the second pant leg. Use your sewing ruler to measure the same amount up from the hem and cut along the edge of the ruler to remove the bottom of the second pant leg.

*NOTE: If your pants have very wide legs, you may want to taper in the side seams and inseams a bit at this point to reduce some of the width at the lower leg and get a more tapered, jogger-type look. If you aren’t sure how to do this, Christine wrote a great tutorial explaining the process.
Step Three: Hem the pant legs and create elastic casings
With the pant legs shortened, we can now start hemming – but first, let’s prepare the elastic. Use your measuring tape to loosely measure around your ankle. You want to make sure to leave at least an inch of space in the measuring tape rather than have it tight to your ankle, since you won’t want your pant leg super tight at the ankle.
Add ½ inch to this measurement for seam allowance and cut 2 pieces of elastic to that length. Set the elastic aside for later.

Next, finish the raw edges at the hem of your pant legs. I used my serger for this, but if you don’t have a serger, you can use a zigzag stitch on your sewing machine. If you aren’t sure what a zig zag stitch is, check out this article.

Next, turn the hem on both pant legs up on the wrong side by 1.25 inches if you are using 1-inch elastic or 2.25 inches if you’re using 2-inch elastic. Press the hems with your iron and pin in place.

Take the pants to your sewing machine and top stitch the hems in place with matching thread, stitching at just over 1 inch (for 1-inch elastic) or 2 inches (for 2-inch elastic) from the folded edge. Stitch almost all the way around, leaving an opening in each hem about 1.5 times the width of your elastic.
TIP: The best place to hide your casing opening is over the inseam area. For demonstration purposes, I moved mine slightly to the side.


Step Four: insert elastic into the ankle casings
Next, grab one of your pieces of elastic and put a safety pin through one end of it.

Insert the elastic, safety pin end first, into the opening of one of the pant leg hems.

Push the safety pin further into the hem, then slide the fabric down over the elastic. Repeat that process to inch the elastic through the hem casing of the pant legs. Just make sure not to lose the loose end of the elastic into the hem – you’ll have to start over if the non-safety pin end disappears into the hem!
Eventually, you should have both ends of the elastic emerging from opposite sides of the opening.

Remove the safety pin and overlap the ends of the elastic by ¼ inch, making sure you’re not twisting the elastic. Pin the two ends together.

Next, sew the elastic ends together with 3 or 4 passes of a zigzag stitch. I like to go over it several times to really make sure it will stay put over time.

Step Five: sew the openings in the hem closed
With the elastic in and the ends sewn together, you can pull on the ankle of the pants to feed the elastic all the way into the hem casing. Pin the opening in the hem closed making sure not to catch the elastic.

Continue stitching around the hem to close the opening and encase the elastic permanently.

Lastly, stretch the elastic in the hem a few times to even out the gathering around the hem.

Repeat Steps 4 and 5 to insert the other piece of elastic into the other pant leg hem. That’s it – your new joggers are done!
Here’s how the hems look from the inside:

And here’s how they look from the outside:

These pants now have a more stylish, casual look and will definitely get more wear!

Plus, I can even wear them with flat shoes!

Hopefully, this tutorial was easy to follow but if you are more of a visual learner, please watch the video tutorial on The Creative Sewist YouTube channel!
If you have any questions or concerns, please leave them in the comments below.
The author may collect a small share of sales from the links on this page.


Comments
Join the conversation
Great idea, can’t wait to try it! I too have a “refashion someday” pile. Thanks.