Recycle a Prom Dress Into a Pleated Skirt + Bonus Cocktail Dress

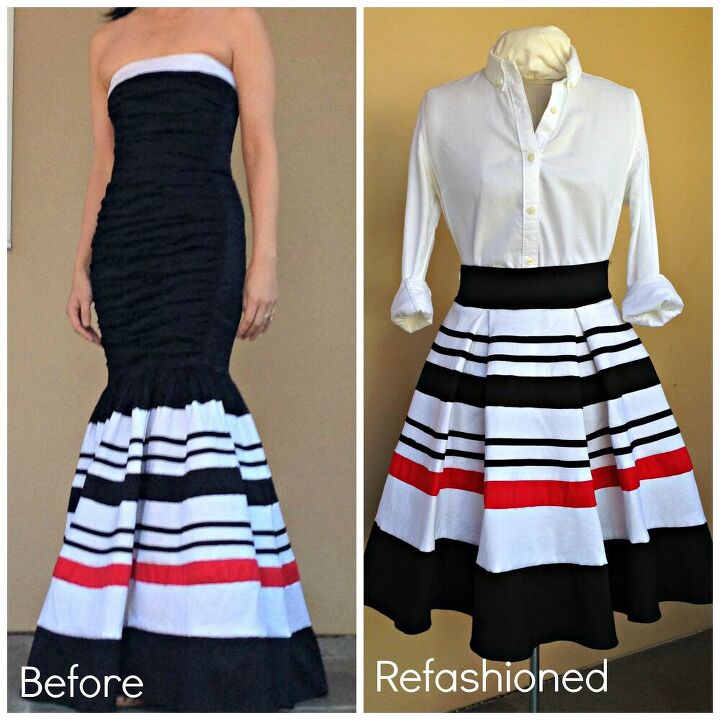
Sometimes, I come across a dress at the thrift store that makes me ask “WTF?”, like this Jessica McClintock prom dress. I liked the ruched bodice by itself, and I liked the mermaid tail by itself but put together, it was an epic fail. I thought these 2 parts should be separated, and that’s exactly what I did.
In this step by step tutorial, I’ll show you how to take apart the mermaid skirt, add pleats, and sew it back together with a side zipper. Since we’re only reworking the waist and one side seam, this project took less than an hour to finish.
Step 1: Pick apart the mermaid tail and first tier of fabric from the tail.
Step 2: Make the waist from the first tier of fabric. I assumed this tier would be a long rectangular strip of fabric but it turned out to be curved pieces that were perfect for a waist yoke. Cut 2 waist yokes – one for the front and one for the facing.
Sew the top with the wrong sides together.
Flip over the waist yoke and press. If you don’t have curved pieces, you can use a rectangular piece of fabric for your waistband. For the length, measure your waist and add a 5/8″ seam allowance on both sides. For the width, figure out how high you want the waistband, and then double it to cover both the front and back. Then add a 5/8″ seam allowance to both sides.
Step 3: Make pleats in the skirt. The waist yoke was 30″ long, which meant I had to pleat the skirt to measure 30″. I made 6 pleats 5 inches apart.
Here’s a view of the pleat from the back. I pinched 8″ of fabric for a 4″ pleat.
The last pleat is really two half pleats with a 5/8″ seam allowance for the invisible zipper and side seam.
Step 4: Sew the waist to the skirt. With right sides together, sew the front of the waist to the front of the skirt.
Step 5: Sew the invisible zipper. I used a wonderful tutorial from Colette Patterns with easy to follow instructions and beautiful photography. This zipper hides nicely in the pleat.
Step 6: Finish the edge of the waist facing by folding under the raw edge and whip stitching in place.
The finished skirt had a preppy vibe to it, so I paired with a white oxford.
For the rest of the dress, I simply hemmed the bottom with a straight stitch.
If you need help calculating the number and spacing of pleats for your waist and length of fabric, I highly recommend a tutorial from Joe and Cheryl. They have beautiful diagrams and easy formulas. Everything starts with your waistline measurement. All other measurements are based on your waistline.
What part of this refashion did you enjoy the most – the skirt or the cocktail dress> Please share your thoughts in the comments below.
Enjoyed the project?
The author may collect a small share of sales from the links on this page.


Comments
Join the conversation
Just great use of a 1 time wear dress ..since I hate to sew anymore than I need too If it were me I’d forget the tricky zipper and make the skirt with elastic waist..
Liked the skirt refashion. Have a skirt with a too large waist to re-do. Will need to add zipper, too, I think. Hopeful for Spring to complete it.
Thanks for this...to inspire me.