THE MONTHLY DRAFT 5: A-LINE SCALLOPED SKIRT

How has it gotten to be March already, guys?! I've had a whirlwind of adventures lately, and I'm sorry to say that the Monthly Draft was the first thing to be set aside on my to-do list. It's so much faster to sew when you're not thinking about documenting the steps! I like documenting, though - it helps me slow down and think about things in a different way, and of course it means I get to share the process with you guys!
So - without further ado - Let's get to drafting!

This installment of The Monthly Draft will take you through the completion of an A-line mini skirt with a front button closure, sewn on waistband, pockets, and paneled scallop detail. We'll be modifying the block we made during the Pencil Skirt monthly draft, but I'll give you a little refresher in case you've forgotten.
Materials
- A roll, or a few large sheets, of sturdy paper
- A ruler, measuring tape, and french curve or flexible ruler
- Pencil, eraser, and paper scissors.
- Muslin/scrap fabric*, and a pen or thin fabric marker
- About 1m of skirt fabric (I used silk chiffon and an underlined with cotton for structure, but use your imagination here!)
- Sewing Machine (serger optional), scissors, buttons, a little bit of interfacing, and matching thread.

THE DRAFT
We're going to use the same skirt block that we drafted for the pencil skirt, but with a few modifications. If you're starting from scratch, you'll want to read the bit between the lines. If you have a skirt block or if you're familiar with the pencil skirt post, meet me on the other side!
Take your waist, hip and length measurements if you haven't already, plus the approximate distance between your waist and hip. For our purposes today, your waist measurement is wherever you'd like your skirt to come up to, your hip measurement is the widest part of you that you're going to need to get the skirt over (generally low on the hipbone over the fullest part of the booty) and the length will be from the top of your skirt (waist) to approximately wherever you want the hem to be. I'm going to show how to lop off the excess in the next step, so feel free to err on the side of long at this stage.
Lay a sheet of paper out in front of you. I like to draft off the edge of the paper because it gives me a straight line to work with.
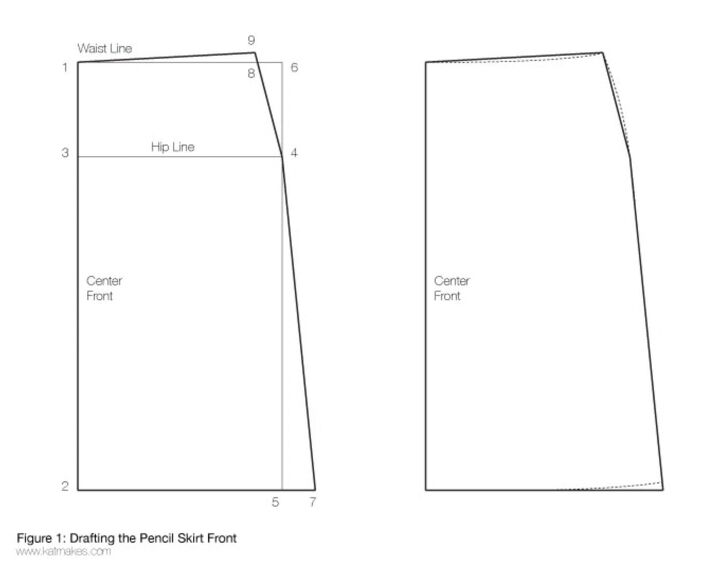
For the skirt front: Draw a vertical line from 1 to 2 that equals your (estimated) skirt length. Then, measure your waist-to-hip distance from 1 to 3, and draw a horizontal line that is 1/4 of your hip measurement (plus 1/4" to 1/2" for ease)- to point 4. Draw another horizontal line from 2 that equals the distance from 3 to 4, and mark point 5. Draw a vertical line connecting 5 to 4, and extend it by your hip-to-waist measurement so that it's in line with 1. Connect 6 to 1 with a straight horizontal line. 5 to 7 is an estimate, based on how wide of a sweep you want for the skirt. I went with 2.5", but ended up removing almost all of it when I muslined. Measure 1/4 of the waist measurement (plus 1/4" to 1/2" for ease) from 1, and mark this as 8. Measure 1/2" up from 8 to 9, then connect 9 to 1.
Still with me? We're nearly there. Next, measure 1/2" up from 7 at the bottom of the skirt, and curve the hem up slightly to meet that point. use a french curve or curved ruler to even out the angles at the hip and waistline, so that you have gently curving seams. When you're done, you can cut this piece out!
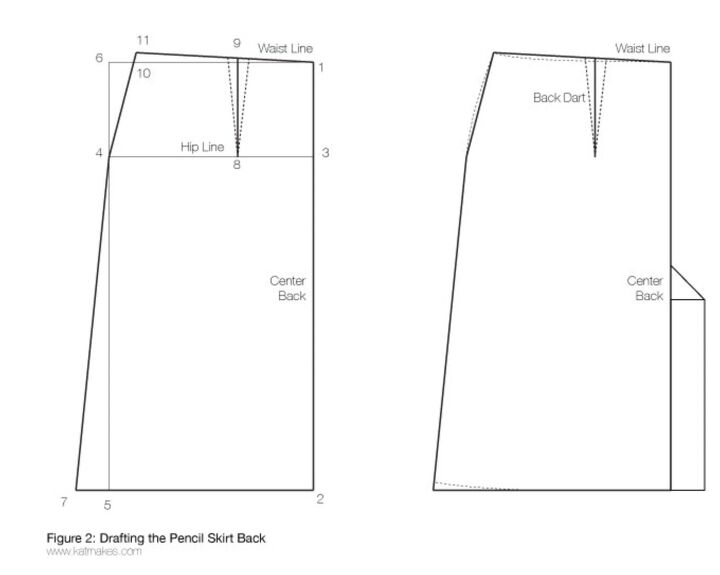
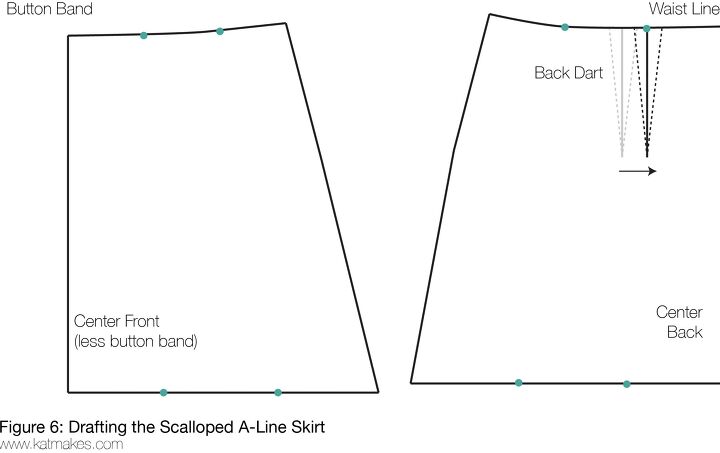
The back is very similar to the front, with the exception of the darts and the kick pleat. Draw a vertical line from 1 to 2 that's the finished length of your skirt. 1 to 3 is the hip to waist measurement, then draw a line across to 4 that is 1/4 of the hip measurement plus your ease, same as the front. 2 to 5 is equal to 1 to 3. connect 5 to 4, then extend by the hip to waist measurement and mark point 6. Measure from 5 to 7 the same sweep amount you used at the front, and connect to 4. Measure 1/8" of hip measurement minus 1" from 3 to get 8 (the bottom of the dart), and square up a line to the waistline. Measure 1/2" from the center of the dart line in each direction to make a 1" dart. 1 to 10 is 1/4" of the waist measurement, plus 1" for the dart. Measure 1/4" up from 10, mark 11, and connect back to 1. As before, curve the side seam edge of the bottom of the skirt, and curve the waist and hip seams as you did for the front. Add the kick pleat by measuring 2" out from the center seam, 10 inches from the hem parallel to the center back seam, and connect back to the center back seam 12 inches from the hem ( a 45 degree line)
Okay. Now that we're all in the same place (we should have a pretty basic looking skirt block) - we're ready to make our changes! If you're starting with the knee-brushing pencil skirt block, take a new measurement on your body for the finished length of the skirt. I was shooting for somewhere in the vicinity of my fingertips, at mid-thigh, but you can make it as long or as short as you feel comfortable. Measure that distance down from the top of the draft, make a mark, square it to the other side, and cut off the excess. (Also, remove the kick pleat if there's any of it leftover)
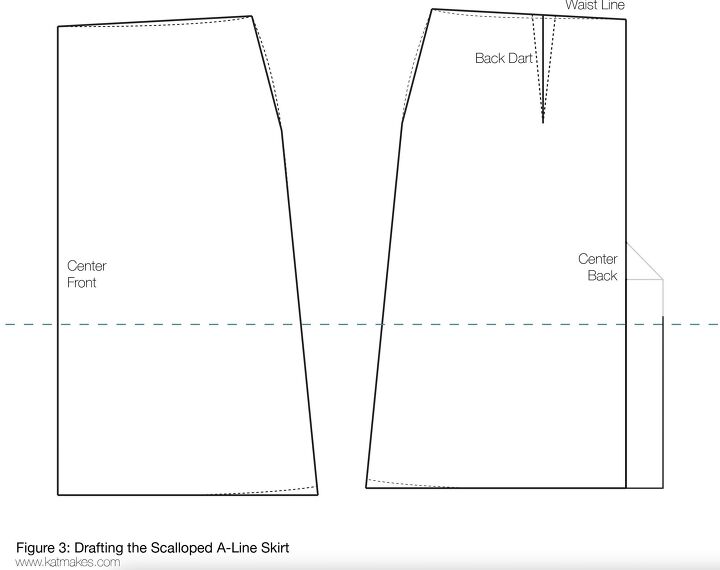
To add an A-line shape to the skirt, I added a bit of extra width by adding a wedge to the side seams of each piece. (The more width you add, the fuller your skirt will be. An inch gave me what I wanted for an A-line shape, but can you see how pulling the side seam side all the way up to horizontal and even with the waistline would give you a circle skirt? Magic!)

Next, we need to make our ~design changes~. I type that with the squiggles for emphasis because everything we're doing past this point will change the style/design of the skirt, but it won't change the fit. That's one of the coolest things about pattern drafting - from a block that you know fits, you can make even your wildest style dreams come true.
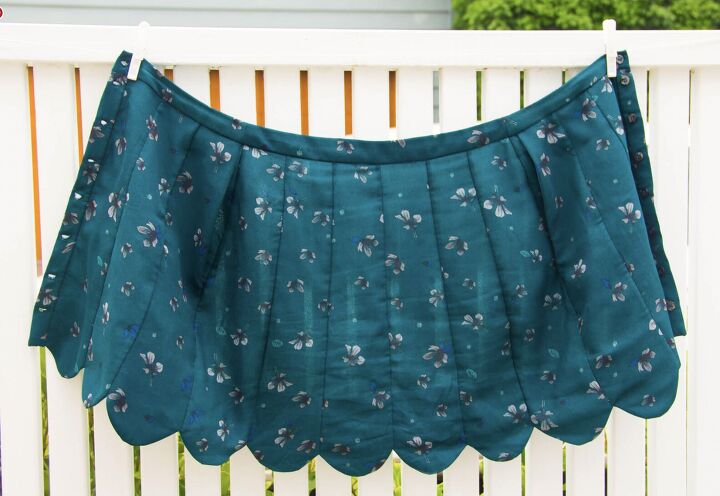
So. I want a paneled skirt, and I want a scalloped hem. For the record, it would be very easy to decide you wanted a paneled skirt with a straight hem, or also a non-paneled skirt with a scalloped hem. In fact, the main reason I decided to make panels at all was because I wanted the extra seams to stabilize the silk chiffon, which would have drooped if I'd left the skirt pieces whole. It's really up to you, and we're going to make the panels and the scallops in two separate steps anyways.
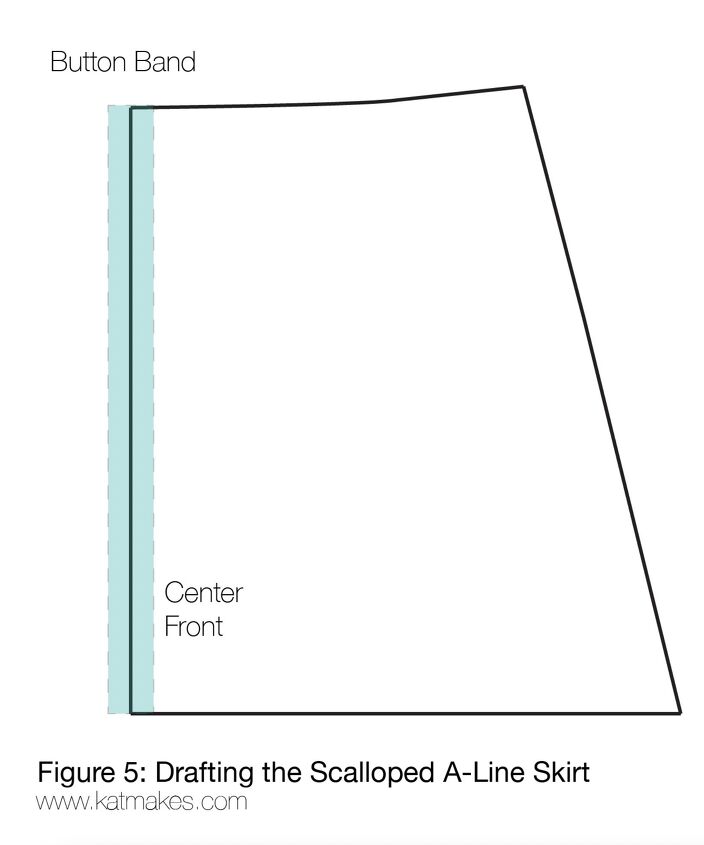
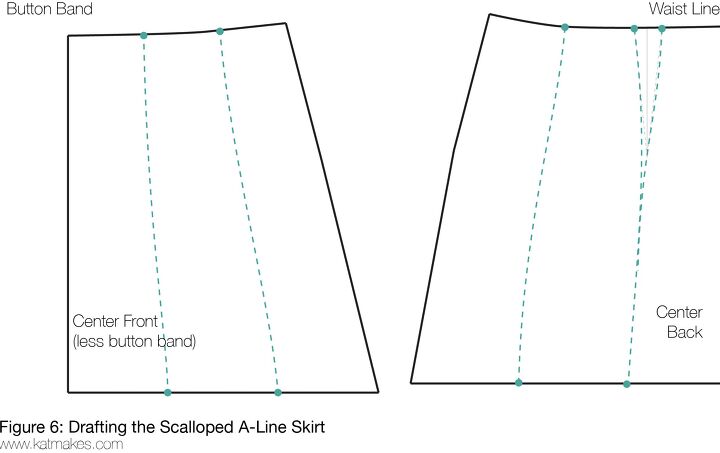
The panels are created with a simple slash, but before we do that we need to make an allowance for the closure. The skirt closes with a button placket at center front, so we need to subtract that from the width, otherwise our skirt won't fit! The button placket will be 1" wide, so subtract 1/2" from the center seam of your front skirt piece (since the front skirt piece represents half of the entire front, we only need to remove half the width of the placket) Done? cool. You could use this opportunity to draft the placket - 1" by the CF length of the skirt... but to be honest I don't bother with those. I generally write "Cut placket 1" wide (add Seam Allowances)" on my front pattern piece, and just use my ruler to cut a rectangle when I'm ready for it.
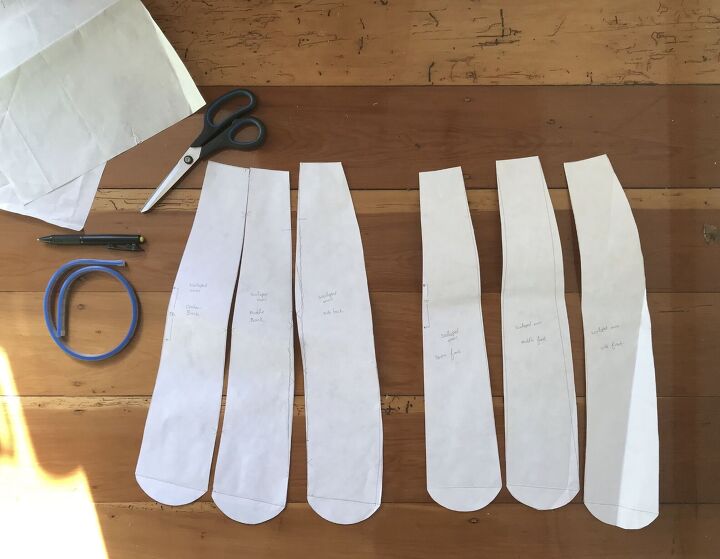
Are you ready for the fun part? Measure the top (waistband) and bottom (hem) lengths of your front and back skirt pieces, divide by three, and use those numbers to make tick marks to separate each piece into three sections.
Connect the waist tick to its corresponding hem tick for each panel, using the neighboring lines to determine how straight or curved your line needs to be. The center front and center back are both straight lines, but the side seams are quite curved, so the lines become more curved as they approach the sides. This, aside from providing fabric stabilization in my case, has the added benefit of looking rather slimming.
For the back, we've got a pesky dart that needs dealing to (you may have one in the front as well, depending on your body shape). Just move the dart towards its closest tick mark, and draw the slash lines up either side of the dart's legs. You're eliminating the dart by hiding it in a shaped seam.
Nifty! When you're finished, be bold, and cut along those slash lines you just made!
(Hi yes sorry I have two figure sixes, and I have elected not to go back and change it. That can be my one token typo in this monster of a post...)
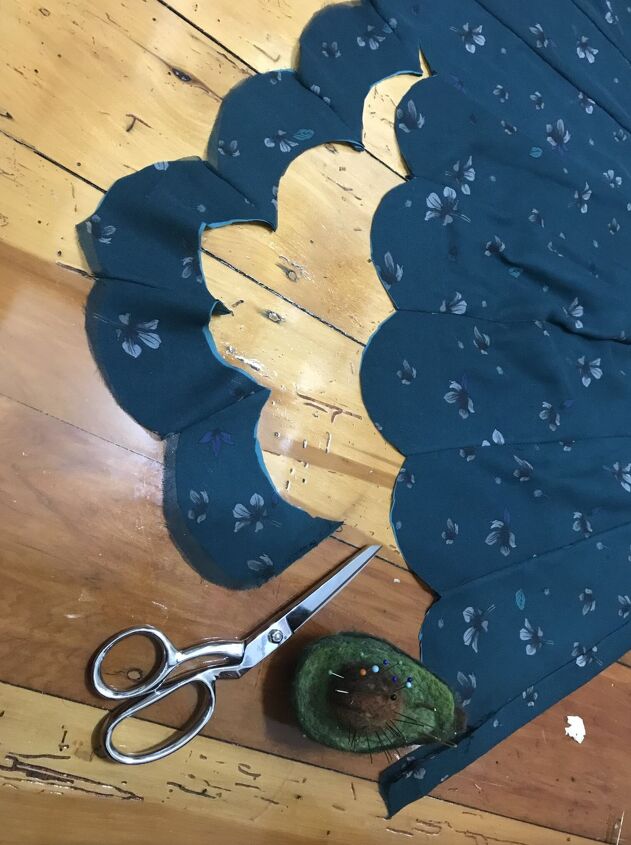
Next, we'll add scallops. If you have a compass, that's awesome - use the width of the hem edge of each panel to determine a radius for your compass, and draw your scallops so that the edge of the circle lines up with the hem edge of the skirt. If you don't live in fancy times and don't need no stinkin' compass, you're going to want to go hunting for a circular object in your house that has about the same diameter as the width of those scallops. Think coffee cups, small bowls, or saucers. A little ceramic ramekin turned out to be the perfect size for my panels.
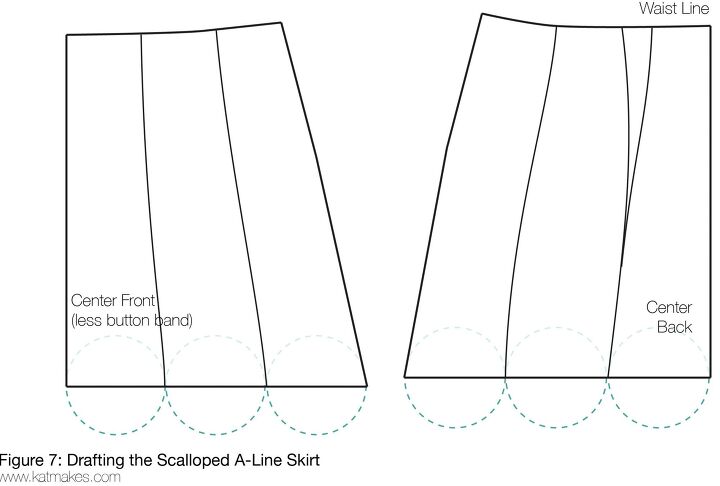
If your version of the skirt wants scallops but no panels, you'll skip my steps for slashing the pattern above, but still divide the skirt into sections at the hem. You can divide your panels into six like mine, or you can decide what size you want your scallops to be and figure out how many you'll need based on the hem measurement. For example, if my total hem length is 40 inches, and I want scallops that are 2 inches in diameter, divide 40 by 2: You'll need to draw 20 scallops. Or, If you want to base it off a total number of scallops: If I want 25 scallops and my hem length is 40 inches, divide 40 by 25 to give you 1.6: the diameter of each scallop. See, I like math when it ends in a pretty skirt!
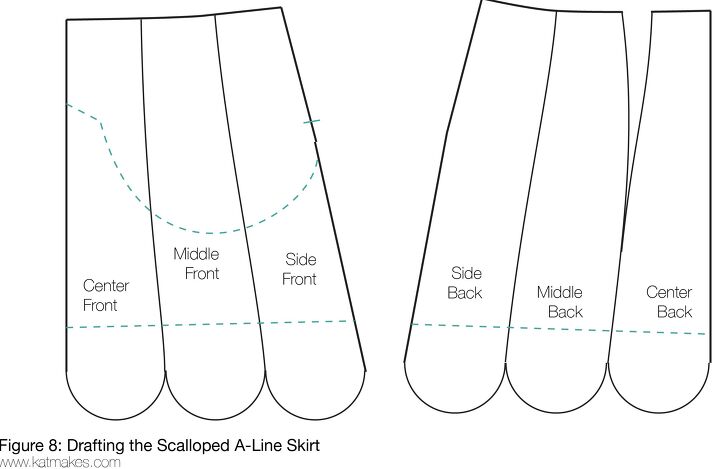
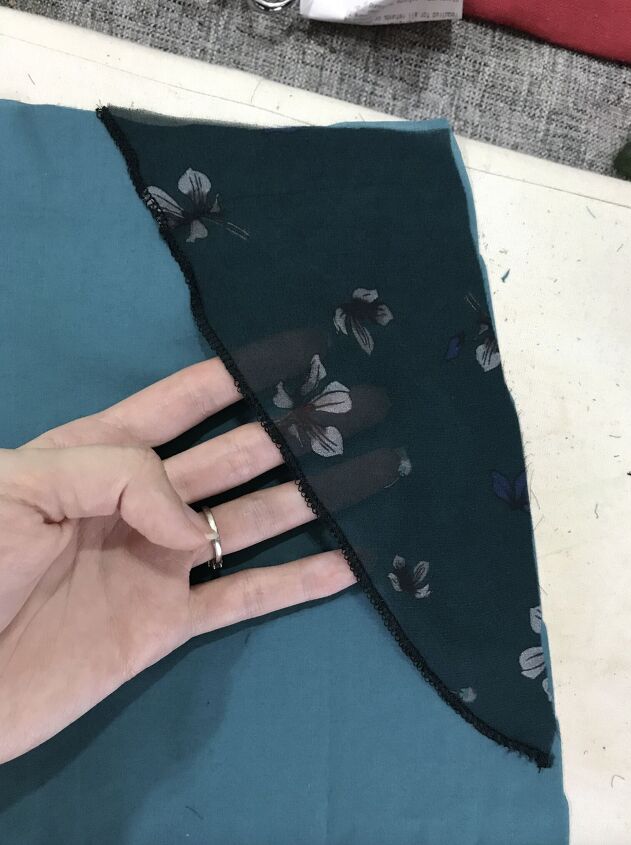
Anyways: Once you've sorted the scallops, just cut off the excess paper and the skirt pieces are done! Draft a facing for your scallops by tracing the lower 3-4" of the skirt onto a fresh piece of paper. I made one facing piece for each front and one for the whole back because the only seams that have any shaping at that level are the side seams. Lastly, you'll need a waistband and pockets. For the waistband, extend your front set and back set each 1" or so, following the curve of the waist at the side seams. With skirts like this, I like to create a sort of 'pocket stay' that's stabilized in the center front seam because it helps with stability (especially when the pocket actually has things in it, because let's face it, having pockets is one thing, but having pockets you can actually put stuff in is different entirely). My pocket drafting method is highly un-scientific. I put my phone down on the skirt front pieces, and my hand spread out on top of the phone. I trace with a bit of extra space around where I think the pocket should slope, and then add tabs for the center front stay area and the side area. I also cut a small wedge of the chiffon at this stage to use as a pocket facing, which you'll see later.
et voila! Your skirt is drafted, how exciting! A few of those steps were a bit fiddly, but I promise it'll be worth all this effort! Don't forget to add seam allowances after you do your fitting.
You'll notice a distinct lack of muslin in this post. That's because I didn't make one! I know this skirt looks significantly different from my pencil skirt, but since they were both grown from the same block, and since I know that skirt fits me - I decided it wasn't necessary. If you have a well fitting block and you make only cosmetic adjustments, there's really no point in mocking everything up unless you're nervous about it for some reason. If this is your first skirt block, get thyself over to my pencil skirt post for information on how to make a muslin. AND take the extra time to do the thing!
THE CONSTRUCTION
My skirt is made from a very wiggly silk chiffon underlined with a very stable and densely woven cotton lawn, so every pattern piece needed to be cut twice. I also cut interfacing for both sides of the button band.
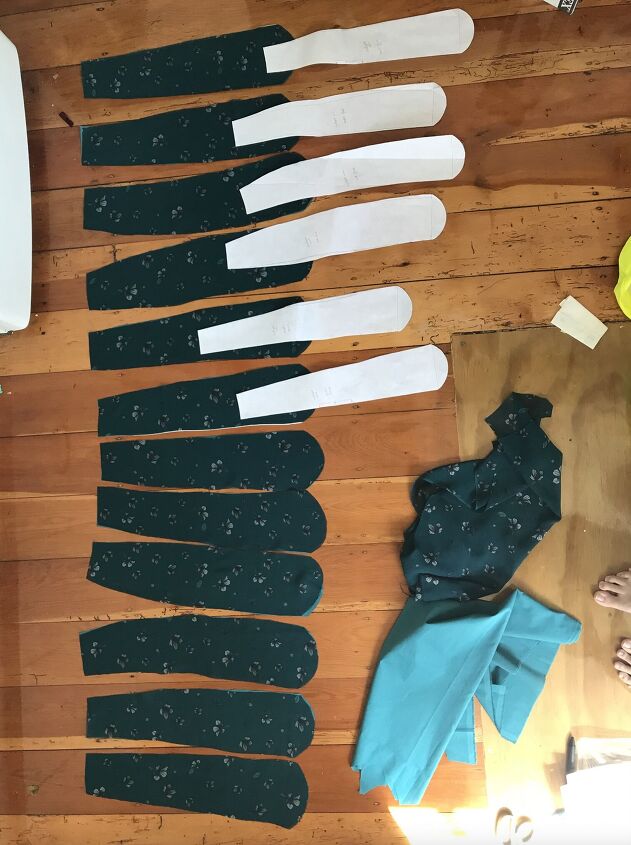
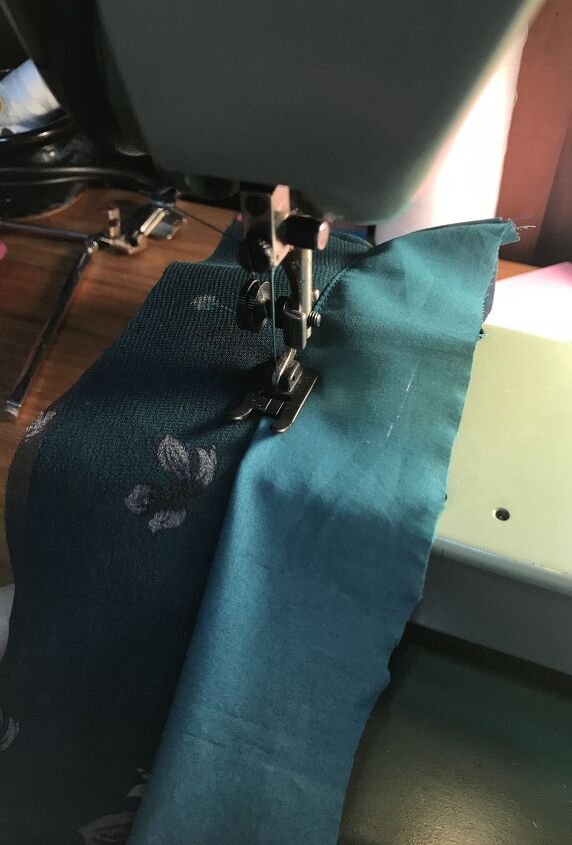
First order of business is to get all those skirt pieces attached. I chose french seams so everything was neatly enclosed, and I did all of the first passes with my serger before moving on to the second passes so that I could make sure the silk was stabilized as quickly as possible. First, sew the wrong sides together for all the front pieces and all the back pieces, pressing each seam and pinning as you go. Then sew the second pass to enclose the serged edges, again pressing as you go. You should have two skirt fronts and one skirt back.
Next, attach the pocket facings to the pocket backs, and then french seam the pocket bag along the bottom edge. Sew the pocket fronts into the side seams (I french seamed this bit) and then carry on sewing the rest of the side seam to complete the skirt. I chose not to use a french seam for my side seam because I wanted to minimize bulk at the lower corner of the pocket.
At this point, I stay stitched around the waistband and center front seam to keep the pockets from flapping about, and moved on to the button band. Ideally, you're going to want to attach your facing before you attach your button band so that you can neatly finish and enclose all your seams, but I was feeling a bit nervous about the length I'd chosen for the skirt, so I decided to attach the button band first so I'd have a better idea of what it would look like once finished. I'm glad I did, because I ended up chopping 2" off the length! I did end up having to fuss a bit with that button band, but it was worth it. On a related note, I waited until this point to cut my facings out, which also turned out to be a good choice since they changed shape when I shortened the hemline.
The facings went on next! After sewing them together at the side seams, I stitched the scallops to the facing with a 1/2" seam allowance, then graded the seam allowance down as closely as I dared, clipped the curve every 1/4 to 1/2" or so (making sure to clip very very close in the scallop points) and then turned the facing towards the inside and ironed the scallops flat. Not gonna lie, this took FOREVER. Be patient, the result will be worth it. If you want a bit more reading material, this tutorial from Colette walks you through a good scalloped hem that's similar to mine.
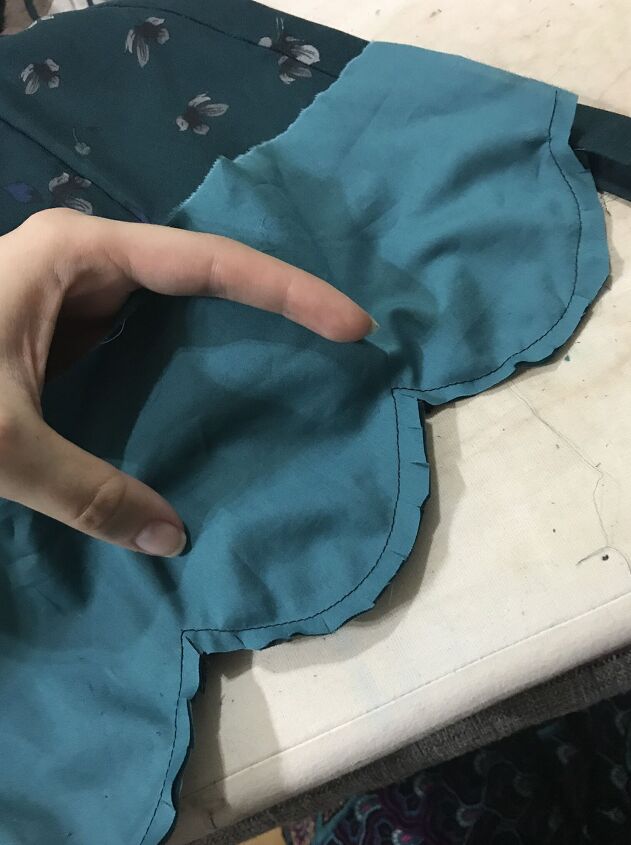
After ironing, handstitch the top of the facing to the inside of the skirt. If your skirt is two layers like mine, try not to catch the outside layer. If it's only one layer, you can make those stitches invisible by only catching a few threads at a time. Go slow! Take this opportunity to finish the bottom edge of the button band as well, since you're there.

We're nearly there! Just the waistband and the buttons left to go!
The waistband is constructed and then sewn to the skirt. First, sew the fronts to the back for both the facing and the main band. Then, sew them together at the top with right sides together. Open the piece and use your fingers to press the seam allowance towards the facing side, and then understitch on the facing side to keep the inside bits from peeking out.
Sew the right side of the waistband to the right side of the skirt. Flip it up and iron it, pressing the seam allowances up into the waistband. You may choose to grade these seams if you wish. Sew the edges of the waistband wrong sides together at the two fronts, and lastly fold the facing under 1/2" (or whatever you chose to use for your seam allowance) - secure it with a few pins, and stitch in the ditch from the top of the skirt to secure it.
Last but not least, we add buttons and buttonholes. I went a bit rogue here and broke out my new-to-me Singer Buttonholer: built for the old Singer straight stitch machines, but I really love the beautiful oval shaped buttonholes it makes. As a bonus, it fits on my Elna Supermatic! (My Elna makes buttonholes of course, but they're the traditional home-sewing square type ones). I'll leave you in charge of making your own buttonholes, but here's a photo of my buttonholer in action:
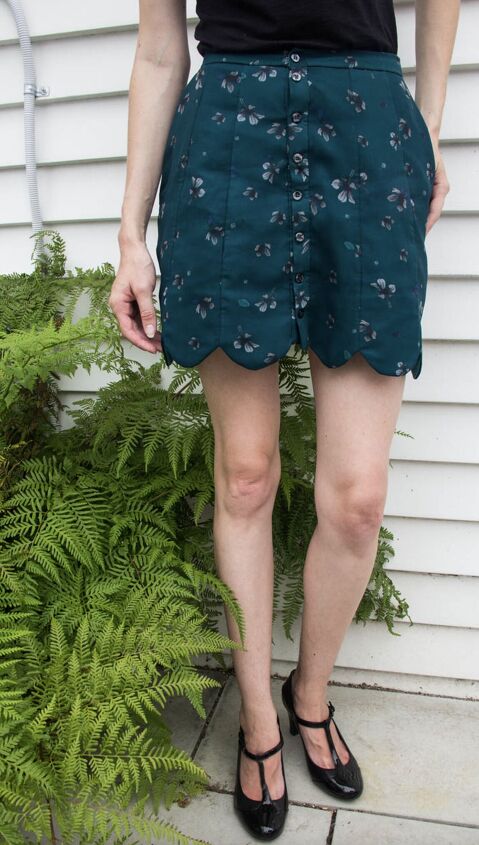
With the last snip-open of a buttonhole, and the last sewn on button, our skirt is done! As I'd hoped, the stable cotton managed to tame the silk chiffon and I have all the lovely color overlays and none of the wobbly sheer problems that might arise with a chiffon skirt. The whole thing is very Late 60's Nearly 70's in a way that leaves me a bit surprised at my fondness (I seem to gravitate towards 40's styles) - maybe I should try the A-line color blocked dresses with some heavy lower-lash eyeliner after all?


My goodness, you guys! The monthly draft was gone for a few months and this post seems to have made up for everything with its length! Even if you're not planning on making exactly this project, I hope the techniques we used today help you in your own drafting and sewing endeavours - and may you always find the appropriate sized circular household object to trace your scallops with!
As always, if you use anything you've learned here (Or decide to go full-on twins with me) please email me some photos, or tag me on Instagram so I can share in the madness! Let me know if you have questions too! Also, if you've made it all the way down to the end, you're a legend. Gold star.
The author may collect a small share of sales from the links on this page.


Comments
Join the conversation