How to Sew Women's Cowl Neck T-shirt FREEDOM

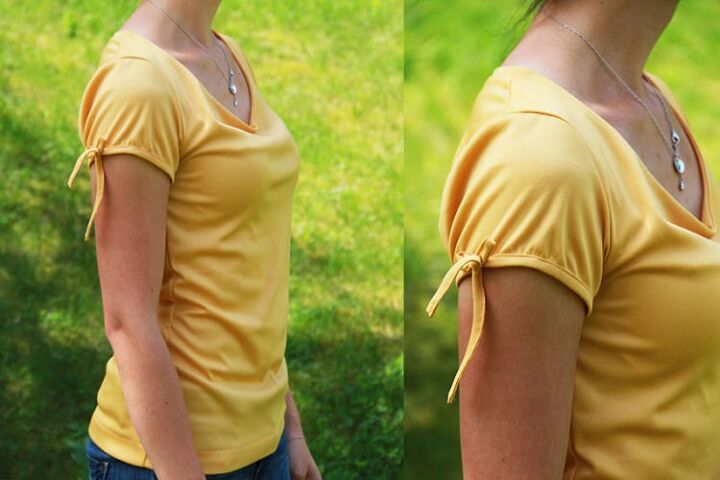
I've created another pattern for a summer T-shirt that has an interesting ruffled front and little bows on the sleeves. You could say it's a cowl neck T-shirt (and I call it that), but the cowl neck element is not very pronounced.
The pattern
Women’s T-shirt FREEDOM is semi-fitted, so if you want to hide your tummy a little bit, this is the right pattern for you. The neckline is slightly ruffled and flattering to all bust sizes. This type of neckline will visually enlarge smaller busts and women with larger breasts will not have any problems with uncomfortable tight spots.
The trendy very short sleeves are decorated with small bows, but it's up to you whether you put them there or not. This pattern is available in sizes 32–62 and you can get it here:
Recommended material
I recommend using medium knits (stretchy materials) - ideally with viscose or modal. Both materials make fabrics shinier and more flowing. But beware of light viscose knits (just viscose + elastane), they are too weak for our purposes.
You can find suitable fabrics in Dumlatek.cz store.
Take a look at these modal knits, for example → Modal
Sewing instructions
Pattern layout
Prepare:
- 1x front piece (cut on the fold)
- 1x back piece (cut on the fold)
- 2x sleeve
- 1x neckline facing (cut on fold)
- 2x 3.5 cm / 1 3/8" wide knit strip for sleeve hems
- Sizes 32–46: 60 cm / 24" long
- Sizes 48–62: 70 cm / 28" long
- 1x 3.5 cm / 1 3/8" wide knit strip for the neckline hem
- Sizes 32–46: 25 cm / 10" long
- Sizes 48–62: 30 cm / 12" long
Neckline
Let’s work on the back part of the neckline first. Measure its length and multiply it by 0.9 - the result is the length of the knit strip you will need.
Mark the center point of the back piece and the knit strip.
Fold the strip in half (lengthwise), align the two marks and pin the strip to the neckline.
Sew the strip to the back piece, I recommend sewing with an overlocker or elastic stitch. Stretch the strip slightly while sewing so that it is sewn evenly.
Suggestion:
If you decided to sew your T-shirt on a regular sewing machine, I recommend you read this article before you get into it:
Iron the hem.
Now prepare the facing of the front piece. Place the facing on the front piece - face side to face side - and sew the pieces together. Clean the free edge of the facing (the bottom one).
Flip the facing over the edge of the neckline and slide it down a little so that the connecting seam is hidden when viewed from the face side of the T-shirt.
Baste the neckline to keep the facing it in this position.
You can learn more about basting here:
Iron the neckline thoroughly.
Shoulder seams
Now you will sew the shoulder seams, and at the same time clean them with the facing.
First, pull out the basting thread (last two stitches) near the shoulder seams so that you can separate the facing from the front piece.
Lay the back piece over the front piece (face side to face side). Pin the shoulder seams.
Cover the back piece with the facing and pin it to the shoulder seam.
Work on the other shoulder seam in the same way.
Sew both shoulder seams and turn the T-shirt face side out. The shoulder seam is finished (and hidden between the front piece and the facing). Iron both shoulder seams.
Face side view:
Reverse side view:
Now you can pull the temporary stitches out of the neckline.
Side seams
Baste the facing to the front piece along the armscyes.
Now lay the front and back pieces on top of each other (face side to face side) and sew both side seams.
Sleeves
Sew the sleeve seams. If you want to have bows on the sleeve, mark a place on the bottom edge that is exactly opposite the sleeve seam.
Next, prepare the knit strips for the sleeve hems and mark their midpoints.
If you don't want bows on the sleeves, scroll down a bit for instructions for the version without bows. :)
Sleeve hems with bows
Turn the sleeve inside out and pin the middle of the knit strip to the sleeve seam.
Then pin the strip along the entire edge of the sleeve, the strip should tighten the bottom edge of the sleeve slightly. Measure both loose ends of the strip - they must be the same length (about 15-20 cm / 6"-7 7/8")
The strips should meet exactly in the middle of the sleeve hem (opposite the sleeve seam).
Let’s sew the hems. Turn the sleeve face side out and sew inside it. Start sewing where the two ends of the strip meet.
Carefully remove one of the pins that attaches the strip to the sleeve...
...lift the presser foot (and needle), insert the sleeve into the machine, and aim the needle to the point where the two ends of the strip meet. Be careful not to accidentally sew through the other end of the strip.
Put the presser foot in the bottom position and insert the needle into the fabric, at this point you can start stretching the strip so that you can sew it to the sleeve evenly.
Sew along the entire circumference of the sleeve.
When you get close to where the other loose end starts, slow down and carefully finish the seam (you can also use a hand wheel).
Pull free ends of the thread chain under the loops when using your overlock.
Now fold the free edge of the knit strip to the reverse side - up to the edge of the sleeve...
...and then once more - over the original seam.
Baste the hem in this position.
Bows
Fold the free ends of the strip 1 cm / 0.4" to the reverse side.
Now fold both sides of the strip to the reverse side (up to the middle of the strip).
...and then fold the entire strip in half (lengthwise). This will give you a thick ribbon.
Baste the ribbon to keep it from unfolding.
Topstitch the ribbon & hem along the entire length - sew from the face side so you can control the seam better. Also, sew through both ends of the ribbon.
Now turn the shirt inside out, insert the sleeves into the armscyes and pin them to the T-shirt. Be careful not to switch up the sleeves by mistake.
Sew the sleeves to the T-shirt (and pull free ends of the thread chain under the loops if you are using your overlock).
Bottom hem
Clean the bottom edge of the T-shirt, fold it about 3 cm / 1.18" (depending on the size of your hem allowance) to the inside of the T-shirt and topstitch it - sew from the face side of the T-shirt, about 2.5 cm / 1" from the fold.
Sleeves without bows
If you do not want to have bows on the sleeves, proceed as follows:
- Sew the sleeve seam.
- Mark a point opposite the sleeve seam (you can use a small notch).
- Measure the circumference of the bottom edge of the sleeve. Multiply the measured value by 0.9. The resulting value is the length of the knit strip you will need to sew the hem.
- Sew the two shorter sides of your knit strip to form a loop and mark a point opposite the seam.
- You can now proceed this way:
- Fold (“roll”) the strip in half (lengthwise). Pin and sew the strip to the sleeve.
- (Neckline hems are usually sewn this way.)
- Or this way:
- Pin and sew the face side of the strip to the reverse side of the sleeve.
- Fold the strip up to the seam, and then once more - over the seam, to the face side of the sleeve.
- Baste the hem in this position and topstitch it.
- (We sewed the sleeves with a bow in a similar way - this method is described in detail in the article above.)
The pattern
You can get the pattern featured in today’s article here:
Have a nice day!
Petra
Don't forget to share your joy with others!
Do you like this article? If so, share it with your friends and tell me about it in the comments section below. I will be glad for any feedback! ♥
PS: Did you know that there are other FREE PATTERNS available on my blog?
Enjoyed the project?
The author may collect a small share of sales from the links on this page.


Comments
Join the conversation