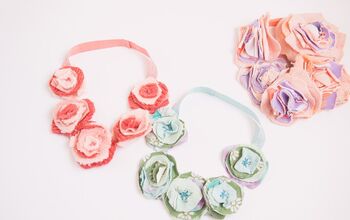
Quick and Easy DIY Flower Headband

I had so many questions about the DIY flower headband I wore in another reel that I put together a tutorial on it for you.
Make sure that you allow the glue to cool before letting go of the flowers, to get a good bond.
Let’s get started!
Upstyle Recommends!
Tools and materials:
- Plastic headband
- Sprays of fabric flowers
- Hot glue gun
- Scissors

1. Prepare your supplies
Remove the flowers and leaves from the stalks.

Cut off the little nub at the base of each flower.

Glue the base back on to the flower to hold it together.

2. Apply the flowers
Put a dab of glue on the base of the large flowers and press them on to the headband.
Arrange them so they’re evenly distributed across the top of the band.

3. Add leaves
After the glue has cooled, add some leaves to the underside of the headband below each flower to give them more support.

I like to plan my design before I glue them in place.

I added leaves in between the flowers, again gluing them to the underside of the band.

5. Finishing
I bought a spray of rosebuds as well and added a few of them in between the larger flowers to give more volume to the headband.

DIY flower headband
And here’s the finished look! So pretty and romantic. Easy to do and gives a unique touch to your outfit.
Let me know in the comments what you think.
Next, check out my Beginner-friendly Summer Dress Tutorial.
And, for even more sewing content, follow me on TikTok: @kenjahb
The author may collect a small share of sales from the links on this page.

![DIY Flower Headband [Sew & No-Sew Options]](https://cdn-fastly.upstyledaily.com/media/2020/11/20/6335649/diy-flower-headband-sew-no-sew-options.jpg?size=350x220)


Comments
Join the conversation