Use an Old Sweater to DIY a New Beanie

Greetings crafters! Today, I'll show you how to use an old sweater to DIY a new beanie.
Not only does this project give new life to a discarded garment, but it also allows you to personalize your wardrobe without breaking the bank.
Let's get started on this upcycling adventure!
Tools and materials:
- Old sweater
- Scissors
- Beanie (for sizing)
- Sewing machine or needle and thread
- Pins
- Fabric chalk or marker
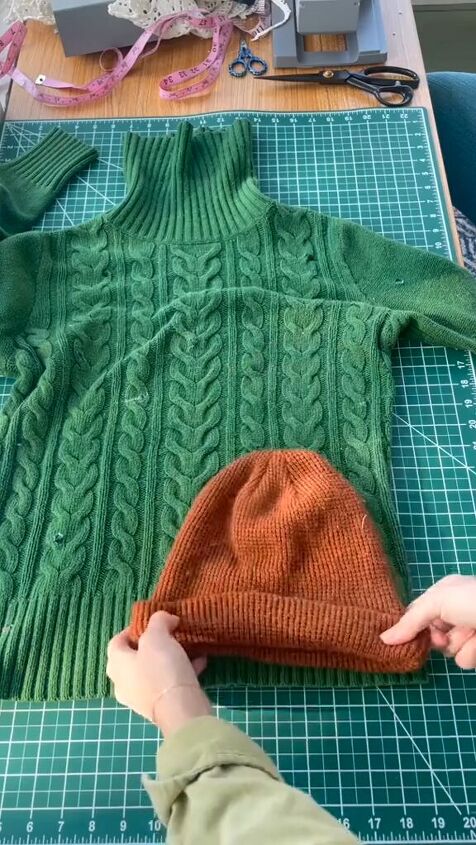
1. Lay out your sweater
Select an old sweater that you no longer wear but still love the fabric. Lay it out flat on a clean surface.
2. Use a beanie as a pattern
Grab a beanie that fits you well and place it at the bottom corner of the sweater.
You can use a marker or fabric chalk to trace it out first, or just start cutting.
Carefully cut along the traced lines, making sure to follow the shape of the beanie template.
3. Sew
Place the two fabric pieces together with their right sides facing inwards. Pin the edges to secure them in place.
Using a sewing machine or hand-sewing with a needle and thread, stitch around the edges, leaving the bottom open.
Ensure your stitches are sturdy to prevent unraveling. Turn it right side out and you’re done!
Use an old sweater to DIY a new beanie
You've successfully turned an old sweater into a trendy beanie, adding a touch of eco-friendly style to your wardrobe.
This DIY project not only showcases your creativity but also promotes sustainability by repurposing clothing.
Leave me a comment and let me know how your beanie turns out.
Next, check out this Genius Button-up Hack for Blouses.
Enjoyed the project?
Suggested materials:
- Old sweater
- Scissors
- Beanie (for sizing)
- Sewing machine or needle and thread
- Pins
- Fabric chalk or marker
The author may collect a small share of sales from the links on this page.


Comments
Join the conversation