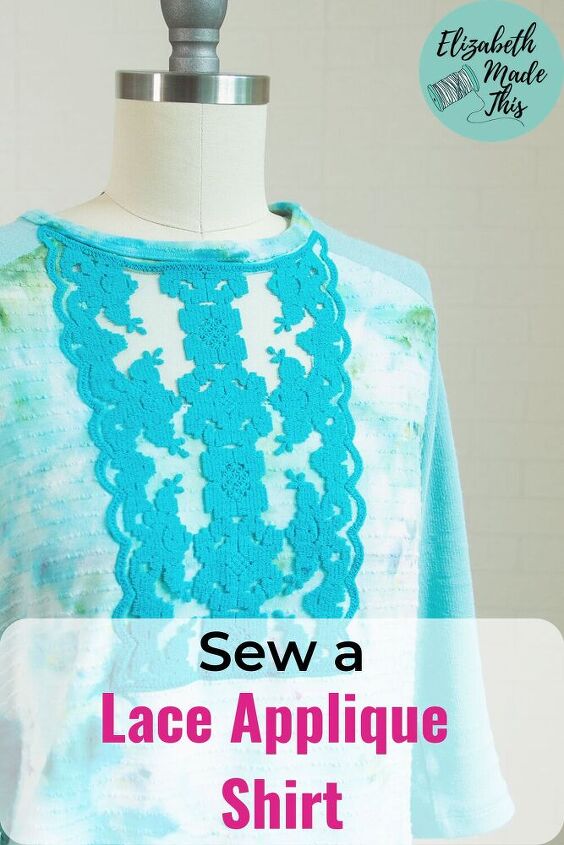
Sew a Lace Applique Shirt
Oh the hours I’ve spent searching for lace appliques on Etsy! I love love love lace appliques, and today I’m showing you how to make your own lace applique shirt.
There’s lots of choose your own adventure moments here: if you start with a t-shirt from your closet, you’ve got a great lace refashion project. If you’re in this camp, looking for a quick way to decorate your own shirt, feel free to skip ahead to where we sew on the lace.
For my other hardcore DIY peeps, I’ll be showing you how to make the tee, and then embellish your tee with the lace applique. This is keeping with my raglan tee series, and this variation requires no pattern hacking! And I’m showing you a different t-shirt neck binding technique than in the sew your own raglan post.
Whatever path you choose, you’re going to love the focal point the lace adds to your tee. It’s a great quick win!

Sew a lace applique shirt
- Antique shops: once in a while, you’re find some cool lace here. I have great-great aunts that made pieces by hand, so there’s good odds that other people’s aunts did too.
- Thrift stores: similar to the digs at antique shops, probably more of the doily variety, but worth the hunt if that’s your jam
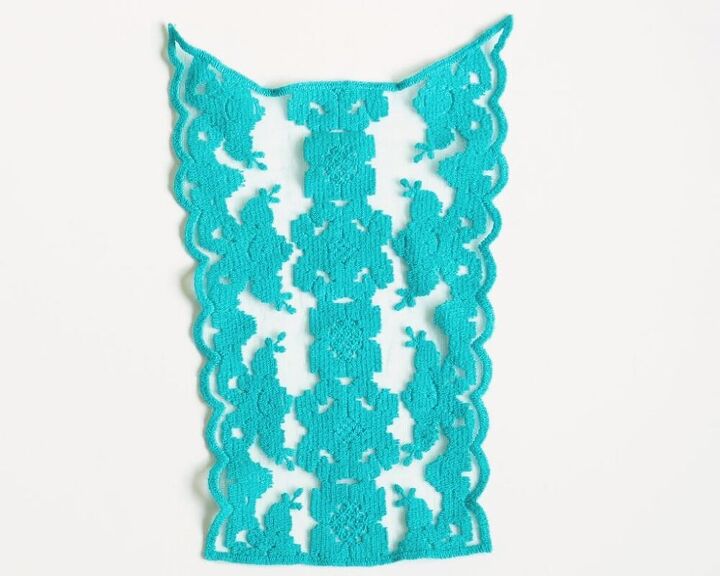
- Trim stores: if you live near a garment district, or you’re traveling to one, you can often find great appliques for $1-2. I found the one I’m using on this project at a trim store that came to a sewing show.
- Etsy: Probably the most reliable place to find good appliques. Search for “lace applique bib” or “lace applique collar” for good matches. Some of my favorite stores: Mary not Martha, Craft Cabaret, One Stop Trims
- t-shirt (use the table of contents to skip ahead to sewing on the lace if you’re going this way)
- Raglan t-shirt pattern (either DIY raglan t-shirt pattern or check out this list for raglan tee patterns for everyone)
- 1 1/4-1 3/4 yards jersey knit fabric (without contrast sleeves) or about 1 yard jersey for the body and 5/8 yard of contrast jersey for sleeves.
- thread to match your shirt, and thread to match your lace applique
Sewing the t-shirt
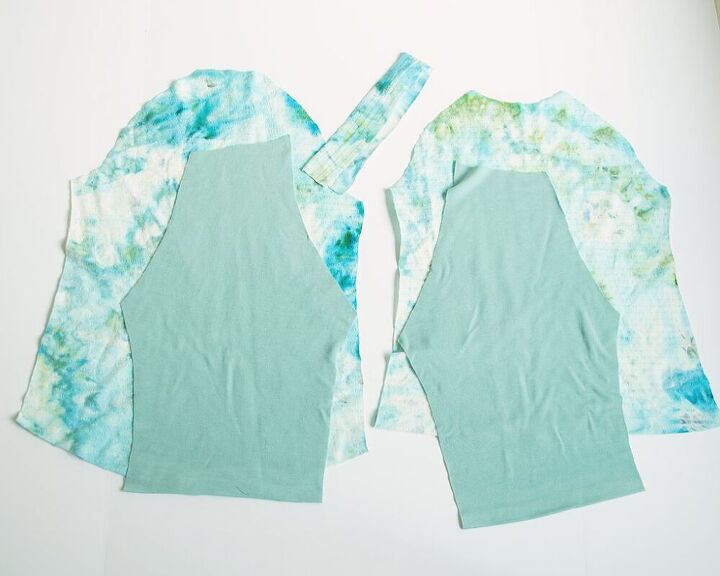
First, cut out your t-shirt pieces. You’ll need a front, a back, 2 sleeves and a neck binding piece.
Next, press up the hems on the sleeves, front, and back. On my pattern, I’m using a 3/4″ hem.
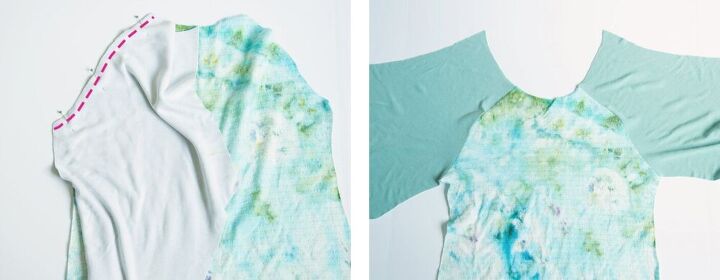
Now we need to sew the front sleeve seams. Pin the front to the front part of the sleeve right sides together.
Stitch the seam. I’m using a 3/8″ seam allowance, but use whatever your pattern calls for. You can either use a serger or a sewing machine fitted with a stretch or ballpoint needle.
Pin and sew the second sleeve to the front.
Press the seams towards the body.

Next pin the right sleeve to the back, right sides together. Stitch the seam, and press it towards the body.
See how the neckline is now open? That’s what we want. Don’t sew the left sleeve to the back! What comes next is one of my favorite ways to sew on the neck binding. It might be one of the easiest to get nice and clean.
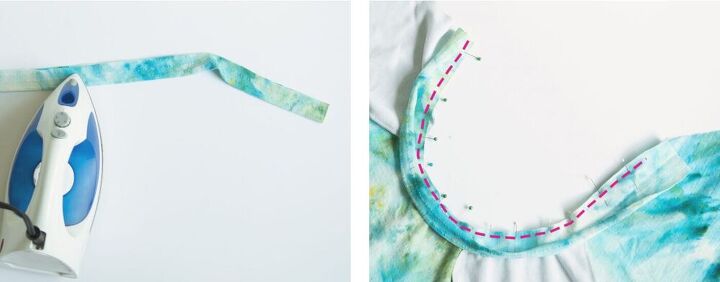
Take your neck binding and fold it in half long ways. Press the fold.
Now unfold it and pin the right side of the binding to the wrong side of the neckline. Stretch the binding slightly as you’re pinning it. Be sure to stretch only the binding and not the t-shirt body.
The binding needs to be slightly shorter than the neck so that it sits close to the body when you wear it. The general wisdom tells you to measure the neckline edge and subtract 10-15% for the neck binding length. In reality, some jerseys need more cut off.
As you’re pinning and stretching the binding, if it feels like your jersey is stretchier, you might have extra leftover. No worries. Just let the extra hang off the end of the neckline. We’ll check it in the next step to get it just right.
Baste and stitch the bindingNext use a long basting stitch to sew the binding to the neckline. It’s a good idea to sew it with a smaller seam allowance than what the pattern calls for here. For example, I’m sewing mine with a 3/8″ seam allowance, so baste at 1/4″.
Look at the neckline on the right side. Are there puckers? If yes, you stretched it too much. In this case, take out the basting stitch, repin a little looser. On the opposite end, does the binding look like it’s standing away from the neck? If yes, take out the basting, and repin, stretching the neck binding a little more.
When you’re satisfied with your neck, stitch the binding to the neckline.
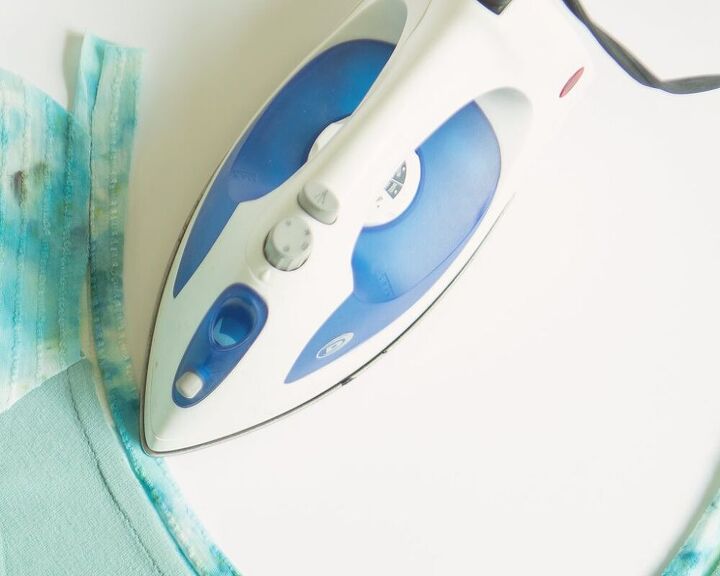
First press the neck seam towards the binding. Now, fold the raw edge of the binding towards the seam so that they meet. Press the fold.
Wrap the pressed edge of the binding so that it covers the stitching line on the right side of the t-shirt.
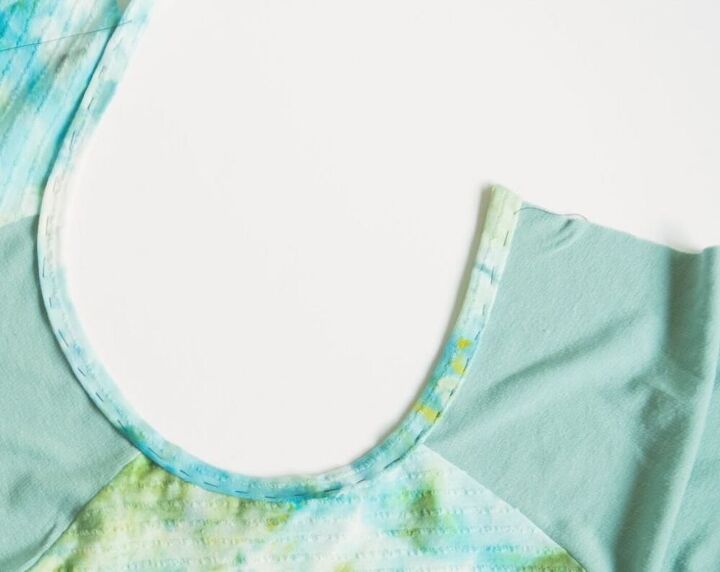
Pin the binding in place or hand baste it. To finish this step, sew the binding to the t-shirt close to that pressed edge. I used my coverstitch here, but you can also use your sewing machine with a narrow zigzag (0.5mm width, 2.5mm length). Take out any basting stitches if you used them. Also cut off any extra binding if you had extra.
Finally on to the left sleeve seam! Match the left sleeve seam to the back piece, right sides together and pin.
Next, sew the left sleeve seam. This will make the seam in the neck binding at the same time. It’s a good idea to baste that intersection where the top and the bottom of the neck binding meets before you stitch the seam.
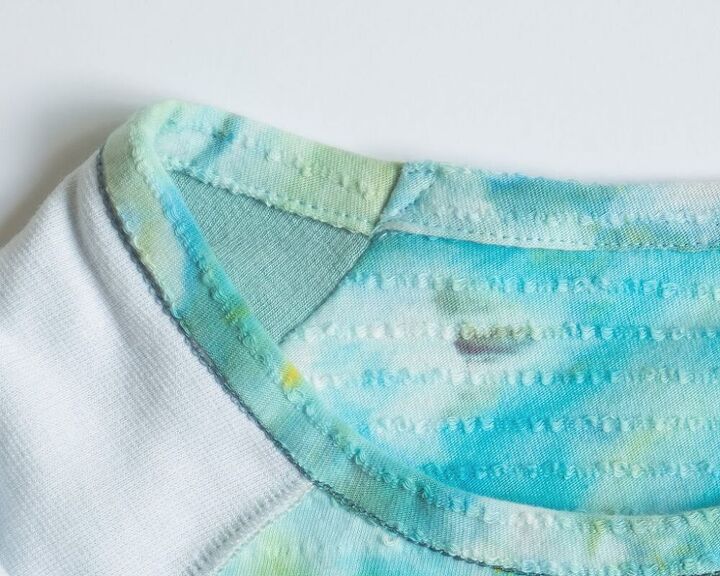
Stitch from the bottom of the neck binding up to the top edge at an angle with a narrow zigzag, backstitching when you start and finish. This will look like a tiny number 7. This extra stitching will help keep the seam flat so it doesn’t bother your neck. We’re almost done with the tee!
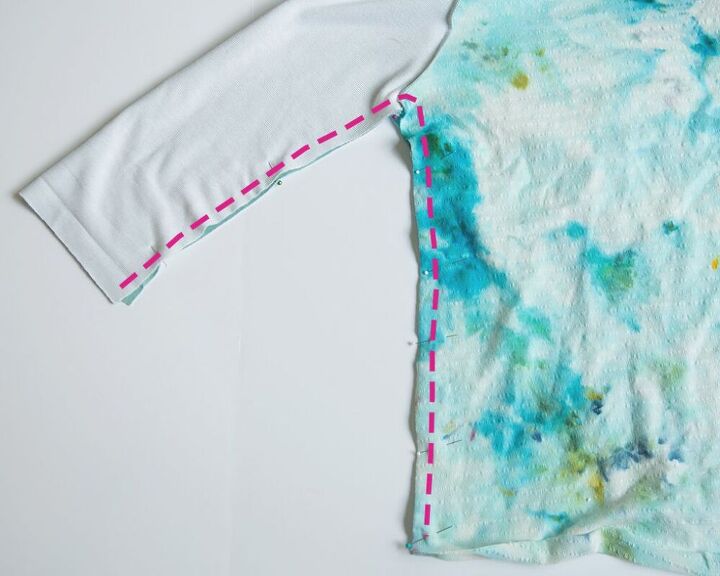
Last seams to sew! Fold the t-shirt right sides together, matching the underarm of the sleeve and front and backs together.
Sew the side seams and underarm seam in one long seam. If you like, baste the intersection of the underarm first so it’s just right. Press the seams.
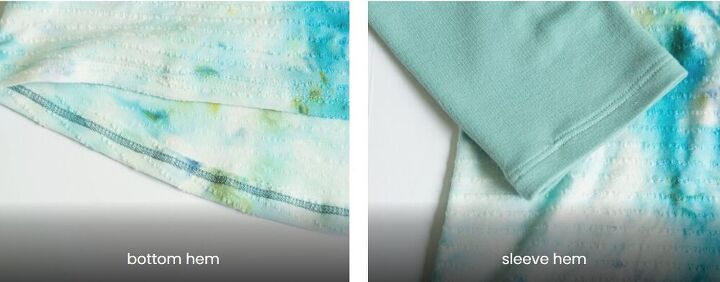
To finish off the t-shirt, fold your hems that you pressed earlier to the wrong side.
Stitch the sleeve hems and the bottom hem. Again, I’m using my coverstitch. If you don’t have a coverstitch, use a stretch double needle and a narrow zigzag. Now the t-shirt is finished, and it’s time to add the lace applique.
Sewing the lace applique to the t-shirt
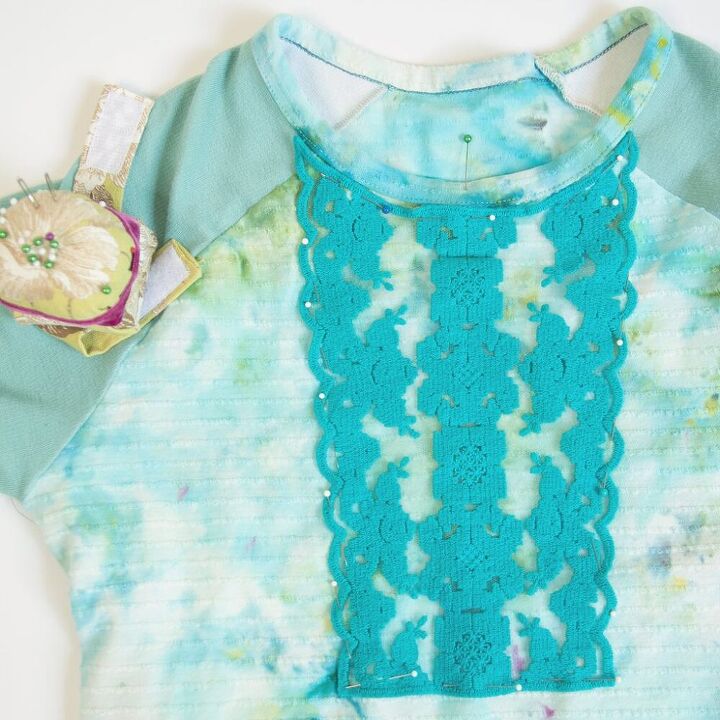
First mark the center front of your neckline. You can eyeball it or be more precise by folding the front sleeve seams together. Mark the center front with a pin.
Next fold the neckline of the applique in half at the top and mark the center front. My applique has a really obvious center front line, but yours might not. Either way, match the center front of the applique to the center front of your t-shirt.
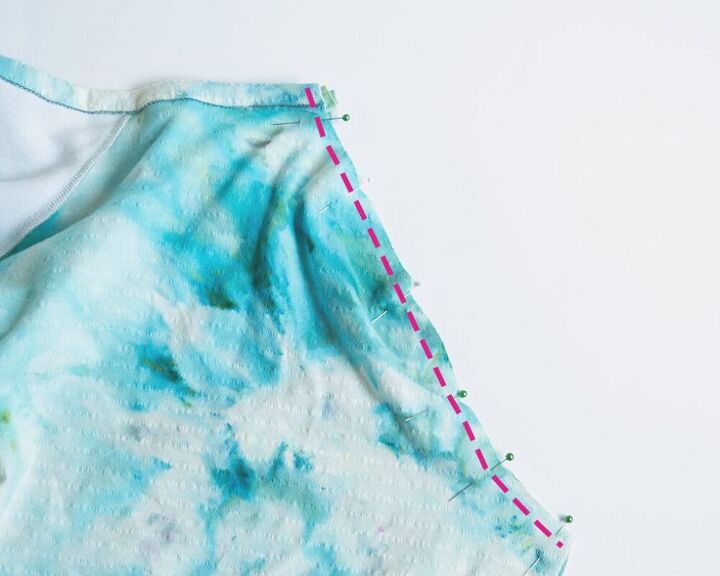
Pin the applique to the t-shirt all the way around.
Change thread if your applique is a different color than the t-shirt to the thread that matches the lace applique.
Set your sewing machine to a zigzag with a 2.0mm width and 1.5mm length. Stitch down the edge of the applique, keeping your stitches on the applique as much as you can. The zigzag will catch the t-shirt underneath no matter what, but if the the “zig” is on the lace but the “zag” goes off the edge, it’ll look a little less clean.
At this point, you’re done, but you can take it one more optional, but awesome step as I say! Here’s the shirt without the next step:

Lace has sheer parts and not sheer parts. If you want to play that up (and you should because it’s cool!), let’s keep going and finish this off a fun way.
Put on your t-shirt and figure out the lowest point you’re comfortable with exposing. For me, it’s down a couple inches from the neckline. Mark that spot with a pin.

Stitch from the top edge of the applique down to that point that you marked, following the lace motifs. Your goal is to see as little of that stitching as you can, so do your best to stitch right on top of the patterned parts of the lace.
When you get to that low point, stitch back up to the top edge of the lace applique’s neckline. Make sure to keep following the edges of the lace’s patterns.
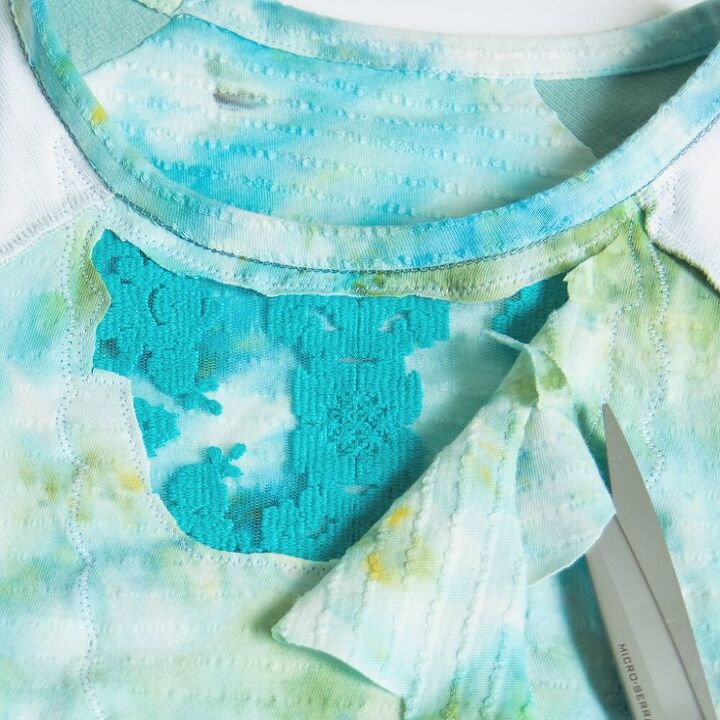
To finish it, turn the whole t-shirt to the wrong side. With your fingers, pinch the jersey away from the lace. Start cutting away the jersey inside the stitching lines you just made at the top of the lace applique. Keep your hand in between the jersey and the applique so you don’t accidentally cut the lace.
The jersey won’t fray, and since you sewed along the motifs, you won’t see it from the right side, so there’s no need to finish the cut edges. Now you can admire the new sheer section of your top!
So that’s all there is to decorating your t-shirt with lace. This is a super easy lace embellishment project, and hopefully, it’ll get you loving on lace appliques!
The author may collect a small share of sales from the links on this page.


Comments
Join the conversation
U GOT IT GIRL. BEST PLACE TO SHOP FOR APPLICAES IS 1/2 PRICE DAY AT S A. FLICK THRU ALL THE SHIRTS & SKIRTS FOR LACE &FLOUNCE FABRICS.