Make This Stunning Shirred Midi Dress Without a Pattern!

Midi dresses are a lovely example of a classic clothing item that never goes out of fashion. I put a fun twist on this timeless item with a shirred bodice. You will absolutely love the result of this shirred midi dress- it’s flowy, unique, and feminine! So, join me as I show you how to make a shirred midi dress with puff sleeves, complete with all the tips and tricks to pull off this stunning look. Let’s get started!
Tools and materials:
- Fabric
- Thread
- Elastic thread
- 1.5 cm elastic thread
- Scissors
- Sewing machine
- Measuring tape
Take your measurements
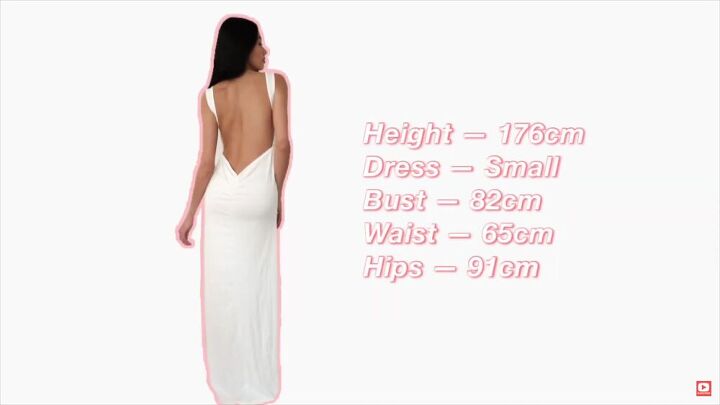
Before we get started with all the pattern pieces, be sure to take the following measurements as shown in the image above. You’ll need your height, bust, waist, arm, and hip measurements.
Make the puff sleeves
For the sleeves, measure out on your fabric the width and length of your arm and mark this on your fabric. Mine was 60cm wide and 65 cm in length. Cut two pieces.
For the armholes, place the two fabric pieces on top of each other, go down 12cm and make a mark. Then, make a 5cm mark on top. Connect the two marks and cut. Be sure to do this on the other side, too.
Now, zigzag stitch the upper and lower edges.
Fold the upper and lower edges by 2cm and pin. Then, sew the folded edges with a zigzag stitch.
Insert your elastic through the upper tunnel. The length of the shoulder elastic is 36cm; it is my armpit’s circumference plus the arm that measures 22cm. These measurements may vary so be sure to measure yourself. Also, add elastic to the bottom tunnel.
Sew the sides of the tunnel to secure the elastic in place. Then, fold the sleeve right sides together and sew along the raw edge; first with a straight stitch and then with a zigzag stitch.
TIP-
Before you sew the elastic, make sure it’s not twisted in the tunnel.
Make the main DIY shirred midi dress
For the main body, fold your fabric with the wrong sides facing. Measure your desired width; mine is 130cm and the length at 109cm. Again, these measurements vary between everyone so be sure to take your own measurements. The width is your bust measurement x 1.5. You can also round off the number to make it easier to work with.
Also, since the fabric is folded, only measure half of your width. Once you’re satisfied, cut out the pattern.
Make a mark at 10cm and another at 5cm. Connect the dots and cut. Repeat this for the other side.
Fold the top part by about ½ a cm and fold again. Sew the fold with a straight stitch.
From the top of your dress, measure 22cm down; this will be where the last shirring line will be.
Then, measure from the top till the 22cm line in half-inch increments. Make dotted lines throughout the width of the bodice so you have a clear guideline while shirring this area. Do this on the front and back pieces.
Make the shirred bodice
Change your thread to an elastic one, and then sew each line with a straight stitch. Make sure your fabric is right side facing up. Continue shirring until you reach the last line. Can you see how beautifully this easy shirred midi dress is coming together?
TIP-
Be sure to backstitch at the beginning and the end of each shirred line.
Assemble the shirred midi dress
Layer your dress with right sides facing and pin the side seams, all the way down.
Sew the side seams with a straight stitch and then a zigzag stitch.
Pin the sleeves to the main body. Align the seams first, and then the rest. Pin all around, as shown. Repeat this with the second sleeve on the other side of the shirred mini dress.
Sew the sleeves to the armholes with a straight stitch and then a zigzag stitch.
Lastly, double fold the bottom of this stunning shirred midi dress and hem all around.
Yeah! That’s it- We are done! What do you think of this exquisite shirred midi dress? It’s definitely unique and can be worn for a lovely formal occasion as well as a casual lunch date. It is so comfortable and flowy. Thank you for joining me and I hope you enjoyed this shirred midi dress tutorial. Until next time, bye!
Enjoyed the project?
Suggested materials:
- Fabric
- Thread
- Elastic thread
- Scissors
- Sewing machine
- Measuring tape
The author may collect a small share of sales from the links on this page.





Comments
Join the conversation
Do you use elastic thread both top and bottom?
It’s beautiful But I’m confused by how much arm to see to the body? Any help appreciated x