How to Sew a Dress Without a Pattern {make This Stylish, Flattering, A

Do you like fun, easy and fast sewing projects? Then this tutorial on how to sew a dress without a pattern is for you so you can enjoy the creative part of sewing without all the hard work of cutting the pattern, fitting the pattern, sewing collars, hems, zippers, buttonholes, whatever…
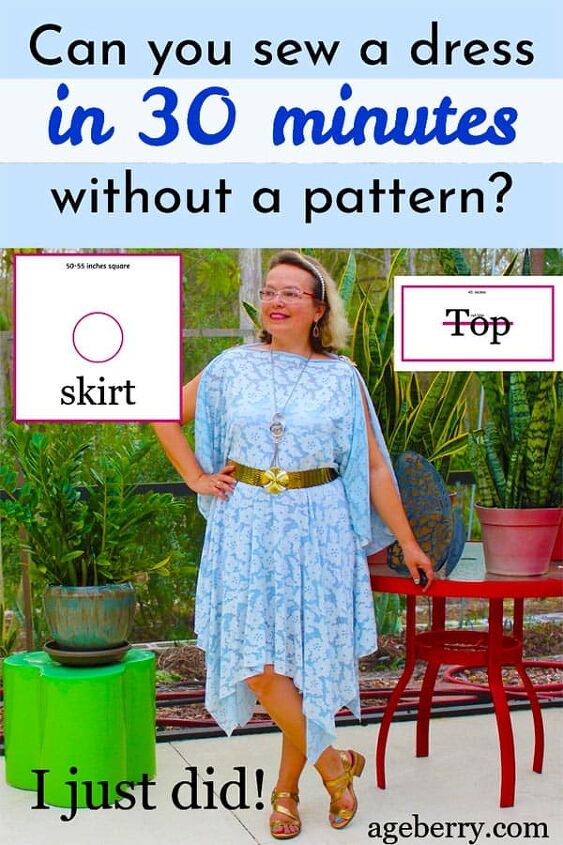
All you have to do to make this stylish flattering dress is cut the fabric – one square and one rectangle and sew only one seam.
No pattern required, we will mark all necessary lines right on the fabric. Super simple. You could literally make this dress in 30 minutes. And the best part is that the dress is ideal for all figure types and you don’t need to spend time fitting or tailoring it.
Attention! If you like the video format, at the bottom of this post, look for a YouTube video version where there is a step-by-step tutorial on how to sew a dress without a pattern. For a more complete picture, I recommend exploring both versions.
Note: Some of the links on this page are affiliate links. This means I will receive a commission if you order a product through one of my links. I only recommend products I believe in and use myself.
Carefully choose fabric for the dress because 90 % of your success depends on it.
I recommend using only stretch knit jersey fabric because the cut edges of this kind of knit fabric don’t unravel and they curl when stretched. It has to be lightweight and 60-inch wide.
I used a blend of cotton and polyester for this project. I don’t recommend using rayon because it’s very stretchable usually and not as stable as necessary for the project. Avoid thicker knit fabrics if you don’t want any bulk around your hips. Avoid stripes, plaids, one-way prints, and fabric with big prints.
Sewing knit fabrics may seem challenging but it’s not difficult at all if you follow some guidelines. I advise you to read this book
Tilly and the Buttons: Stretch!: Make Yourself Comfortable Sewing with Knit Fabrics
✅ Related tutorial: Free Arm Sewing Machine: Do I Need One?
You will need approximately 3 yards of 60-inch wide fabric.
Coordinating threads (see below what threads I recommend)
Rotary cutter and self-healing mat (optional)
Sewing machine or Serger
Regular sewing tools (like pins, needles, scissors, etc.)
Does it make sense – SQUARE circle skirt? Apparently, it does, look at the dress and you will see it IS a square circle skirt, really.
For the bottom of the dress, we are going to make a circle skirt. I know, I know, there are hundreds of tutorials on how to make a circle skirt. Bear with me, I have my own way to make it. So below is my own circle skirt tutorial, see steps 1- 4.
We will start by cutting a square from our 60” knit fabric.
For this, place the fabric right sides together with the selvages aligned and cut the raw edge straight. You will need a large table for this. If you have problems cutting the edge straight check out my popular video tutorial How to cut fabric perfectly straight.
Measure the cut edge, mark about the same distance on the folded edge and fold the fabric again along that line. Cut the other edge. Now you have a square of folded fabric and it has four layers, two folded sides, and two open sides.
You can cut fabric with sewing shears but it’s better to cut using a rotary cutter because we are not going to finish raw edges of this dress (the knit fabric doesn’t fray) and they have to be cut without any small ripples. The rotary cutter produces a much smoother edge.
✅ Related tutorial: Rotary cutter tips and tricks
For this measure your waist and divide it by 4. Mine waist number is 34” (oops, I am obviously not a model) so I divide it by 4 and the result is 8.5 “. And that’s all the math you need.
Now take your flexible measuring tape, find 8.5 “ mark on it and place it like on the fabric like you see in the video below – make kind of a quarter of a circle with the tape. You don’t have to be very precise, really. Find the approximate radius of the circle this way. Mine was around 6”. Subtract 1” from this number – it will be 5”.
Draw a waistline using this number (5” for me) as the radius. Don’t make the waistline equal your waist measurements with stretchable knit fabric – it will be way too big for the skirt because it stretches out a lot. Also, you don’t need to be very precise with your measurements: with the knit fabric you have room for some errors, half an inch more or less doesn’t really make a big difference.
Use a measuring tape and a marking pen to draw your waistline (actually it’s a quarter of your waistline, remember?). Measure and mark the radius from the folded corner of your fabric and then connect the marks by hand drawing.
Step 3.
Of course, we can make a round hem line on the circle skirt but this can create a big problem with the hem. Knit fabric may stretch not equally on all sides and you may end up with a wavy hemline after wearing the dress. The magnitude of this stretching can vary from half an inch to 2” or even more along the hem line and will depend on the type of fabric: its density, thickness, composition, structure, etc.
It’s not easy to make the round hem properly. So, do you really need it? Let’s keep it square, much easier!
Cut the waistline and make 4 small notches (2 at the center front and back and 2 for each side). The notches will have the same distance between them, they are equally spaced. These notches will help you to line up the skirt with the top.
Step 5.
The top is made from a rectangle of fabric.
The length of the rectangle is around 45” for any size.
And the width? Measure yourself from shoulder to waist and subtract 1” from this number. For example, my measurement is 16” so my number for the top is 15”. Multiply this number by 2. That’s the width of our rectangle.
Fold it in half lengthwise and make sure all the edges match and they are as smooth as possible (cut them with a rotary cutter also).
Now let’s cut the waistline on this piece of fabric.
Clip the folded corner (a point on the center fold line) – this will be the center front and the center back of the top. Measure a quarter of the waist measurement (for me it was 8.5”, see it up on the page) and mark these points to the left and to the right from the clipped center. These points are our sides. Cut the fabric between these points along the folded line.
Pin the top to the skirt. Start with matching 4 notches on each piece. First pin the center front, then the center back and then pin both sides of the dress. There is no difference between front and back though.
✅ Related tutorial: Types of sewing pins and their uses: all you need to know about straight pins for sewing
Be especially careful on the sides. It has to go like this ( see the image below ). The allowances for the seam are about 1 cm (⅜ “).
I decided to baste the pieces because it seemed to me that pinning was not enough.
I prefer to use my serger for sewing knits. So, if you have a serger use it to make the seam. I think 4 thread overlock stitch is perfect for this dress. I like that I can get one-step professional finish for my garments using my serger.
If you don’t have a serger and you are serious about sewing you can get one through my affiliate links.
This Brother serger is for beginners mostly. It’s quite cheap but works well and does what it suppose to do – cut, sew, finish in one quick pass.
And this JUKI serger is more expensive but it has many more useful features and creative possibilities with this serger are practically endless.
But if you don’t have the serger, then use your regular sewing machine.
But I strongly advise you to use thread called Eloflex – it’s first ever stretchable thread for regular sewing machines, you can sew knits with it without a serger and use the thread in upper threading and in the bobbin. I have a review of this thread on my blog “ How to use Eloflex – an innovative stretchable sewing thread from Coats”.
Use just a regular straight stitch of the sewing machine with Eloflex thread.
✅ Related tutorial: Stretch thread for sewing
If you don’t have Eloflex, then use a narrow zigzag stitch to provide the necessary stretch.
That’s all for sewing. Now let’s put it on.
I used two brooch pins for keeping the dress on my shoulders.
You see that brooches created a boatneck opening for the dress. I think it looks nice, right?
Now let’s make it even nicer and hide the raw edges.
For this, stretch the fabric and you will see that the raw edges curl – I think this is better than finishing the raw edge with the sewing machine.
Also, I recommend using a belt around your waistline to hide the plain seam and make your waist look smaller.
I think this dress that I made without a pattern looks pretty and it was so fast and fun to make. It took me less than an hour. This is a super simple project that even a beginner sewist can make without worrying about patterns.
So I decided to make another one just to see how it will go with different fabric (the orange fabric is cotton knit jersey).
This is just a basic dress sewing tutorial. But we can embellish the dress and there are endless possibilities to add some flair to the dress, right? Simple embellishments can turn ordinary garments into something extra-special. I would like to hear your ideas. Trims? Embroidery? Applique? Fabric flowers? Interesting cuts? Share your thoughts in the comments below.
So here is my YouTube video. Check this out if you like to see how to sew a dress without a pattern instead of read…
Did you find this page helpful? If so, save this pin (see below) on your sewing board so you can come to this tutorial later when you are ready to sew a dress without a pattern and follow me on Pinterest for more tips, tutorials, and inspiration!
Ready to take the next step in your sewing journey? Check out more step-by-step tutorials from my blog and don’t forget to share!
Enjoyed the project?
The author may collect a small share of sales from the links on this page.


Comments
Join the conversation
love it! I can't wear sleeveless at work, but I think a few grommets and some cording down the arms would make sleeves ;)
This pattern is so adaptable. I'm saving this one. Thank you!