Cute and Easy Front Twist Hairstyle Tutorial

In this tutorial, I’m going to show you how to do this simple and quick front twist hair look.
I have short hair, but this look can work on medium-length and long hair too. Let’s get started.
Tools and materials:
- Bobby pins

1. Part your hair
Start with a deep side part. This is a part where most of the hair is on one side.

2. Twist the section
Take a small section of hair from the part and twist it back.

3. Pin it to your head
Lay the twisted section against your head. Place the twist inside the open bobby pin, then slide the bobby pin in towards the hair.

4. Create a second twist and combine it with the first
Twist a second section of the same size and place it over the first section to create a v-shape.
Slide the bobby pin up towards the part. The two bobby pins will interlock so it’s secure.

5. Repeat
Repeat steps 2-4 all up the side of your hair. You can do as many twists as you want, whether they’re small sections or thicker sections.

Create twists along the hairline and pull them back so they meet in a similar space.
As you go down, they’ll line up nicely.
If any of the twists don’t feel secure, go back in with a couple more bobby pins.

6. Hide the bobby pins
Take the hair behind where the twists end and use it to cover up the interlocking bobby pins.

7. Twist the side
For the other side of my hair, I created only three twists since there wasn’t as much hair and I let the hair beneath it lay flat.
Cover the bobby pins with your hair.

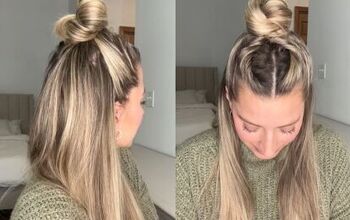
Front twist hairstyle
Here’s the finished twist updo! I love the hair twist in front, and it gives you a lot of room to style the back whether you keep it straight or add some texture.
Let me know if you try out this hairstyle below!
Next, check out my Quick and Easy Double Dutch Braid Bun Tutorial.
The author may collect a small share of sales from the links on this page.


Comments
Join the conversation