Fun and Easy DIY Tote Bag Tutorial

I am so excited to share this DIY tote bag project with you.
Bags seem to be one thing you can never have enough of. This tote bag is great for carrying around your necessities and whatever else you want.
Pick out a fabric you love and get creative with this super fun DIY.
Tools and materials:
- Fabric
- Lining
- Scissors
- Ruler or measuring tape
- Pins
- Sewing machine or needle and thread
1. Bag handle
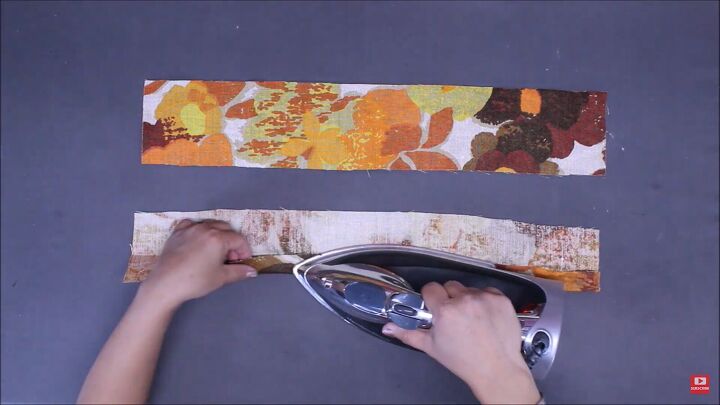
Cut two pieces of fabric measuring 4 by 22 inches. Take the first piece of fabric and fold it in half lengthwise. Iron it to keep it in place.
Open it again and fold ¼ in lengthwise towards the center fold and iron it down. Then fold and iron the other side as well.
Now fold the fabric in half lengthwise and iron it. Repeat these steps on the second strip of fabric.
Sew a straight stitch along the length of both sides on both handles.
2. Sew the handles onto the lining
Cut one piece of fabric measuring 20 by 26 inches. Fold it in half lengthwise to find the center and mark it with a pin on both sides.
Place the handle 4 inches out from the center. Pin each end of the handle facing in, four inches out from the center.
Do the same with the second handle on the opposite side. Sew the handles in place.
Take a strip of fabric measuring 2 by 20 inches and sew it along the edge with the handle, right side facing in.
Take another strip of fabric with the same measurement and do the same on the opposite side.
Then fold the flap of fabric back up and topstitch the strip and the lining.
3. Inside pocket
For the inside pocket, cut a piece of fabric measuring 12 by 14 inches.
Fold it in half with the right sides facing in and sew along the edges to close it.
Leave a few inches open at the top to turn it right side out after sewing.
Fold the pocket in half to find the center. Then fold the length of the bag in half to find its center. Place the pocket in the center 4 inches down from the top.
Place the opening of the pocket facing the bottom of the bag. Then sew the sides and bottom of the pocket down to the bag.
4. Outer fabric
Cut the outer piece of fabric to be 20 by 28.5 inches. Fold the handle in and place the outer piece with the right sides facing along the top edge of the bag.
Pin it in place and then sew. Repeat these steps on the opposite side of the bag.
Now place the top borders of the bag in the center so that the lining is on one side and the outer piece on the other, and pin along the open edges.
Measure 4 inches across and three inches down along both corners of the outer piece.
Mark and cut those corners out. Do the same to the corners of the lining.
5. Closing it all up
Mark and pin a 5-inch opening along the edge of one side of the lining. Now sew the edges leaving the 5-inch opening.
Take the corner of the lining that is next to the opening and open it so that the bottom edge faces the side edge. Pin and sew it closed and do the same on the opposite corner.
Then repeat these steps to fold and sew the corners of the outer fabric as well.
Use that 5-inch opening to turn the bag right side out. Then with the lining still out of the bag, sew up those last 5 inches.
Push the lining into the bag and sew a top stitch around the top edge of the bag.
Then sew the straps down on the inside of the bag.
DIY tote bag
Now you’re all finished and you have a beautiful and convenient homemade bag with a lining and an inner pocket.
What a fun and easy way to get creative and make something super practical. I hope you enjoyed this project.
Leave me a comment and let me know how your bag came out.
Next, learn How to Upcycle Pants Into a Cute Tote.
Enjoyed the project?
Suggested materials:
- Fabric
- Lining
- Scissors
- Ruler or measuring tape
- Pins
- Sewing machine or needle and thread
The author may collect a small share of sales from the links on this page.


Comments
Join the conversation