How to Easily Make Alterations to Pants in 5 Different Ways

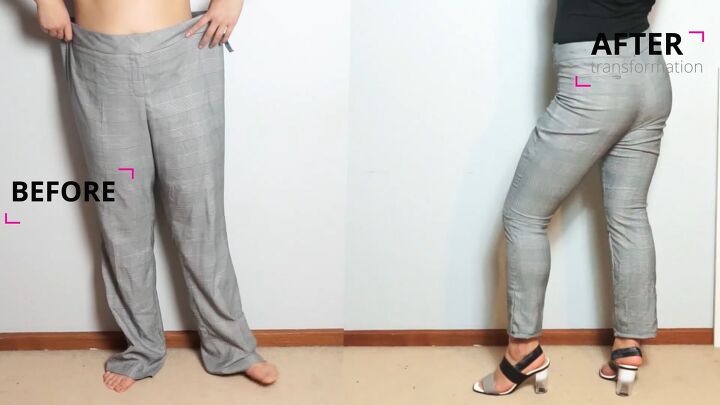
Has this ever happened to you? You buy pants and the color, style, fabric, and price point are perfect but they need alterations. They’re too long, too wide at the waist, or the crotch or the waist doesn’t fit properly. This tutorial will teach you how to make alterations to pants, so they fit you just right!
Tools and materials:
- Serger or overlock machine
- Sewing machine
- Marking chalk
- Pins
- Scissors
- Webbing
- Bias binding
- Elastic
- Measuring tape or ruler
- Iron
- Needle and thread
How to alter pants that are too big
This happens far too often where the pants fit great on the butt but need taking in at the top and shortening by the legs. Here’s how to alter them.
1. Take in the pants
Pin the side seams at the waistband until it fits, then continue pinning down the side seams.
Pin the inside seams as well.
Pin the cuffs upward to the desired length.
2. Cut the pants
It’s time to cut the excess fabric. Begin with the outside seams. Cut each outside seam separately going through the waistband.
Cut the inside seams out following the pins, leaving at least ½ inch or 1.5 cm for seam allowance.
Cut the cuffs off below the pinned line.
3. Sew the pants
Turn the pants inside out. Sew the outside seams using a straight stitch. Then, sew the inner seams. Overlock or serge all the raw edges.
Trim the hems at the bottom so they are even. Fold up and fold up once again to ½ inch or 1.5 cm and overlock in place to ensure a neat finish. Iron the pants for a professional look.
How to alter pants to a bigger size
This happens when pants shrink or they just need to be a bit bigger. This tutorial is done on shorts, but you can use this technique to alter pants to a bigger size.
1. Cut the shorts
Cut open the side seams from the waistband all the way down to the end. Denim is very thick, so cut more vigorously than with other fabrics.
Keep the crotch attached.
2. Expand the shorts
I use red webbing to expand the shorts. Measure the amounts needed for the right and left sides of the shorts. Cut the webbing a bit longer than the shorts.
Attach bias binding to the webbing at the short end to give a nice clean finish.
Sew the bias down at ⅙ of an inch or 0.5 cm and fold it over again, enveloping the frayed ends of the webbing, and sew it at ⅙ of an inch or 0.5 cm on the other side. Do this to the other 3 ends of the webbing.
Attach the webbing to the shorts. Edgestitch it all the way up and repeat on the other side of the webbing. Do it for both sides. Fold in the top edge so it’s hidden on either side.
Looks so cute and fits so much better!
How to alter pants at the waist
This is how to alter pants at the waist and add a raw edge at the cuff.
1. Adjust the waistband
Pinch the waist at the back. Pin it to the desired measurement. Mark the spot. Remove the pin.
Cut at the mark and then cut the other side,
Remove the center seam.
Sew up the back of the jeans with a ¼ inch or 1 cm seam allowance.
Overlock the back seam to clean any raw edges and secure the seam.
2. Adjust the cuffs
Fold the cuffs upward to the desired length.
Cut them. Then, pin in place and turn the right side out. Pin it on the right side. Cut across the cuffs.
Use the fingers to create a ragged edge and frayed look. Repeat on the other leg.
How fabulous do these jeans look now?
How to alter pants legs
These pants are super cool and have great features like pockets and zippers that I don’t want to disturb.
1. Shorten the pants
Pin the pants at the bottom to the desired length.
Cut the excess off. Use the first removed cuff as the pattern for the other leg.
Measure elastic around the ankle. Mark the spot and then cut the elastic.
Sew the elastic together to create a loop for each ankle.
Insert the elastic at the bottom of the leg.
Fold the fabric over the elastic and hem in place for an elasticized hem.
How to alter pants at the waist (example 2)
1. Take in the pants
Pin in place at the back to get a better fit. Take the pants off.
Cut the side seams down all the way down the leg of the pants. Remove the center seam. Repeat on the other side.
Once they are both cut, pin them in place and sew them with a ¼ inch or 1 cm seam allowance. Overlock or serge the edges to conceal any raw or frayed edges.
How to make alterations to pants
Thank you so much for watching this tutorial to alter pants on your own! Though it may seem a bit challenging at first, you see how simple it is to learn how to make alterations to pants. Please let me know in the comments if you tried any of these techniques!
Enjoyed the project?
Suggested materials:
- Serger or overlock machine
- Sewing machine
- Marking chalk
- Pins
- Scissors
- Webbing
- Bias binding
- Elastic
- Measuring tape or ruler
- Iron
- Needle and thread
The author may collect a small share of sales from the links on this page.


Comments
Join the conversation