How To Make Zero Waste Pajama Shorts
We know you've been spending a lot of time home, at least more than usual. That's why we wanted to teach you how to make some comfy shorts! They are easy to do, perfect for the summer + they are zero waste! What's not to like?
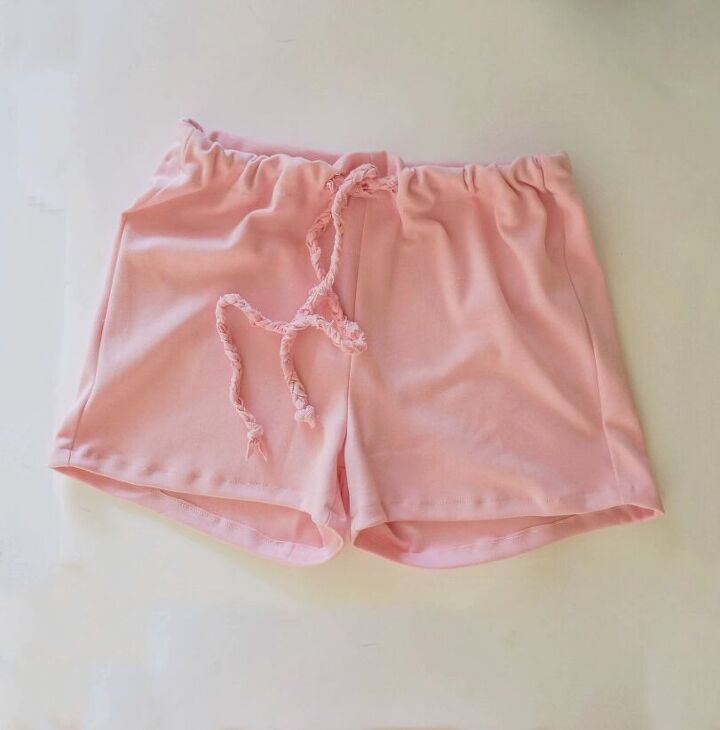
Why are they zero waste? Because a lot of pajama shorts have elastics on them and elastics are not biodegradable. In fact, they won't degrade until a hundred years or more have passed. We are not using elastic, but we will still have an adjustable waist created by a lace made of fabric waste. And yes, I'm talking about the same waste that we'll get from cutting the parts of our shorts in this tutorial. It took me two days to finish them, dedicating only 1 hour per day. Which means it took me like 2 hours to make a pair of shorts that I will be using for days now! I used some fabric I already had home from the days I owned a fashion business. It's a pink interlock, a knitted thick fabric with amazing quality. This post is not sponsored, but I will leave you the link to where you can get the exact same fabric I used —In case you want to order it—. I've been purchasing their fabrics for a while and they have a lot of colors and different fabrics. They are certified organic cotton and their quality never disappoints.
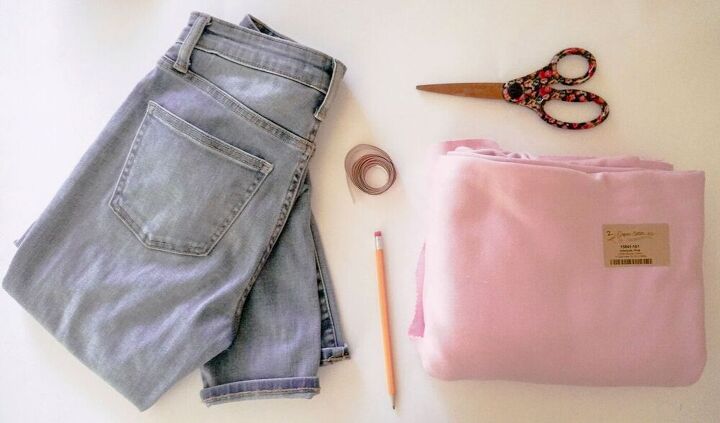
What do I need to make my own zero waste shorts?
- 50 cm of Interlock or Jersey fabric. (I used this organic cotton interlock)
- Some pants that fit you perfectly. (Avoid baggy pants or leggings)
- Scissors.
- A pencil or chalk.
- A ruler or measuring tape.
- Sewing machine.
- Thread of the same or similar color to the fabric.
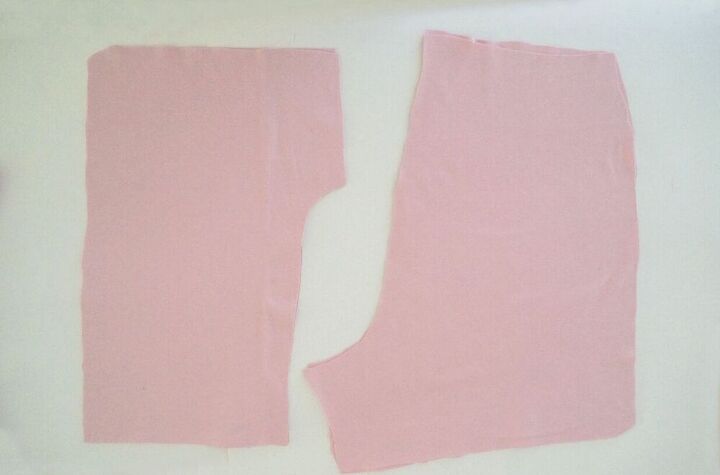
Your pants will work as your sewing pattern. We don't have time to measure ourselves so, this is faster and easy. If you want high wasted shorts, make sure your pants are high wasted as well. The same goes if you want mid-rise or lower waste. Use pants with the same rise. Turn your pants inside out —this way we'll get a more exact pattern—. You'll notice one side is wider than the other and that's because there are two different pieces: the front and the backside. We're going to start with the front side.
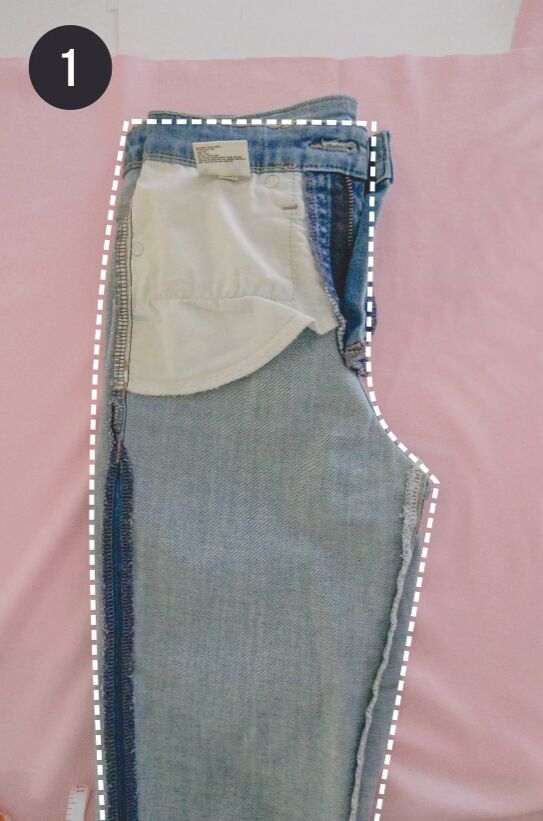
1. Place your pants folded in a way you can see the front part over your fabric —just like I did in the picture—. We need to draw the outline. Trace the pants just as they look.
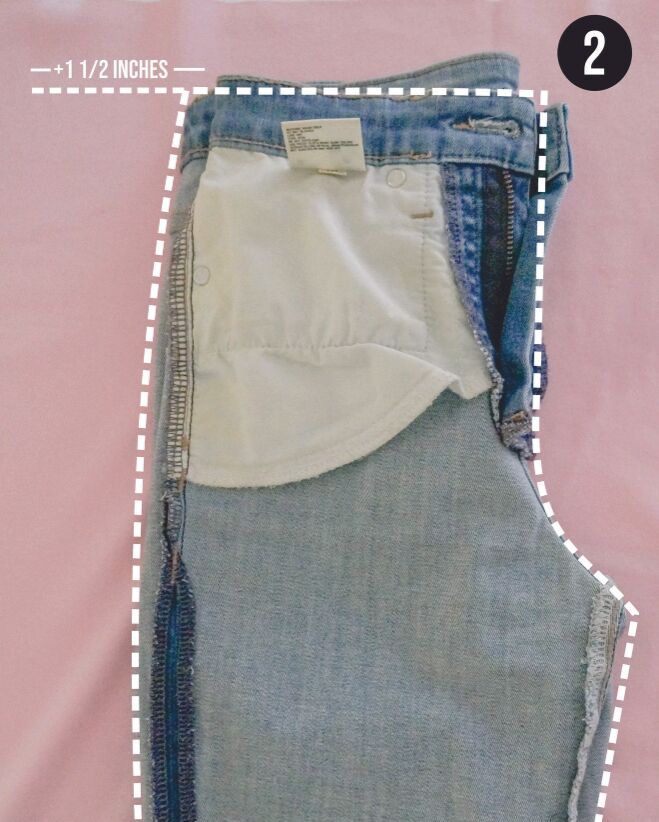
2. We must consider that your pants fit perfectly and we want our shorts to be baggier, so we must add at least one inch to the side of the waist. It's really up to you and how baggy you want your shorts to be. I added 1 1/2 inches.
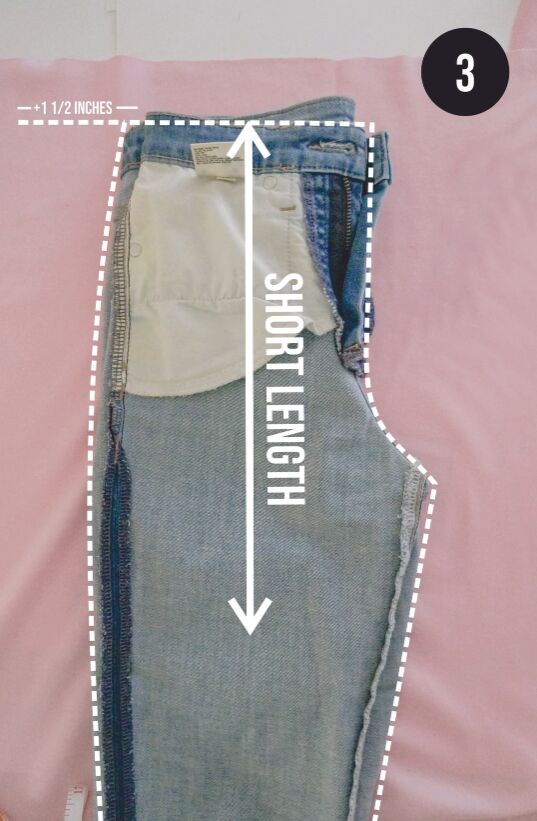
3. Now it's time for you to measure. How long do you want your shorts to be? You can measure yourself and pass the exact number to the pants.
4. Make a mark and add the same inches you added already in the waist and draw a straight line joining the two marks. Keep the inner side of the pattern, untouched.
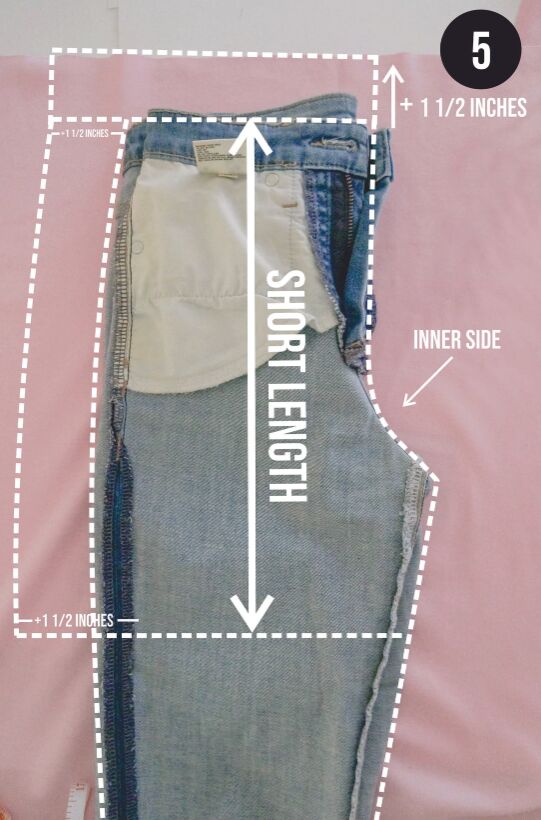
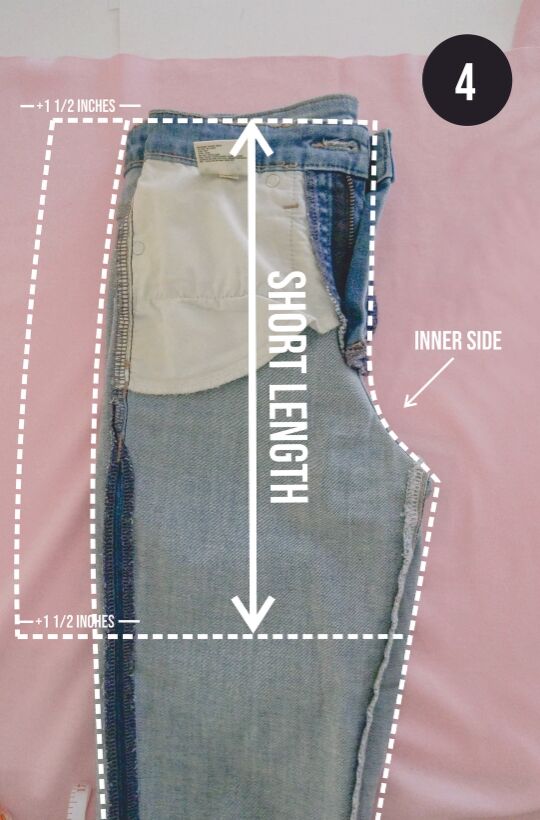
5. Add 1 1/2 to the waist, because we are going to fold it to create an adjustable waist.
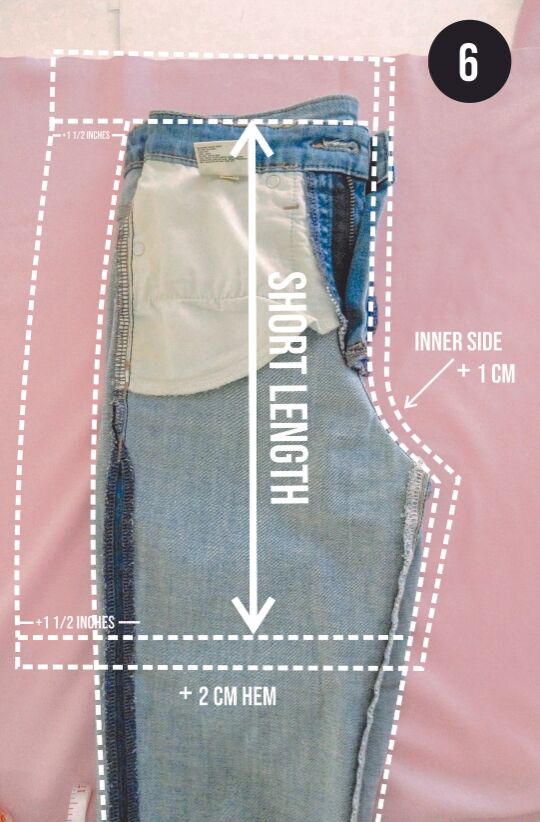
6. Now, we're going to add 1 cm to the inner side of the pattern and 2 cm to the lower, this will be the hem of our shorts.
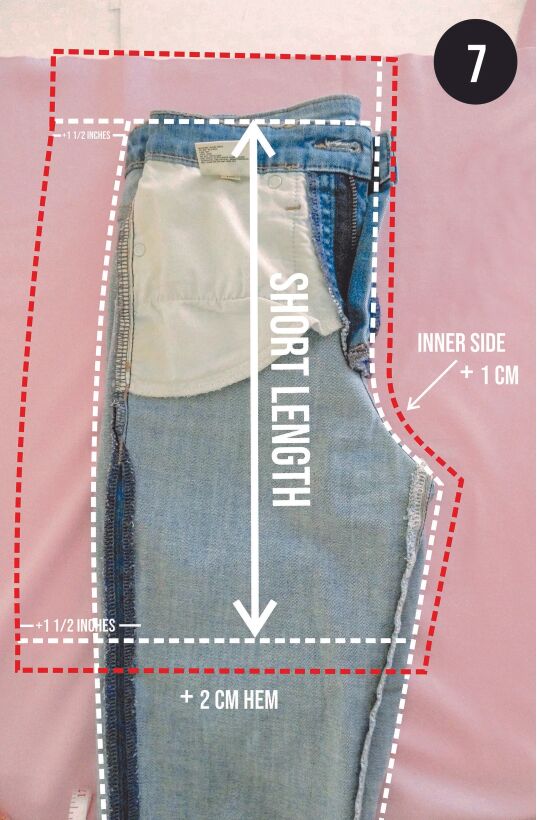
7. Once done, you can cut it. The red border is what you must cut.

1. Again with our pants turned inside out, we'll place them over the fabric and repeat the same first 3 steps that we did on the front side. Draw the contour of the pants.2. Once added the same inches and marked the length of your shorts you're good and ready for the next step.3. The backside of the pants is not exact, so we must add the real measure to the inner part. If you pay attention and unfold your pants a little, you'll see there's a part of the pants we can't unfold completely to draw the exact outline. So, we're going to measure that hidden part.
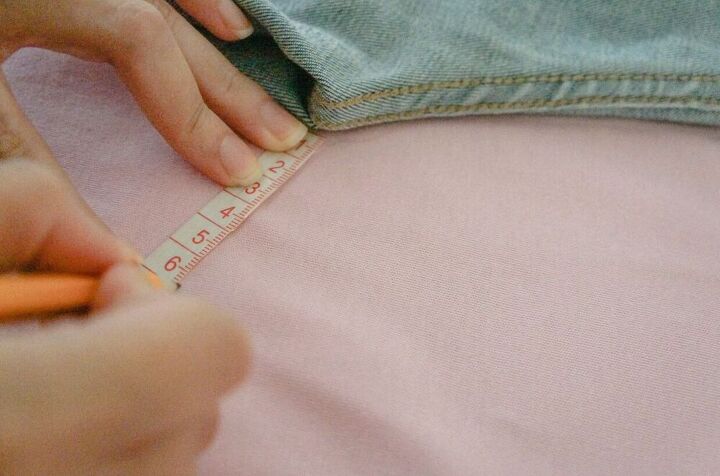
Now, add the same measure to your pattern, just like I did over here.
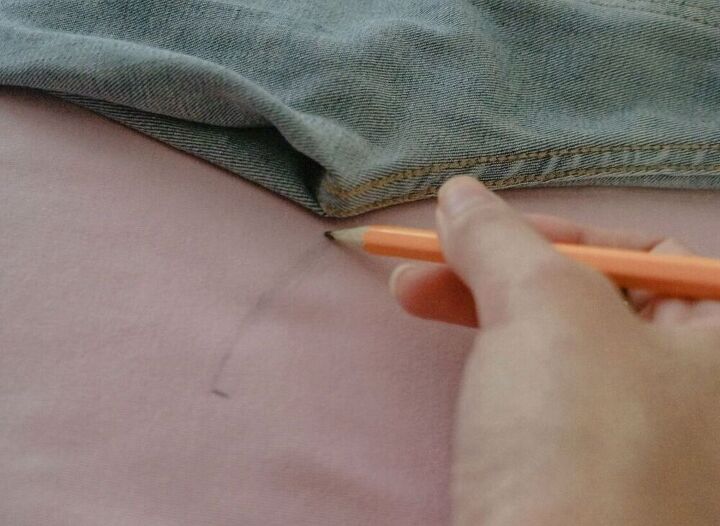
Finally, draw it, but not a straight line. Curve it a little.
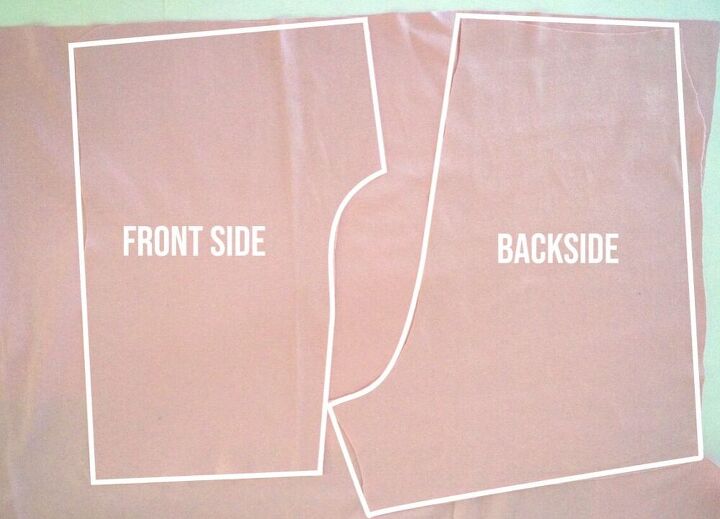
4. Now, we're going to repeat the same thing we did on the 5th step on the front side and add 1 cm to the inner part and the hem. Once done, cut it.5. As you can see, we have two parts now. Each from one side and we need two more, so in order to have two identical parts, we are going to mirror them. Put the side with all the pencil or chalk marks over the fabric. The clean side must be face up. Just like that, you will cut the other two pieces.
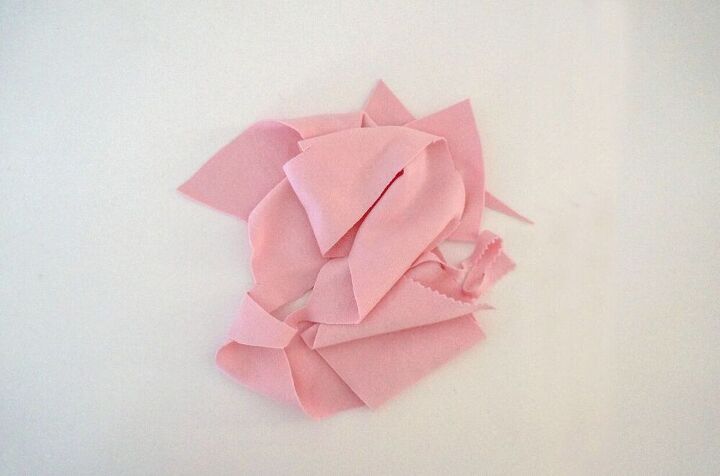
You probably ended with a few small useless looking pieces of fabric... those are the leftovers, so please don't throw it away because we're about to use them.
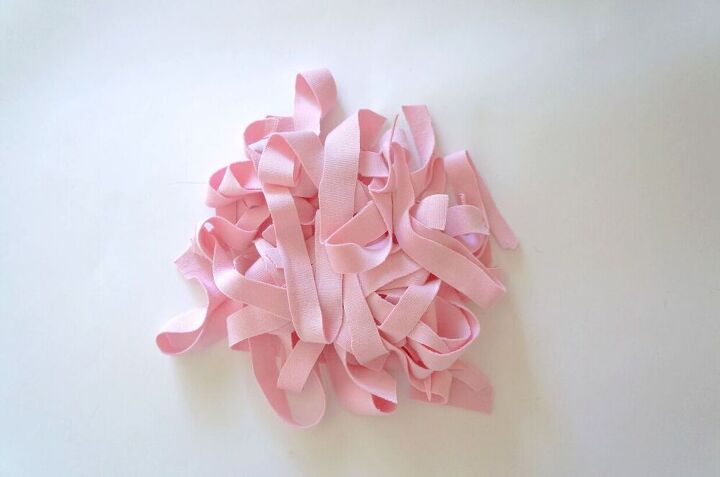
1. Make sure to cut them into small strips. I cut mine about 1/2 inch wide. It's alright if they're not all the exact size, of course, they won't look the same. They also don't have to be perfect, don't worry.
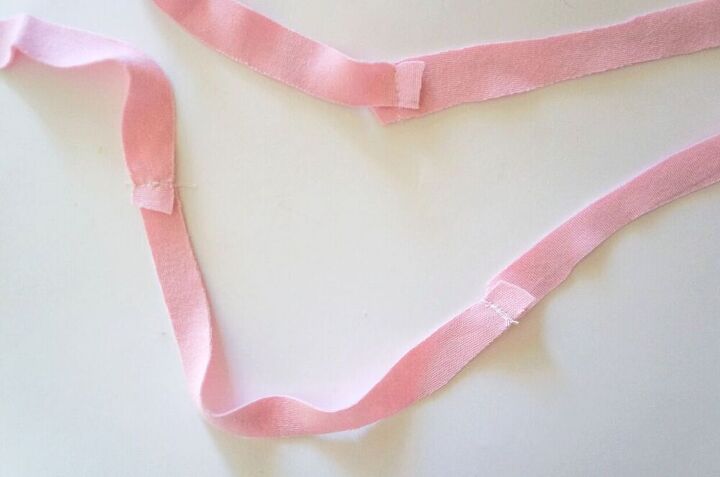
2. Next, we're going to sew them together and create larger strips. —I measured my own waist and added 70 cm to have extra ribbon and be able to knot it on the front, once my shorts are done—.
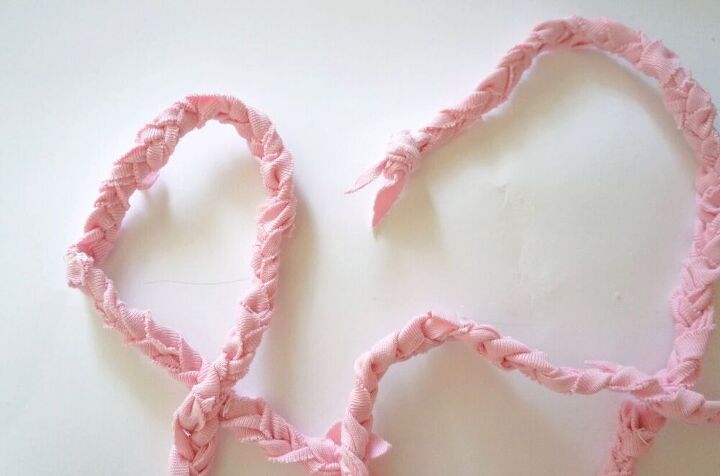
3. Now, we just need to braid them! And that's it, we made our own lace.You can also sew all these pieces together and create a ribbon, but I like how the braided lace looks.
You can use an overlock machine to sew the short and the quality will be even better. However, I know most people don't own one so, we'll use a straight seam. Just make sure to check the tension. I used 4. 1. Let's take our pieces just like they are, together and facing each other —so romantic ♡— and let's sew them by the curve/inner side.
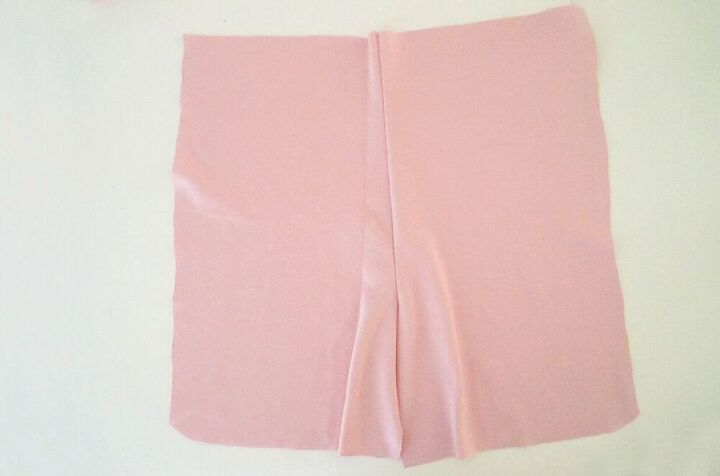
You'll end up with something like this. Do this with both sides.2. Then, expand them until they face each other. You'll notice the backside is wider and that means you made a great job with your patterns.
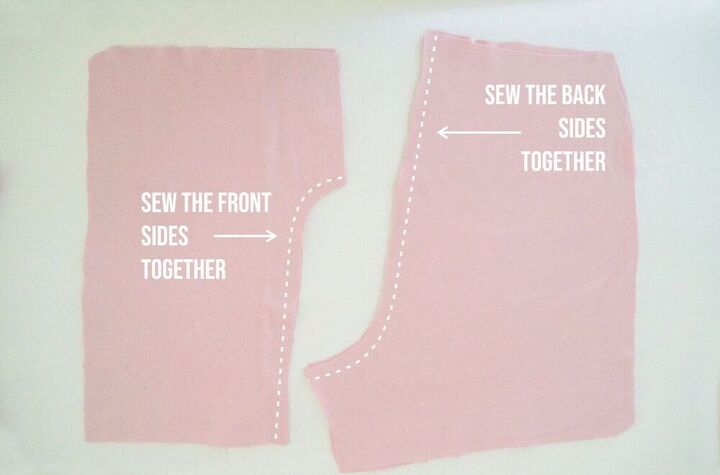
The next thing we'll do is sewing the front and the backside together with the seams facing up.
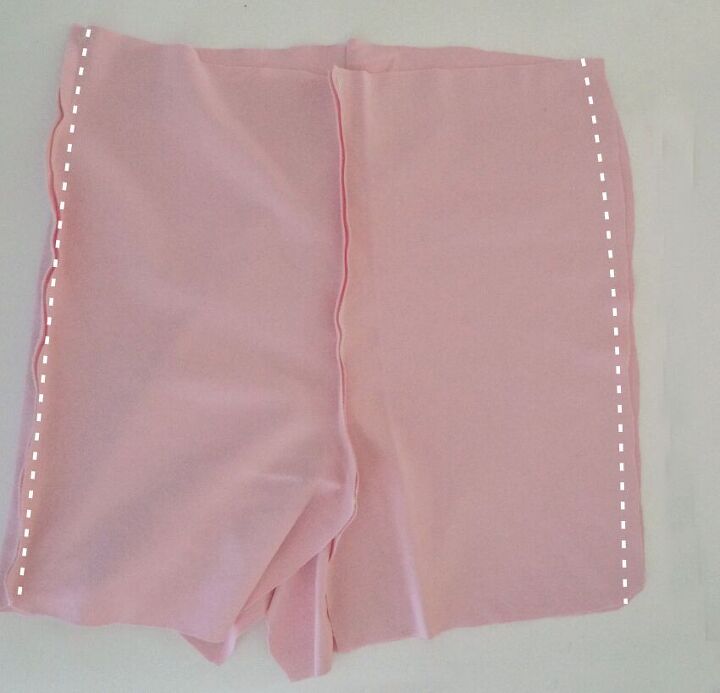
Sew the sides together, just like the lines on the image.
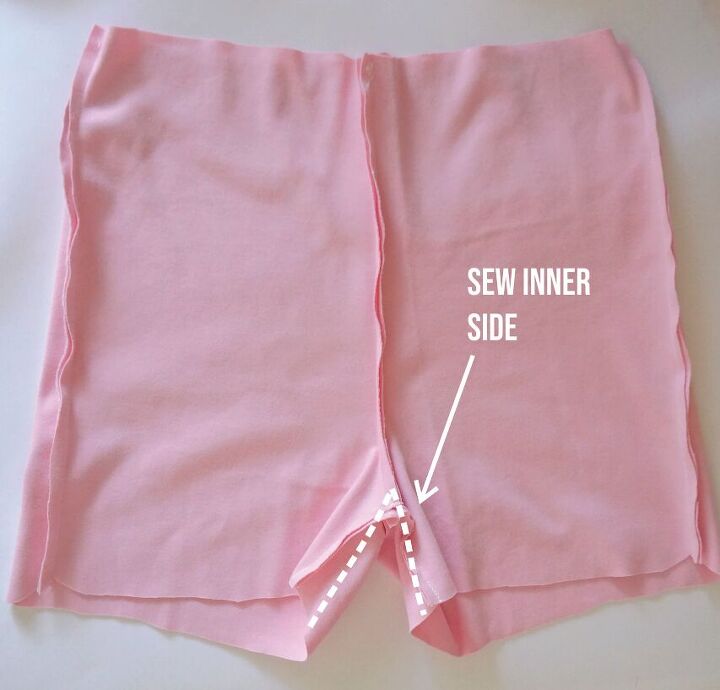
3. Don't forget to sew the inner sides, which will cover the crotch and inner side of the legs. Front and backside together.
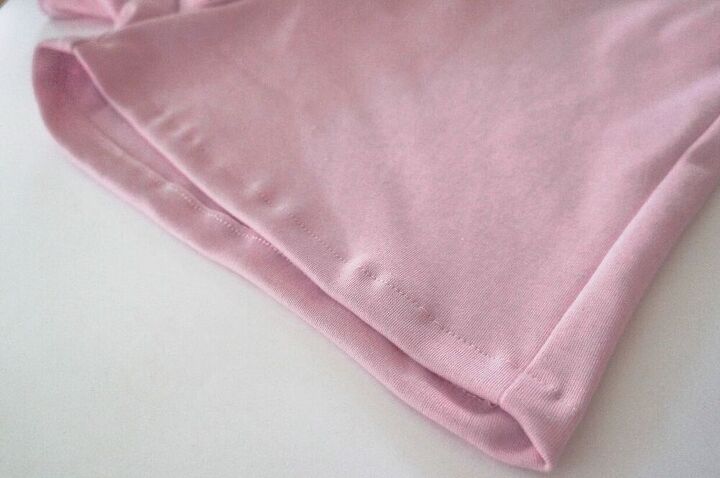
4. Now, for the hem, we are going to fold 2 cm up and sew both legs. You can use a zig-zag stitching or stretch your fabric a little when sewing. This will keep your fabric's elasticity.
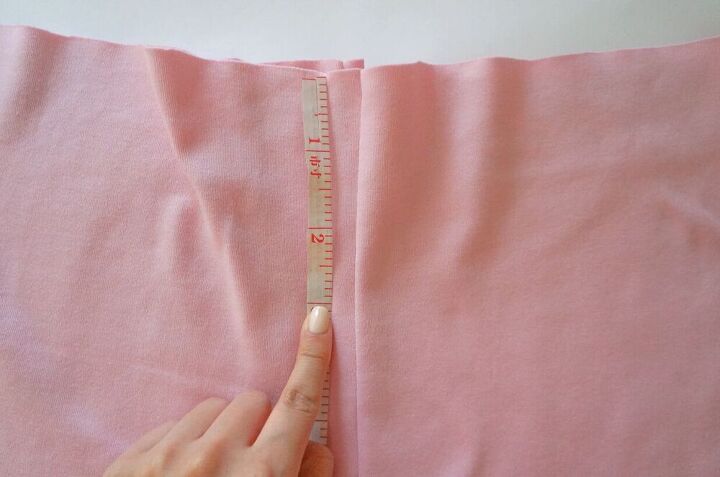
5. Next, we're going back to the waist, specifically to the front side.
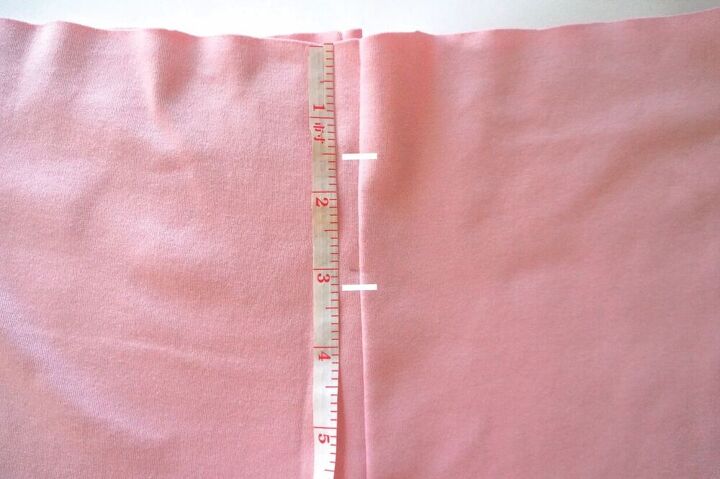
6. Measure the 1 1/2 inches we added before and add another extra 1 2/3 inches. Make a mark for each.
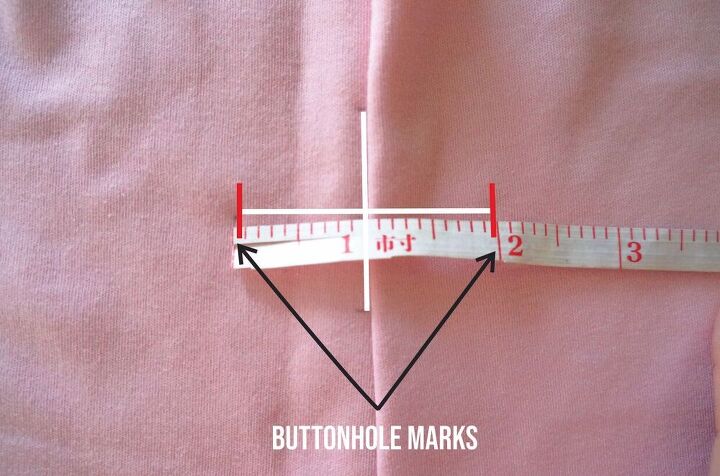
We need to make two buttonholes in the middle. This be can be up to you, but I gave a space of 2 inches between each other. We're going to make another two marks for each buttonhole.For this, you need to divide in half you the 1 2/3 inches we added. Then from that mark, you can divide the space you want in between your buttonholes, like this:
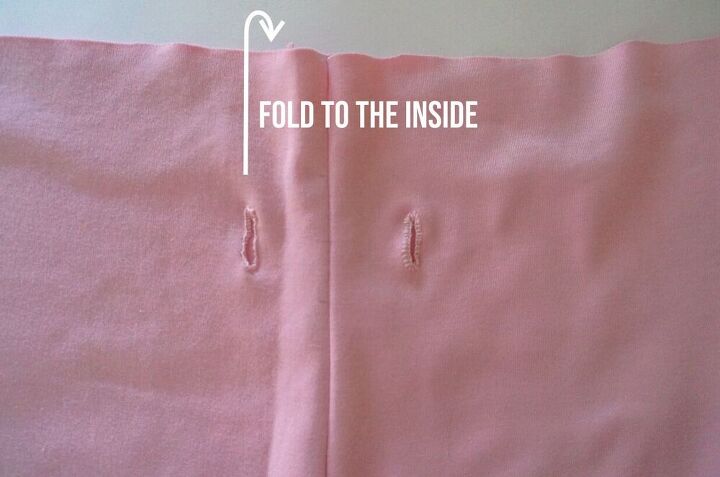
—A lot of sewing machines do this now, so look at your manual to learn how to make them in your machine.— Also, make sure to try it a couple of times in another piece of fabric to avoid ruining your shorts. If you don't have the machine option, you can always make them by hand. Here's a video of how to do them.Make sure to measure the thickness of your cord/lace before you make the buttonhole. Just to make sure it will fit.8. Finally, we just need to sew the waist. Again you can use a zig-zag stitch or stretch your fabric while you sew it.

If you iron it first, I promise you it gets easier, but you can iron it at the end. Ironing is important to make the hem and the waist look more defined and your short's quality will look a lot better just after that.—If you don't have a clothing iron, you can use a hair iron—. Don't forget to place your cord on the waist and we're ready to go!This is the final result! As you can see, they are pretty easy to make. At least, I will be wearing them a lot this quarantine!It only took me 2 hours and the best part is that they're zero waste! Using natural fibers makes them biodegradable and the fabric leftovers were used as well.But... what do I do if I still have fabric leftovers?Don't worry! If they're cotton, linen, or any natural fiber, as I said, they are compostable! Or you can bury them in your garden too and they will biodegrade in a month or less! If you ordered or bought a lot of fabric —like I did— then you can use it for other projects! I hope you enjoyed this tutorial, but mostly, I hope you enjoy your new pair of comfy shorts! Any doubts don't forget to let us know in the comments, we're happy to help! Now tell us, do you enjoy sewing? What do you think of this tutorial? Did you make your shorts already? Let us know!—All the love, Lucy.
The author may collect a small share of sales from the links on this page.


Comments
Join the conversation
You could also "topstitch" just below the top of the shorts before you insert the waist string, so you are sewing thru both thicknesses, to make your "more defined waist." I would think that would last longer than just ironing it. You'd probably want to iron it before you stitch it so it's straight & easier to stitch.
They are adorable! I didn't see the link to your fabric source...