Learn How to Shorten a Lined Skirt With This Tutorial

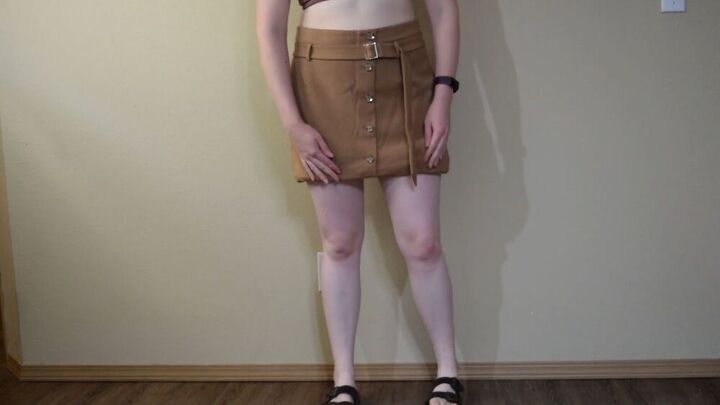
On a recent trip to the thrift store, I found this skirt that was super cute. The color and design were perfect for fall, but the problem was the length. It was a midi skirt, and I felt like that looked awkward on me. So I decided to try refashioning it by shortening it and therefore making it fit better. In this tutorial, I’ll walk you through the process of shortening a skirt, even if it has a lining.
Tools and materials:
- Skirt
- Scissors
- Sewing machine
- Sewing pins
- Fabric chalk
- Ruler
- Measuring tape
- Seam ripper
- Iron
The first thing I needed to do in order to shorten the skirt, was to decide how long I wanted it to be. So I tried on the skirt and folded it up until I was happy with the way it looked. I decided to cut it off at the sixth button so that I’d still have five buttons left.
After I took off the skirt, I laid it down flat on my cutting table. Using some fabric chalk, I counted down to the sixth button and marked the skirt right at the button. I then used my ruler to draw a straight line out from either side of the button. With that done, I flipped over the skirt and drew a straight line in the back, matching it up with the lines in the front. Just to be sure my hem was even, I used a measuring tape to check the distance from the top of the skirt to the lines I drew and made adjustments accordingly.
Now that my cut lines were even, I started cutting the skirt. In this step, though, I only cut the upper layer of fabric and not the lining. Once I got to the button, I used my seam ripper to remove it. I was then able to keep cutting around the top layer of the skirt, again, leaving the lining intact for now.
Since I didn’t cut the lining in the previous step, my top layer was still attached to the skirt. So I smoothed out the lining and cut it below the edge of the top layer to get it out of the way. I then turned the skirt inside out so that I could focus on fixing up the lining. Then, using my measuring tape and ruler, I drew a straight line around the lining at 1” shorter than the edge of the outer layer. Once that was done, I cut along the line that I drew all the way around the skirt. This time I had to make sure to only be cutting through the lining, and not to accidentally cute the outer layer.
In order to hem the edges of the skirt, first I needed to iron them. So I went over to my ironing board and placed my skirt onto it so that the ironing board was essentially inside the skirt. Starting with the lining, I took the edge and folded it ¼” towards the wrong side, then another ¼” towards the wrong side and ironed on the fold. I did this all the way around, pinning the rolled hem in place as I went. Once I was done with the lining, I repeated the same process with the outer layer of the skirt. I then went over to my sewing machine and used a straight stitch to sew down both the hems separately, stitching along the upper folded edge.
That’s it, you guys! How cute is this skirt?! I like it so much better now than when it was that awkward length. I think it’s so cute and perfect for fall. This same principle can be applied to any skirt you want to shorten, so keep that in mind next time you’re thrift shopping and find a skirt that you love except for the length! I’d love to see your refashions, so leave me a picture in the comments!
Enjoyed the project?
Suggested materials:
- Skirt
- Scissors
- Sewing machine
- Sewing pins
- Fabric chalk
- Ruler
- Measuring tape
- Seam ripper
- Iron
The author may collect a small share of sales from the links on this page.


Comments
Join the conversation
So, so cute!