How to Make a Tiered Dress for Any Season

Let’s talk how to make a tiered dress!
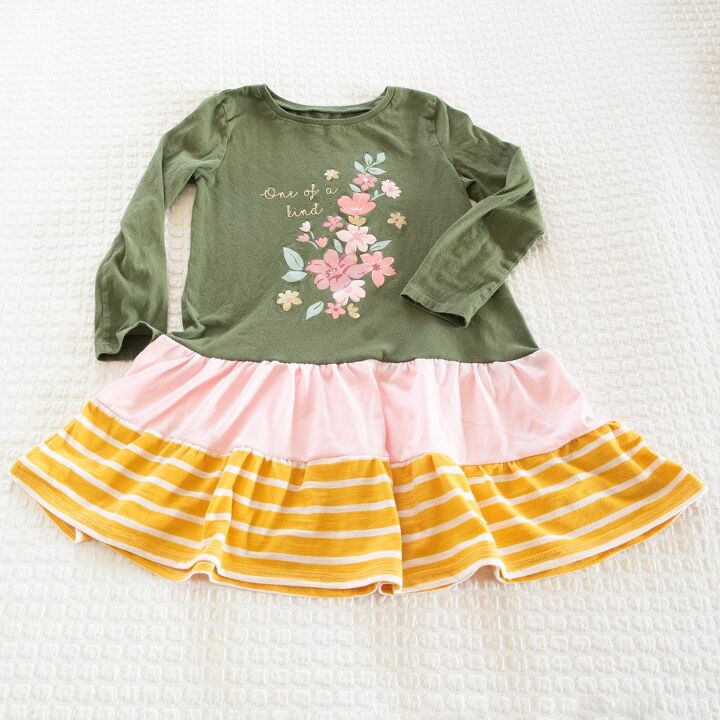
If you have kids, you likely have a stash of t-shirts they’ve outgrown in one direction but not the other. You could donate them or pass them on to a friend, but if they’ve still got some good wear in them, why not turn one into a DIY tiered dress?
So in this post, I’ll show you how to chop up an old tee and give it new life with some fun contrast fabric. I’ll show you step by step how to make a tiered dress, then I’ll give you some ideas of how to adapt your tiered dress making for different seasons.
So rifle through your daughter’s t-shirts and grab a pair of scissors and let’s do this.
What kind of fabric should I use for a DIY tiered dress?
You can make tiered gathered dresses out of wovens or knits. This project will focus on knits. If you’re looking for a fun diy tiered maxi dress, I would check out this pos t.
For this project, I would recommend using:
- t-shirt: cotton or cotton blends are ideal here
- jersey fabric: lightweight and not ultra stretchy–again cotton and cotton blends are a great choice. You can upcycle other t-shirts if you’d like here.
You could go for a rayon spandex for the skirt as well, but choose lighter weight ones. We’ll be adding a lot of fabric to the skirt, and some rayon spandexes are quite physically heavy in large amounts.
elizabethmadethis.com is a participant in the Amazon Services LLC Associates Program, an affiliate advertising program designed to provide a way for websites to earn advertising revenues by advertising and linking toSome of the links below are affiliate links. This means that, at zero cost to you, I will earn an affiliate commission if you click through the link and finalize a purchase.
How to make a tiered dress: Supplies
- 1 T-shirt any size, preferably with a fun graphic you’d like to save.
- 1/4 yard each of 2 different contrast cotton jersey fabrics
- Sewing scissors
- Chalk wheel or fabric marker
- Quilting ruler
- 80/12 universal sewing machine needle
- Stretch double needle
- Pins
- Tape measure
Step by step tutorial for how to make a tiered dress
1. Cutting the t-shirt
First things first, lay out your t-shirt on a flat surface. Next, use your chalk wheel and ruler to draw a straight line across the bottom just above the hem.
If you’d like, you can always make the t-shirt body shorter. Cutting it above the hem will make for a drop waist diy tiered dress. You could also cut it at waist level for a typical t-shirt dress style or just under the base of the armholes for an empire waist.
You’re the designer here, so do what you’d like!
2. Measuring the t-shirt bottom
Next, measure the bottom of your t-shirt.
Multiply this number by 2. You need to do this because you’re only looking at half the total circumference of the bottom of the tee.
Write down this adjusted number.
We’ll use it in a second.
3. Measuring the center back
After this, measure the center back of your t-shirt. Do this by folding the shoulder seams together and measuring straight down the back.
Compare this to the chart I used in how to turn a t-shirt into a dress. We’ll use it again here:
Total center back length for your dress:
2T3456789101112131418.5″21″21.5″23″25.5″28″30″32.5″33.5″34.5″35.5″37″38″
Important: Subtract the length of your t-shirt along center back from the number on the chart.
I’m giving you measurements for 2T-girls 14, but you can of course make this for any size. Just measure your favorite dress at center back and see how long your total length is.
4. Calculating the length of your tiers
This is where this tutorial is different from the t-shirt dress tutorial. Figure out how many tiers you want to make for your dress. Divide the extra length you need by that number.
For my daughter, her t-shirt measures 15″ at center back, and she needs 25.5″ of total length.
I’m adding two tiers, and 25.5-15=10.5.
10.5/2=5.25.
So each of her tiers will be 5.25″, though you could make the bottom one a little longer to accommodate the hem.
I’m adding two tiers, and 25.5-15=10.5. 10.5/2=5.25. So each of her tiers will be 5.25″, though you could make the bottom one a little longer to accommodate the hem.
These are highly adjustable and forgiving math problems here!
5. Calculating the width of the tiers
Remember that width number of the t-shirt I had you write down in step 2? We’re using it here.
For your 1st tier, multiply the number by 2. This means this tier will be two times as wide as the bottom of the t-shirt
For the 2nd tier, multiply the number by 2.5.
If you want more tiers, just add .5 to your next multiplier (so the next would be 3, 3.5 etc). I wouldn’t go past 4 tiers because you might end up manhandling a ton of fabric before too long, but if you want to make a diy tiered maxi dress, that might be the look you’re going for.
Here’s a jiffy chart for you to keep track of everything:
Skirt total length (divide by how many tiers you want)T-shirt bottom width
Width of tier #1 (x2 of t-shirt bottom width)Width of tier #2 (x2.5 of t-shirt bottom width)
Math is over, let’s cut some extra fabric.
6. Cutting the tiers
You’ve already got your t-shirt cut.
Cut out your tiers to equal the height and width you calculated earlier. Use your ruler and chalk/fabric marker to draw the rectangles on the fabric and cut away.
If you don’t have enough width in your fabric to equal the width you calculated, simply cut 2 pieces that equal that width. There’s plenty of ease in this pattern to accommodate the extra seam you’ll need, so don’t worry at all if you need to cut 2 pieces vs. 1.
Now we’re ready to sew!
7. Sew the tier ends together
Set your machine for a narrow zigzag stitch: 0.5mm width, 2.5 mm length.
Put the ends of each tier right sides together. Sew the short ends of the tiers together with a 3/8″ seam allowance.
Press open the seams.
8. Press up the hem
Press up the raw edge on the bottom tier by 3/4″ Since I’m using a striped knit, I’m using the stripe as a guide. You can always use one of my favorite tools here, the Clover Hot Hemmer which makes easy accurate work of pressing hems.
9. Gather the bottom tier
Set your machine to it’s longest stitch setting. Divide the tier into quarters first using pins and the seams.
Sew across the top of the tier, near the edge. When you get to a new quarter marking, pull out the thread and stitch to the next quarter mark.
This might seem redundant and tedious, but this will make gathering and pinning easier later.
From here, pull on the bobbin thread from quarter point to quarter point. Gather up the fabric and distribute the gathers evenly.
You’ll notice it’s MUCH easier to make your gathers even when you’re only doing a quarter of the total circumference of the tier at a time.
Repeat for the rest of the tier.
10. Sew the bottom tier to the top tier
From here, pin the gathered edge of the bottom tier to the top tier with right sides together.
Fuss a little here with the gathers, tightening or loosening them up so that the top tier’s fabric stays smooth between the quarter marks.
Switch your machine back to the narrow zigzag stitch.
Sewing with the top tier on top, stitch the bottom tier to the top tier with a 3/8″ seam allowance.
Press the gathers, then remove the gathering threads.
11. Sewing the t-shirt to the tiered skirt
Mark the center back and center front of the t-shirt with pins. Do this by folding the side seams together.
Gather the top of the top tier just like you did for the bottom tier.
Pin the top tier to the t-shirt, matching the quarter marks and with right sides together.
Sewing with the t-shirt on top, stitch the top tier to the t-shirt with a 3/8″ seam allowance.
Press the gathers, then remove the gathering threads.
12. Hemming your DIY tiered dress
To finish up, use a double needle and a narrow zigzag stitch to sew your pressed hem around the bottom of your tiered dress.
I’m using my coverstitch here, but the double needle is great, and you can use a single needle with a narrow zigzag too!
How to mix up your DIY tiered dresses for different seasons
- For Summer: use a tank top as your t-shirt top and burnout knits for the skirt.
- For Fall and Winter: Use a sweatshirt for the top with lighterweight lace knits for the skirt, and wear it over leggings!
- For Spring: Use a long-sleeved tee as your top, and sew up the tired skirt from shirting fabrics.
And that’s how simple it is to make a DIY tiered dress.
Prep Time
20 minutes
Active Time
1 hour
Total Time
1 hour 20 minutes
Difficulty
Easy
Materials
- t-shirt
- 1/4 yards each of 2 contrast cotton jersey fabrics
Tools
- fabric scissors
- chalk or fabric marker
- quilting ruler
- 80/12 universal sewing needle
- stretch double needle
- pins
- tape measure
Instructions
- Cut off the t-shirt above the hem.
- Measure the bottom of the t-shirt and multiply this number x2. Save this number.
- Measure the center back of the t-shirt by folding together the shoulder seams and measuring down the center back fold. Subtract this number from the total length you want your dress to be. Not sure how long to make it? Measure the center back of your favorite dress for reference, or use the chart in the post for a good idea of where to start.
- Divide the adjusted length measurement from step 3 by how many tiers you want to sew. So if you need 20" total length and you want to make 2 tiers, that's 10" each.
- Multiply the width from step two by 2 for the top tier, 2.5 for the second tier, 3 for a third tier and so on. I wouldn't go beyond 4 tiers unless you really love working with tons of fabric!
- Cut tiers from your contrast jersey fabrics the dimensions you calculated in steps 4 and 5. If you need to cut 2 pieces of a tier to get to the width you need, that's totally okay.
- Place the right sides of the tier ends together and sew together the short ends with a 3/8" seam with your machine set on a narrow zigzag stitch (0.5mm width, 2.5mm length). Press open the seams.
- Press up a 3/4" hem allowance on the bottom tier.
- Sew a long gathering stitch around the top of the bottom tier. Pull on the bobbin threads to gather up the fabric. Adjust the gathers so that they're as even as possible.
- Pin the bottom tier to the top tier with the right sides together. Sew the two tiers together with a 3/8" seam allowance and a narrow zigzag stitch. Press the seam towards the skirt.
- Gather the top of the top tier just like you did with the bottom tier. Pin the tiered skirt to the bottom of the t-shirt, adjusting the gathers to fit. Sew the t-shirt to the skirt with a 3/8" seam allowance. Press the seam towards the skirt.
- Use a twin stretch needle to hem the bottom tier to finish off your lovely DIY tiered dress!
Recommended Products
As an Amazon Associate and member of other affiliate programs, I earn from qualifying purchases.
Enjoyed the project?
The author may collect a small share of sales from the links on this page.








Comments
Join the conversation