The Easiest Maxi Dress You’ll Ever Sew!

Maxi dresses are so chic and classic. They may seem complicated to sew, but I assure you, this is not the case. I’m going to show you how to make a maxi dress without having to buy a maxi dress pattern either. It’s simple and even fun to create. Grab a lovely printed fabric, and let’s get to it!
Tools and materials:
- Fabric for dress
- Satin fabric for bow and necktie
- Scissors
- Pins/clips
- Marker/chalk
- Sewing machine
Measure yourself
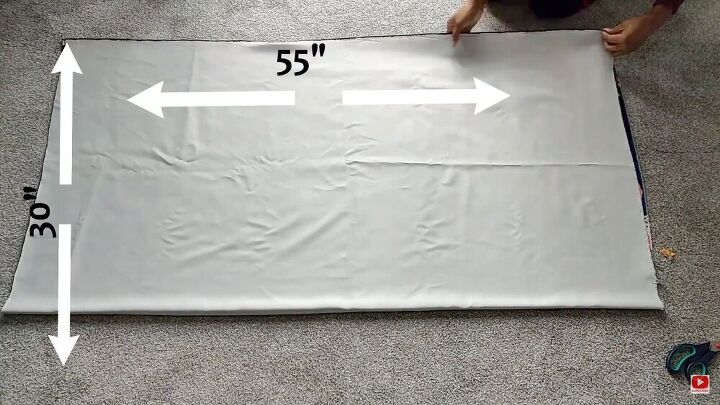
Fold your fabric into two, and then into four, width ways. The width I am using here is 30 inch and the length is 55 inches. The measurements here are really according to your size and height. I am pretty tall, and so this length is perfect for me. So before you do anything else, go ahead and measure yourself.
Create the pattern
Mark an inch off the end of the fabric and draw a line. Next, draw two inches from that line and draw another line, lengthways.
Mark two inches inwards on the second line you just drew. This will be for the armhole. For the arm home, mark 6 inches lengthways, and connect the two dots, in a curved manner.
Once done, cut out the pattern and make sure to cut open the folded edge.
Sew the underarm areas
Assemble your underarm curved areas, fold the hem, and sew. Repeat this for both sides.
Fold top area
In this step, you will need to create a channel to feed through your necktie. So, connect your top part, fold over, and sew. The fold should be bigger than the underarm fold. Make sure there’s a channel big enough for the necktie to sit snug. Repeat this on the back part as well.
Sew the side seams
Now go ahead and sew the side seams, starting from the underarm and stopping right to where your knee will be; this way you will have to open side slits. If you don’t want side slits, then feel free to sew it all the way down. The choice is yours! Before sewing, I placed the fabric together with fabric clips.
Hem your dress
If you opted for open side slits, then hem your sides. Also, hem the bottom of the dress for a neat look. To hem the sides and bottom, simply fold the fabric over, the wrong side in, clip in place, and hem away.
Make the necktie
This is the fun part! Take a fabric of your choice, I opted for a bright pink color that compliments my dress’s print. Cut your fabric, 60 x 5 inches. Fold it over, widthways, and clip in place. Leave a gap in the middle so that you can turn it inside out once it’s sewn. Also, cut the end parts diagonally. Don’t forget to close the opening.
Create the bow
Take three pieces of fabric; cut 17x17 inches. I used a piece of black net fabric so it gives my bow more structure and the remaining two fabrics are the pink satin pieces that I used for the necktie. Lay your fabric on top of each other; with the net fabric in the middle of the other two. Pin in place, and stitch all four edges. Leave a gap so it can be turned inside out.
Once the piece is turned inside out, create a pleat in the center. Simply pinch and gather the middle, making a cute bow structure. Hand stitch the middle part in place.
To cover the middle piece of the bow, take a piece of fabric that you used for the dress itself, fold, and cover the middle part of the bow. Sew it on to secure in place.
Assemble everything
Feed the necktie through the top channel of the dress. Add the bow to the side or wherever you please to give your maxi dress an extra, snazzy accessory.
This is what it looks like! Seriously, it's the easiest maxi dress you will ever sew! I am so pleased with the results and the whole ensemble just looks perfect, don’t you think? Go ahead and make a couple of these in various colors and prints so that you are sorted for the warmer, summer months. Enjoy!
Enjoyed the project?
The author may collect a small share of sales from the links on this page.


Comments
Join the conversation
It looks beautiful on you. Your directions are spot on. Short round people like me need to make a few adjustments. lol
You look awesome in the dress and thanks for sharing how easily I can make my own. Great job!