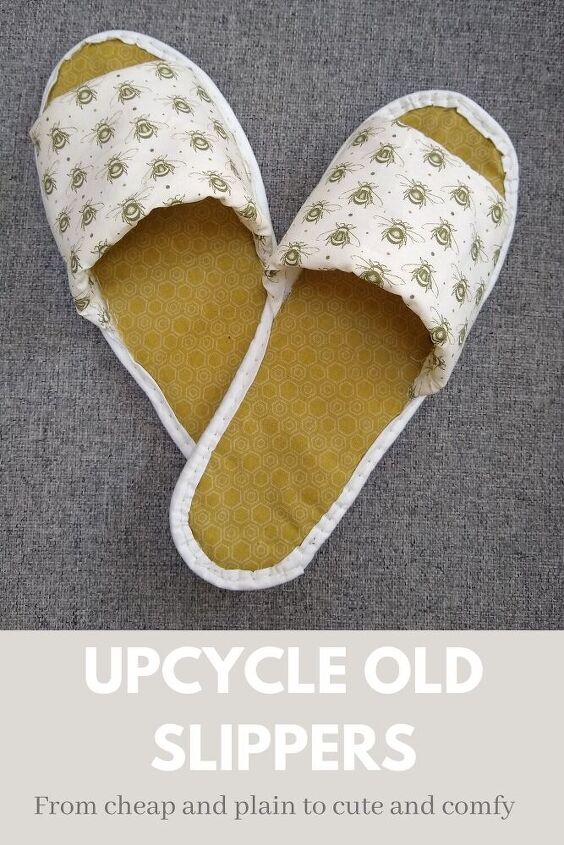
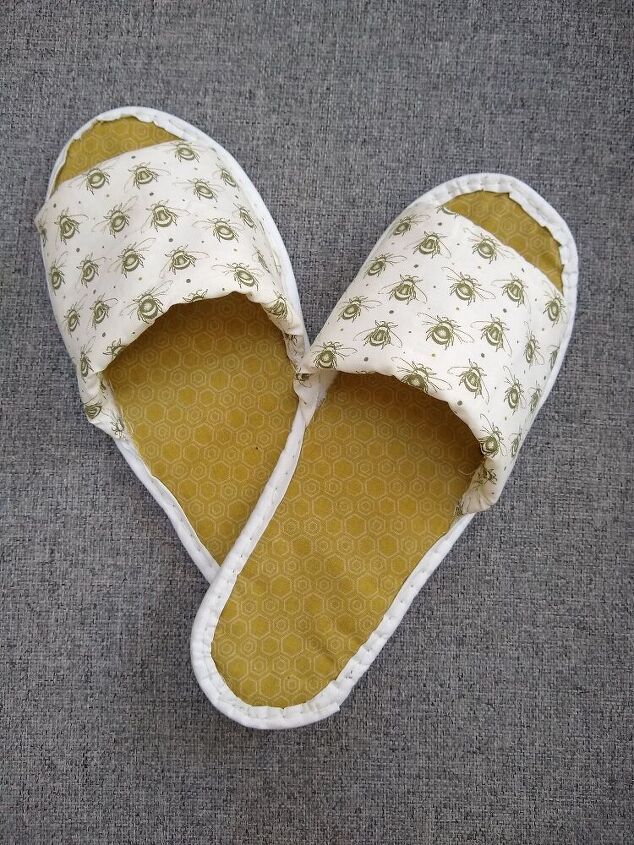
Cute Sliders From Hotel Slippers

Use your favourite fabrics to transform cheap "disposable" slippers into pretty sliders to wear around the house!
After lockdowns and restrictions throughout last year, I finally got the chance to go away for a night staycation with my friends in December. Between the hotel restaurant, pool and spa, it was just what we needed to decompress and forget about the pandemic for a weekend!
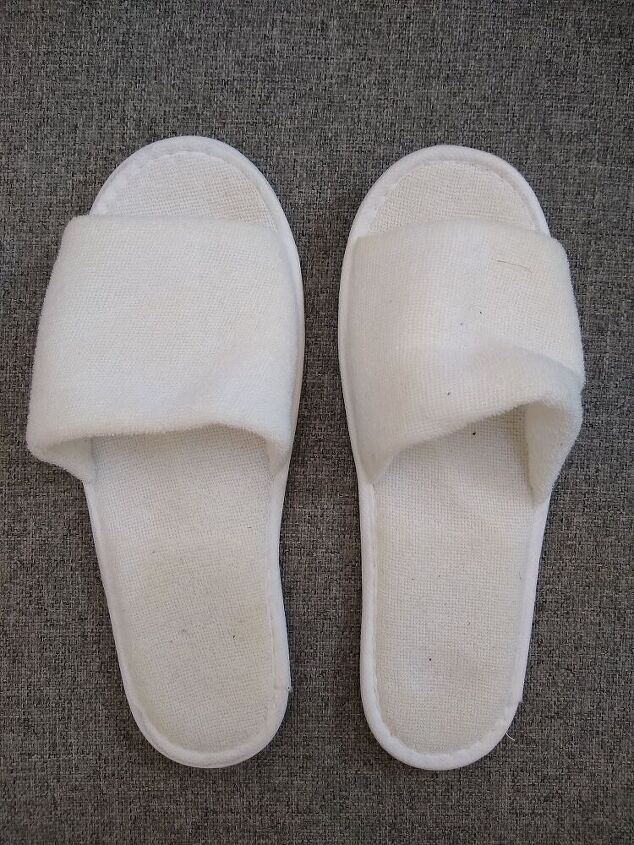
We were given plain white slippers at the spa and pool, just like in many hotels. While my friends threw theirs away after the trip, I hoped (as an avid crafter and upcyler) that I could reuse mine for a project in the future. I stowed them away in my suitcase and didn't think about them again until this summer. I realised that my winter slippers were too warm and fluffy for the summer heat and decided to make myself some lightweight alternatives for days still spent at home.
In this tutorial, I'll show you how to upcycle your own unwanted slippers into fun, unique and comfy sliders to wear around the house without overheating.
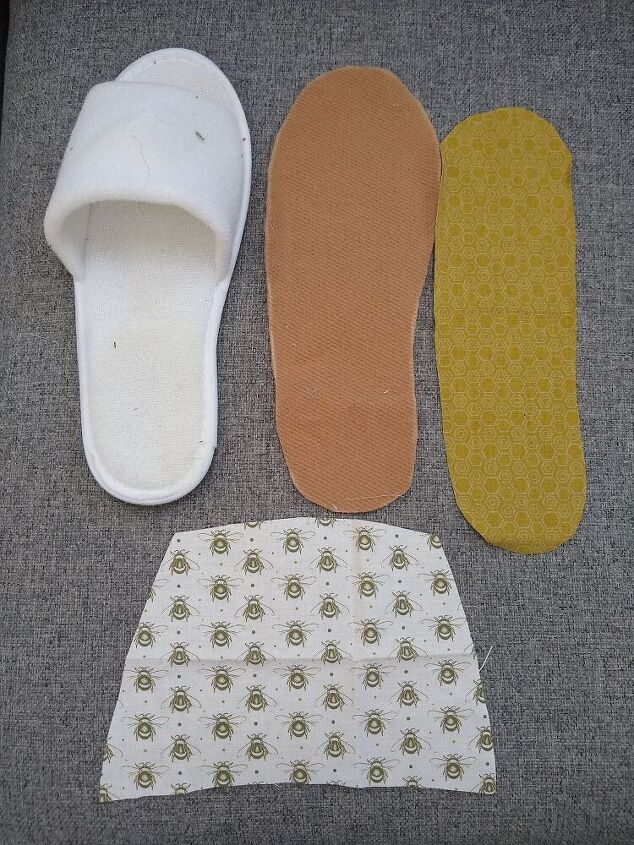
All you need are some pretty fabrics to cover the top and base, a thicker material like wool for the sole and bias binding (I made this myself). This is a perfect opportunity to use up fabric scraps from previous projects that were too small for anything else! You will also require a strong thread and sharp needle to join all the layers together
Step 1
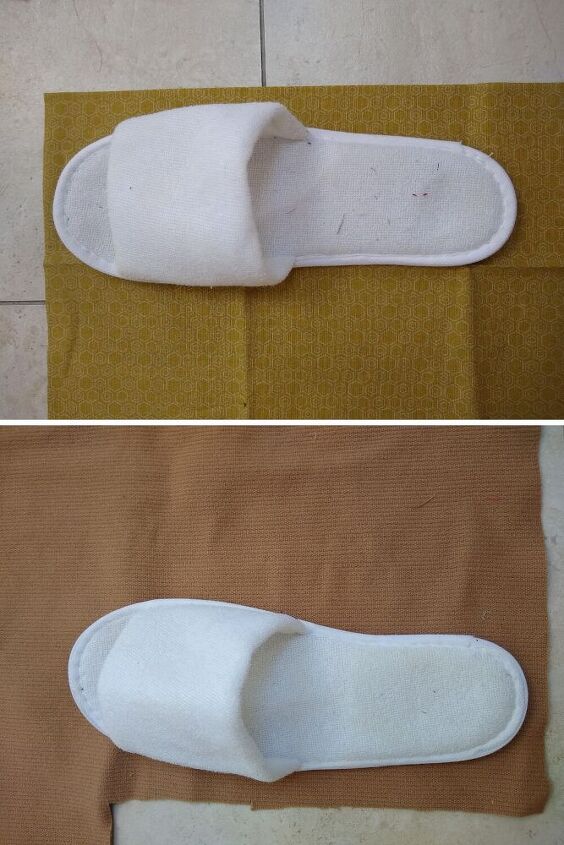
Take your slippers and lay them down on the right side of the fabric you want to see on the inside of the shoe. I chose a mustard coloured honeycomb print that I got in a set of fat quarters. Trace around with fabric chalk or a pencil and cut out one for each slipper. Repeat with the woollen backing fabric (or whatever hard-wearing fabric you're using.)
Step 2
Insert the inner printed fabric into the slipper to see how it fits. Mine was too big at the sides where the front band is attached, so I traced the excess and trimmed it away.
Step 3
Measure the top and bottom curves of the front band that goes across the shoe. Sketch the shape on your second piece of fabric (it can be the same one, but I continued with the pollinator theme to choose this bee-autiful print!). Add about an inch (2.5cm) of allowance to the top, bottom and side edges to ensure the covering can be folded around the pre-existing band.
Step 4
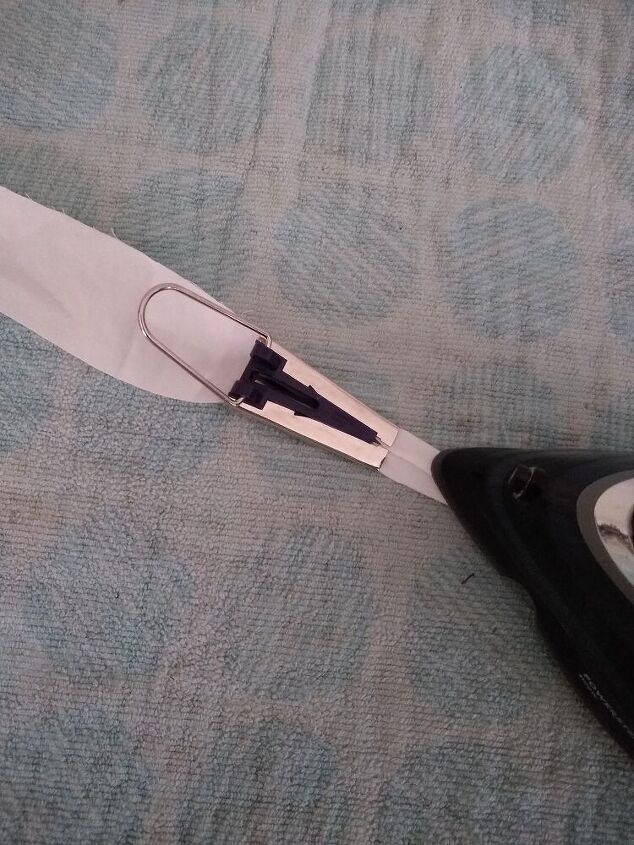
Next, I made a plain white bias binding to cover up the raw edges around the slipper. If you have shop-bought binding, you're good to go! I took scrap fabric from a sheet and cut out a strip long enough to wrap around the perimeter of the shoe and 3.6mm wide. I then used my bias tape maker to feed through the strip and iron the edges into the middle. You can of course do this manually instead.
Step 5
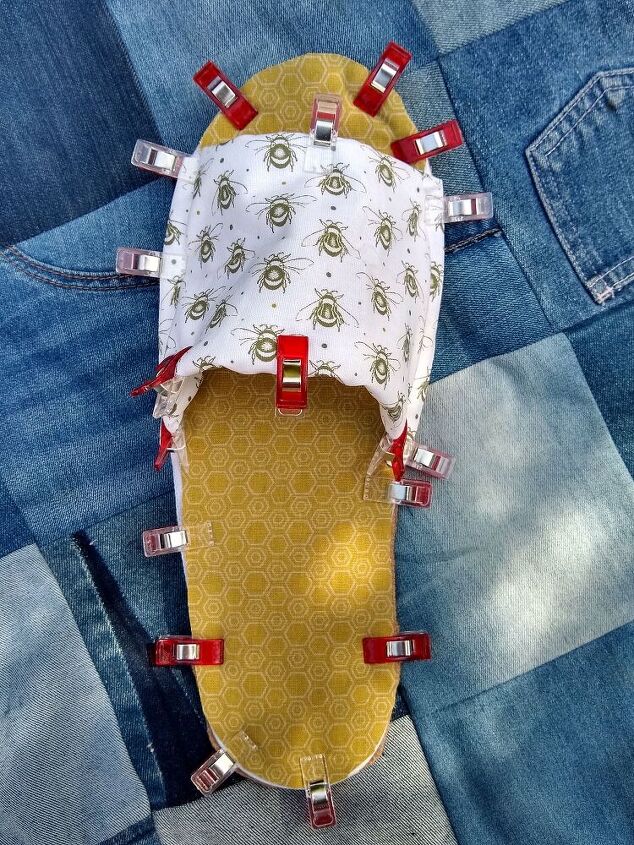
Once all of your components are ready, go ahead and position them on the slipper base. Use small pegs to clamp the three layers of fabric into place around the edge, making sure each layer is pulled taught to the edge. Fold the covering for the front band between the base of the shoe and the woollen backing on either side. Then, wrap the top and bottom edge under the band itself and tuck everything in as neatly as you can. Use pegs to clamp the sides of the covering with the shoe and woollen layers.
Step 6
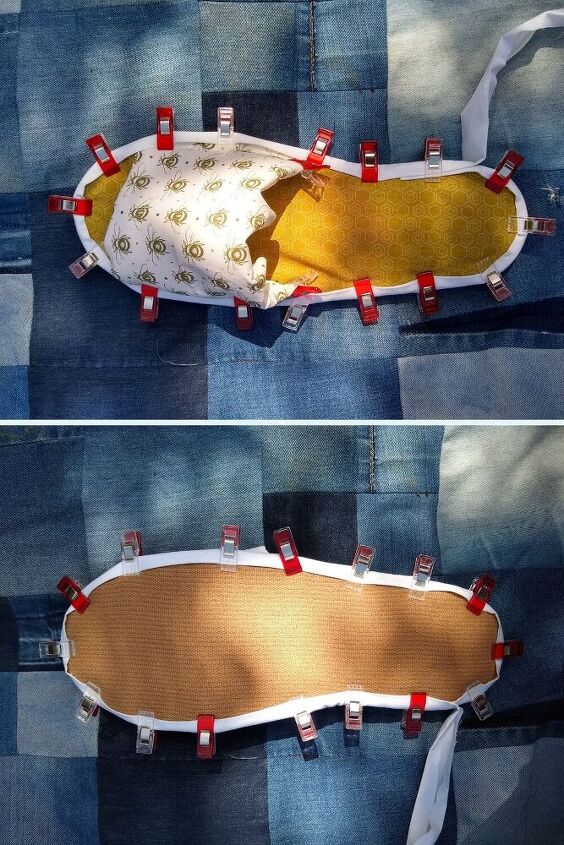
Now that everything is in place, it's time to add the binding. Starting along one side of the shoe, fold your binding over the edge, encompassing all layers. Pull it tight to avoid too much puckering. Remove the original pegs as you go and place them over the binding instead. Keep the tension as you work around the shoe, placing extra pegs at the curved parts to keep everything in place.
Step 7
Taking your sharp needle and strong thread, use a large backstitch to work around the binding, pushing it through all layers together, including the slipper itself. This can be quite tough to do so I would recommend using a thimble to avoid hurting your fingers. This part of the process requires patience but can be quite relaxing! Check regularly to ensure all layers are being caught by the stitches as you go. To finish off, snip the excess binding away and fold under the end, continuing your stitches to secure. Knot off your thread at the nack and snip any long threads.
Step 8
To finish off the front band, take a smaller needle and finer thread. From the underside of the band, use wide stitches to tack the folded edge up without showing through to the front. Repeat on the top edge. You could alternatively use fabric glue for this stage. Finally, attach the edge of the interior fabric to the side of the shoe by stitching through the side of the band and the fabric. This will be hidden inside the shoe so don't worry too much if it's a little messy!
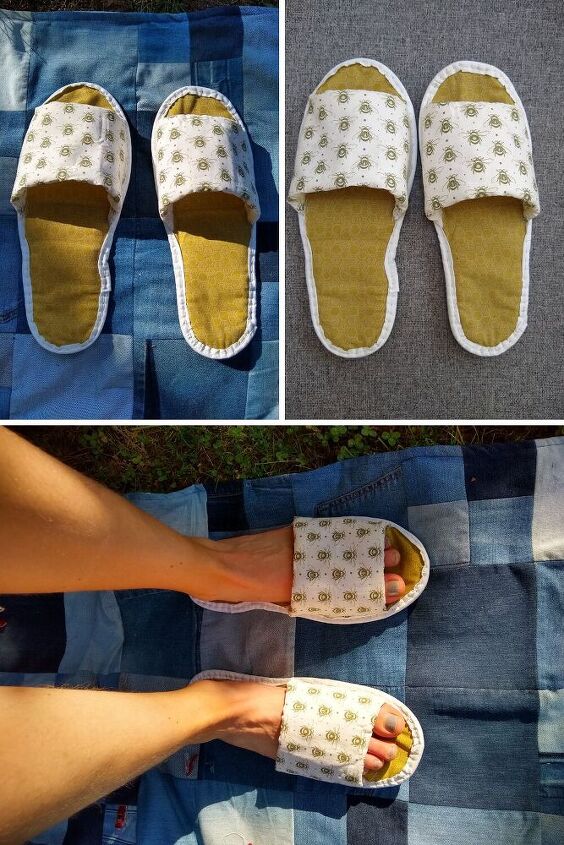
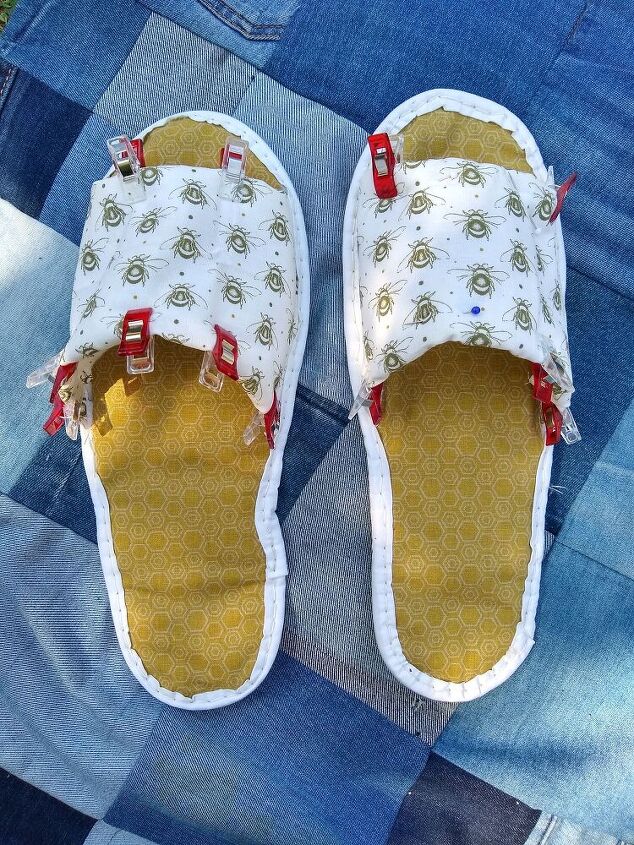
All done! Enjoy your newly transformed slippers- perfect for pottering around the house or garden. Feel free to customise in any way you like, with embroidery, embellishments or pom-poms for example. If the bottoms are too slippy, try using dots from a glue gun to provide a non-slip surface. The possibilities are endless!
The author may collect a small share of sales from the links on this page.


Comments
Join the conversation
Oh my goodness, how cute!
SO clever! Love them!