Quick and Easy Reversible Tote Bag Pattern Tutorial

Today, I have a reversible tote bag pattern for you.
This DIY tote bag design is very straightforward to make and I’m going to give you full instructions for how to sew a simple tote bag.
I made mine from a patterned and a toning plain fabric, but you could use matching fabrics in two different colors.
Best fabric scissors!
Tools and materials:
- Approx. 1/2 yard (1/2 m) of 36 inch (90 cm) wide patterned and plain fabric
- Fusible interfacing
- Measuring tape
- Ruler
- Tailor’s chalk
- Scissors
- Pins
- Iron
- Sewing machine
1. Cut out the bag panels and handles
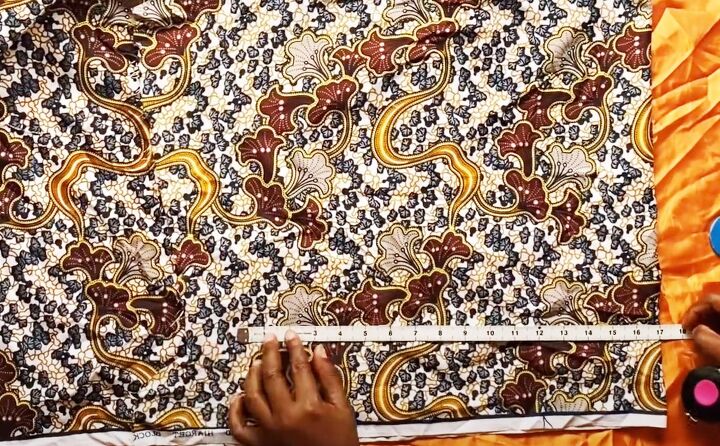
Fold your main fabric in half lengthways.
Measure 17 inches (43 cm) up from the fold across the width of the fabric and join the marks with a straight line for the height of the bag.
Measure 16 inches (41 cm) along the fold to mark the width of the bag.
Cut out a 2 inch (5 cm) square from the two lower corners of the bag, at the fold.
Cut a piece the same size from the contrast fabric, using the first panel as a template.
From the remaining contrast fabric, cut four strips 3 inches (8 cm) wide and 16 inches (41 cm) long for the handles.
Cut matching pieces for the panels and handles from fusible interfacing.
Iron the interfacing to the wrong side of each piece.
2. Sew the side seams
Fold the panels in half with the wrong side inside and sew the side seams.
3. Make the handles
Join the handles pieces together in pairs along the short edges and press the seams open.
Lay the handle flat with the wrong side uppermost.
Turn in the two long edges by half an inch (1 cm) each and press.
Fold the handle in half lengthways and top stitch both long edges.
Make a second handle in the same way.
4. Bag base
Check that the top edges of the cut-outs measure 2 inches (5 cm) from the side seam and trim as needed.
Bring the sides of each cut-out together diagonally, with the seam in the center of one side.
Pin and sew in place.
5. Attach the handles
Turn the patterned panel right side out.
Find the center of the top edge.
Pin the ends of one handle an equal distance each side of the center on one top edge, making sure the handle is flat. I placed my handles 2 inches (5 cm) either side of the center.
Pin the second handle to match on the other side of the bag.
Sew the handles in place.
6. Attach the contrast panel
Place the main panel right side out inside the contrast panel, so the right sides are together and the handles are sandwiched between them.
Matching the side seams, pin the two panels together around the top edge.
Sew around the top edge, leaving a 3 inch (8 cm) gap unsewn in the center of one side.
Pull the main panel and the handles through the opening.
Push out all the corners.
Tuck the contrast panel inside the main bag.
Turn the ends of the opening inwards and top stitch around the top edge of the bag.
DIY tote bag idea
To use the reverse side of the bag, just turn it inside out.
You can modify your DIY tote bag by making it smaller or larger or changing the length of the handles.
You could add a simple pocket to one or both sides of the bag and a magnetic closure to the top edge.
It’s such a simple pattern, it’s easy to adapt it and make it unique.
I’d love to read your comments about this reversible tote bag. Let me know if you’re going to make it.
Next, learn How to DIY a Cute and Easy Upcycled Denim Bag.
Enjoyed the project?
Suggested materials:
- Approx. 1/2 yard (1/2 m) of 36 inch (90 cm) wide patterned and plain f
- Fusible interfacing
- Measuring tape
- Ruler
- Tailor’s chalk
- Scissors
- Pins
- Iron
- Sewing machine
The author may collect a small share of sales from the links on this page.


Comments
Join the conversation