Easy On-trend Pop Art Nails Tutorial

Hi everyone. Today, I’m going to show you how to do pop art nails with simple blue and black nail designs. Let’s get started!
Tools and materials:
- Black gel polish
- White gel polish
- Dark blue gel polish
- No wipe topcoat
- Matte topcoat
- Dotting tool
- Thin brush

1. Apply blue nail polish
Apply the blue, gel nail polish to all of your nails and then cure.

2. Outline the nail
Use a thin brush and line your nails with black gel nail polish.

3. Make a thin, black stroke
Still using the black, make a thin stroke around the outer curve of your nails.

4. Make a thin, blue stroke
Make an additional thin stroke with dark blue gel polish, this time starting from the bottom center of your nail and stopping just before the black stroke.

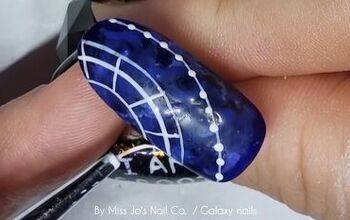
5. Dot your nail
Use a dotting tool and white gel nail polish to add a dot at the top center of your nail, just below the tip of the black stroke.

6. Make a thin, white stroke
Finish the curve by using white gel polish to another stroke polish from the bottom to the top, mimicking the blue and black strokes.
Stop just before the white dot. Once you’re finished, cure.

7. Apply topcoat
Apply a no-wipe, glossy topcoat and then a matte topcoat. Cure.

Pop art nails
Here are the finished pop art nail designs! What do you think of this look? I hope you love it as much as I do.
For more DIY nail content, check out my post on How to Do Quick & Simple Red & White Nail Art.
Product used:
- Born Pretty Black Series
- Born Pretty No Wipe Topcoat
- Born Pretty Matte Topcoat
The author may collect a small share of sales from the links on this page.


Comments
Join the conversation