Easy Red, White and Green Nail Design for Christmas

In this holiday nails tutorial, I’ll show you how to do classic red, white, and green nails.
This is great if you’re looking for easy Christmas nail ideas. Let’s jump right into it.
Tools and materials:
- Red nail polish
- White nail polish
- Green nail polish
- Silver glitter nail polish
- Detail brush

1. Draw four dots
Starting with a white base color, make four dots in a diamond shape in the center of the nail.
Use a thin detail brush to make smaller dots.

2. Connect the dots
With a red nail polish, connect the dots to form a diamond.

3. Fill it in
Fill in the diamond.

4. Draw green half-diamonds
Draw a green half-diamond on each side of the red diamond. You can use the same dot trick to get a correctly proportioned diamond.

5. Draw green full diamonds
Draw two full green diamonds above the red diamond. The green diamonds should surround the red.

6. Draw red half-diamonds
Draw red half-diamonds on each side of the green diamonds.

7. Draw three silver lines
With a silver glitter polish, draw three diagonal lines through the diamonds.

8. Draw three more silver lines in the opposite direction
Draw three more diagonal lines in the opposite direction to create a criss-cross pattern.

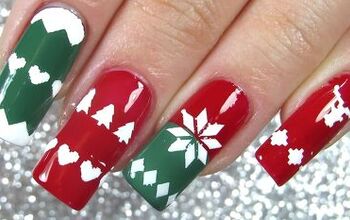
Red, white and green nails for Christmas
Here are the finished holiday nails! Let me know your favorite holiday nail designs in the comments below.
Next, check out these 3 Cute and Easy Line Art Nail Designs for Christmas.
The author may collect a small share of sales from the links on this page.


Comments
Join the conversation