A New Take on a New Look 6525 Pattern

I have really enjoyed pushing my creativity with the New Look 6525 pattern gifted to me from Minerva this month. It has been my feature pattern focus and I have so enjoyed using the different pattern variations to create several looks this month.
This pattern has become a wardrobe staple pattern. I have tweaked it to the point that it will be my favorite option for knit dresses and tops. Every version looks like a different dress and the combination of styling options is almost endless.
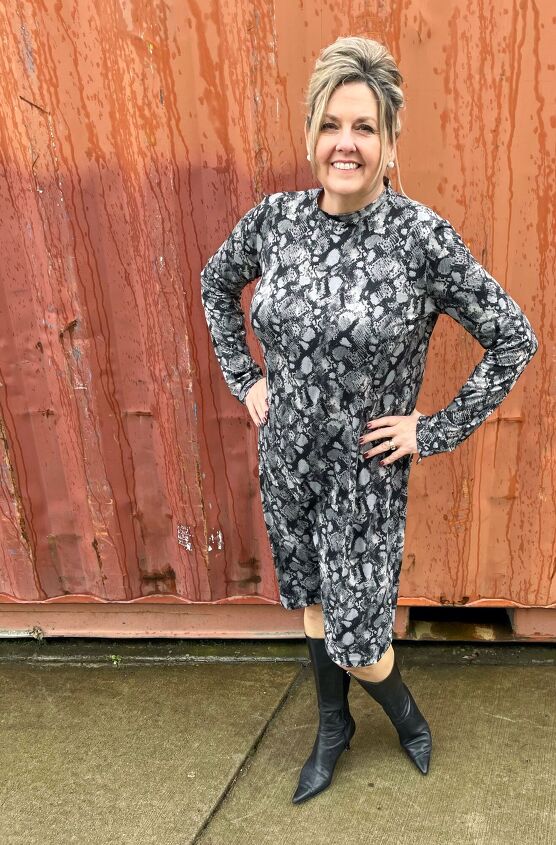
This version of my New Look 6525 was sewn with a heavier scuba type knit from my local fabric store. I immediately loved the print when I saw it, but wasn’t quite sure what to make with it. It needed a simple, classic pattern so the print would be the feature. Once again I found this using this New Look pattern.
I cut out the size 16 pattern. It is a perfect size through my back, shoulders and bustline and I very much appreciate the fit and finish. What I love even more about this pattern is the ease with which I can grade down several sizes through the waist and hips. My previous paisley bell sleeve version of this pattern can be seen here. I used a much lighter knit from Minerva so a more flared version of the skirt worked well and gave it nice drape.
For this version of the dress, I wanted to reduce the amount of fabric in the A-line shape. With the fabric being heavier I didn't want the dress to look and feel too heavy. Having made a top version already ( click here) I knew that for the fit I wanted, I could grade down right from under the arm. I simply folded the side of the front and back bodice straight down starting at the arm syce. This reduced the A-Line by at least 10" but it still allowed for a bit of drape in the skirt. It created the perfect balance for the heavier fabric and the simple lines fo the dress. To achieve a knee length for my 6 foot frame, I reduced the longest version of the pattern by 5.5". This allowed for a 3cm hem so I could serge the edge then double stitch the hemline. What I do know is that I have found the perfect finished length for a dress, and THAT is an ultimate sewing goal ! Once again this pattern has helped me to create a perfect pattern for wardrobe basics. I am really pleased with the finished result.
I really wanted to keep the lines of the dress simple and let the print be the feature. To finish the neckline I wanted a binding made from the same fabric, not a contrasting bias binding. I cut a 2" strip of the knit fabric that was 0.5" longer than the total circumference of the neckline to allow for a seam allowance. Fold the strip wrong sides together, press and sew the short ends together. Mark the center front and two sides of the neck binding with pins, then pin to the dress neckline. As you binding is a bit smaller than the neckline gently stretch it to fit. Once you have overlocked at 3/8" remember to press the binding flat. Press, press and press again to get a flat, crisp finish. Having a neckline that blends into the dress is the perfect finish to this simpler version of the 6525.
For this dress I chose the straight long sleeve option. I lengthened the sleeve by 6.5" to ensure that I had a large 2" hem to turn under. This allowed for my double stitching to be placed higher on the sleeve to look like more of a cuff.
All in all the end result of this particular version of my New Look 6525 is pleasing and classic, not to mention comfortable. I am so excited to have a custom pattern to use for any knit fabric that will fit perfectly.
After all.... These is Sew Much To Design.
Happy Sewing,
Lou Sheffer
Enjoyed the project?
The author may collect a small share of sales from the links on this page.


Comments
Join the conversation
Great share 👍️