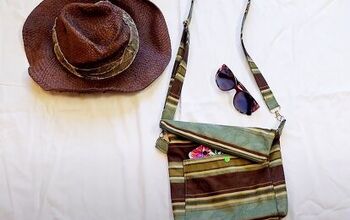
Free DIY Crossbody Bag Pattern

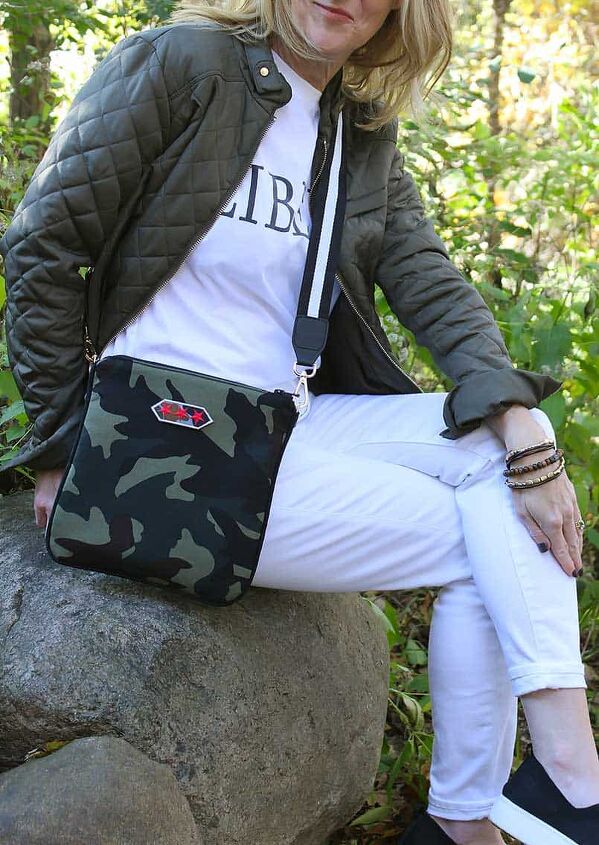
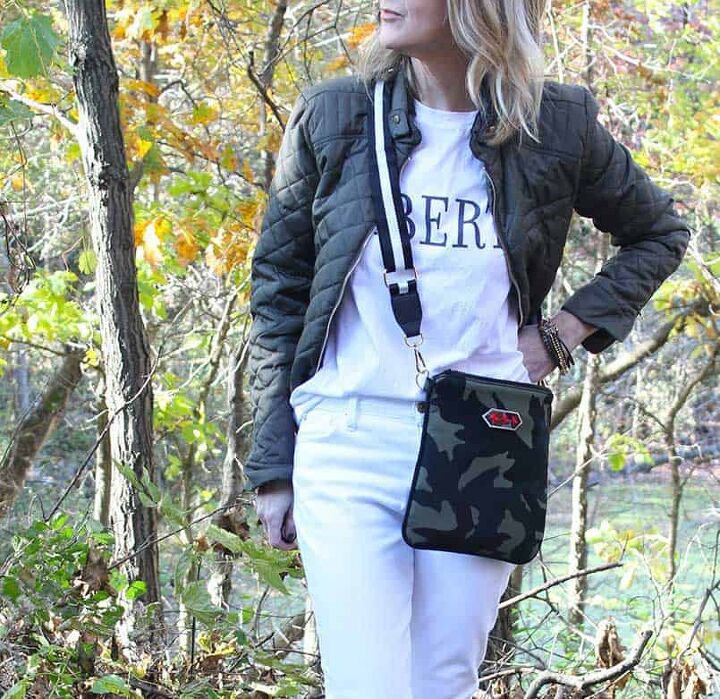
Purses are such a personal thing. The size, the fabric, the color, etc. That’s why it’s so fun to make your own and create it just the way you want. Come along and make one for yourself with this easy DIY crossbody bag pattern.
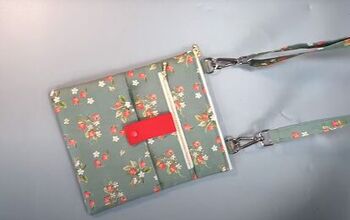
Be brave and stretch your sewing chops! Get as wild or stay as tame as you want. If you’re anything like me, this is your everyday errand running, game day, concert, event-going bag, and a highly functional hands-free superhero.
Find my Baguette-Style Purse HERE
Purchase the Baguette Pattern HERE
Purse Pattern Features
This crossbody project is pretty straightforward and has many optional details you can take or leave based on your skill level. I will walk you through it step by step.
If you want to simplify the purse pattern design, see the “Beginner Sewing Steps” section near the bottom of the page for more help. I detail what you can skip and how to work around each item.
Purse Lining
Adding a lining to your bag can make it sturdier and protect the outside fabric from the contents of your bag. It’s also a great way to add a bit of personality with contrasting or complementary fabrics, fun colors, or patterns.
Handbag Interfacing
This step is optional. If you want a slouchier look or if your fabric is thick and already has enough integrity on its own, you may want to skip this step.
My fabric was medium-weight and not super stiff. Pellon Fusible Fleece Interfacing gave it more rigidity plus a lovely softness and cush.
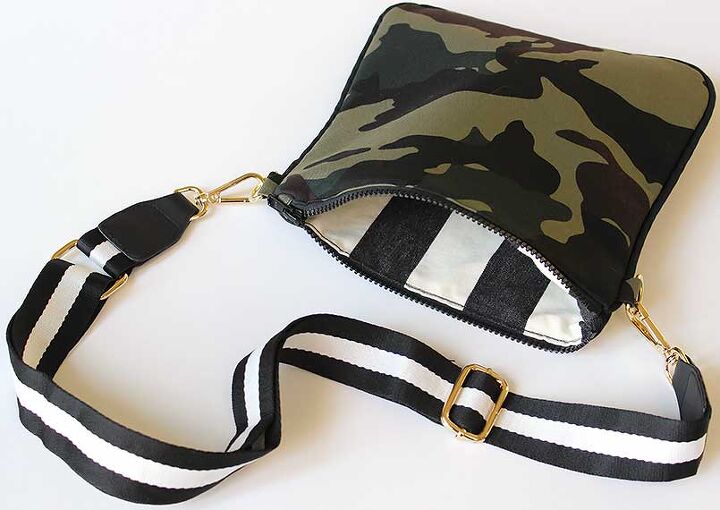
Crossbody Adjustable Purse Straps
I just love this trend! Adjustable straps are readily available and can easily change up your outfit and look. They are relatively inexpensive and available in SO many colors and patterns.
You could also sew your strap out of your purse material or another contrasting fabric.
I purchased a couple of adjustable purse straps on Amazon. There is something for every taste and so many options to choose from. See the ideas in my blog post!
How to make Bias Cording
Sometimes called piping, this trim is a great way to make your purse look more tailored. You can make your own cording. It’s easy! Or you can buy it premade in most fabric stores.
If you are adding piping, keep in mind you will have one additional pattern piece. For more information to make it yourself and figure out yardage, for a great tutorial, click HERE.
Remember, cording your purse is optional.
How to Put in a Zipper
If you choose to add a zipper, I’d recommend a closed style with hard plastic parts. If you prefer an open-top bag or if you are a beginner sewist and not ready to tackle adding a zipper, just skip it.
I explain how to sew a zipper into this purse style in the tutorial below.
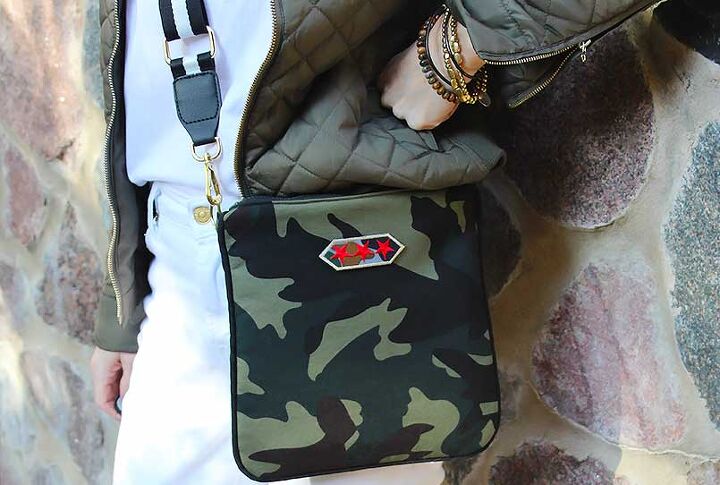
Purse D-Rings
These connectors are the loops that are attached directly to your bag. They allow you to connect your purse strap to your bag.
You can create your own with fabric loops, but using a metal connector piece will be more durable over time.
D-ring connectors are available in various colors so that you can match the hardware with your strap. They are also made in a variety of sizes and styles.
Check Amazon for a plethora of options. I bought the Dritz brand at JoAnn Fabrics.
Sewing on Embellishments and Trims
There are so many unique appliques, trims, and tapes to decorate your bag. If you are a Twin Cities resident, check out SR Harris HERE.
Check your local fabric store or Amazon for great products and ideas if you live elsewhere.
Many embellishments are available to iron on, or you can sew on or use fabric glue to adhere to your purse.
Designing your Crossbody Bag
Okay, let’s get started. You are the designer, time to get creative! Make this purse the way you want it; it fits your wallet, phone, keys, lipstick, or anything else you want to carry with you.
Below is the pattern I created, but you can adjust the size and shape of your bag based on your wants and needs.
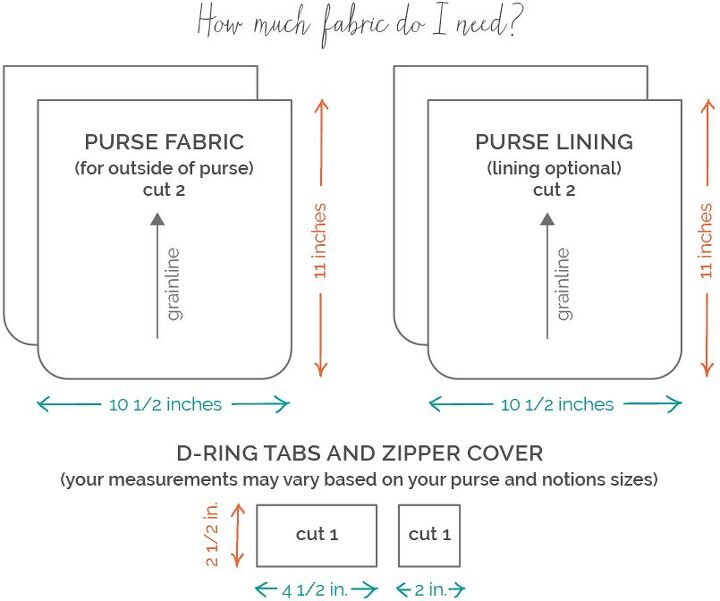
How Much Fabric do I Need?
Grab a large piece of paper and a pencil. Take the items in your purse and draw around them in your preferred shape. Add the final measurements to your drawing to calculate how much fabric your purse requires.
The dimensions of my crossbody bag are below. I used approximately 1/3 yard of the purse fabric, 1/3 yard of the lining material, and 1/2 yard for making the black bias cording.
Fabric Shopping and Selection
When you have completed your crossbody bag design and determined the fabric yardage, it’s time to find your fabric. Take your drawing and yardage estimate with you to the store or have it with you as you shop online.
If you are unsure how much fabric to buy, ask your local fabric store employees for assistance. They are always ready to help with yardage questions.
Materials And Sewing Supplies
Below are the items you need to make this project …
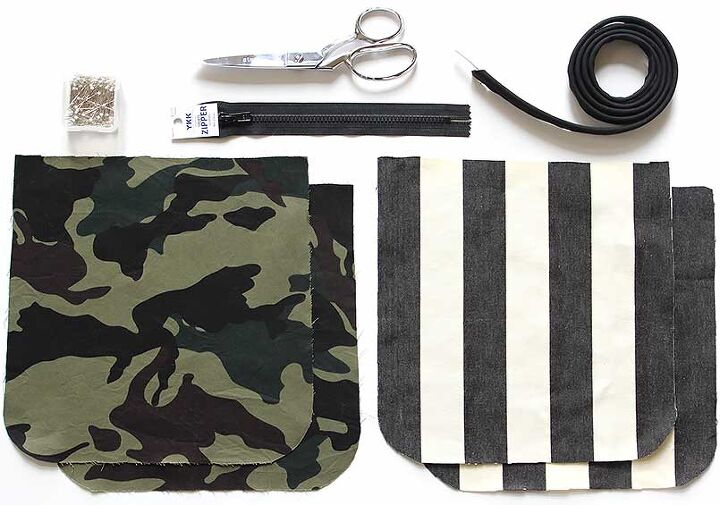
All project materials are NOT pictured above; please refer to the list below for specifics, custom options, and ideas on where to purchase them.
- Fabric for Bag
- Fabric for Lining optional
- Cording Fabric optional
- Fusible Fleece Interfacing optional
- Cording optional
- 2 D-rings optional
- Zipper optional
- Adjustable Purse Strap
- Matching Thread
- Sewing Straight Pins
- Pencil
- Paper Scissors
- Fabric Scissors or Rotary Cutter
- Ruler
- Sewing Machine
- Pattern Paper optional
- Cutting Board optional
- Bias Tape if you don’t line the purse
Special Sewing Supplies worth Considering
Below are a few items that will make your sewing easier and your bag more professional.
Microtex Needle
Microtex needles are VERY sharp, and above all, these babies are awesome for sewing multiple layers of fabric together. They have a fine point that will easily fly through your fabrics.
SCHMETZ Microtex Needles fit most sewing machines just like regular machine needles do. They are a reputable brand.
Fusible Fleece Interfacing
Fleece interfacing adds a layer of softness, body, and stability to your crossbody bag project. You can fuse it directly to the fabric, eliminating the need for pinning, basting, and sewing.
I used the Pellon brand and found it at JoAnn Fabrics.
Preparation For Sewing
Just a few simple steps to take before you start sewing.
Prewash Bag Fabric
First, prewash your fabric to help prevent any shrinkage in future washings that would compromise the look and lay of the bag.
After the fabric is dry, press with an iron, if you do not intend to wash your purse, you could skip this step.
Create a Paper Pattern
It’s easiest to make official pattern pieces, and then you can use the pattern again.
I like the pattern paper I found on Amazon HERE (affiliate link). It’s similar to the weight of a commercial sewing pattern. You can write on it and see through it if you want to trace anything. It’s also very reasonably priced.
Refer to your original drawing and measurements, then draw and cut out your pattern pieces. You can certainly skip making a pattern. An alternative method would be using a removable fabric pen and drawing directly on the fabric with a straight edge.
Layout pattern and cut fabric
Next, lay out your fabric and the pattern pieces on a cutting board or a surface that is safe to cut on. (Or draw out the pieces on the fabric if you are not using pattern paper.)
Pay close attention to the grain of the fabric and ensure the pattern pieces are positioned correctly. If you are using a patterned fabric, be extra careful. Cut your fabric pieces.
Sewing your Crossbody Bag
Preparation
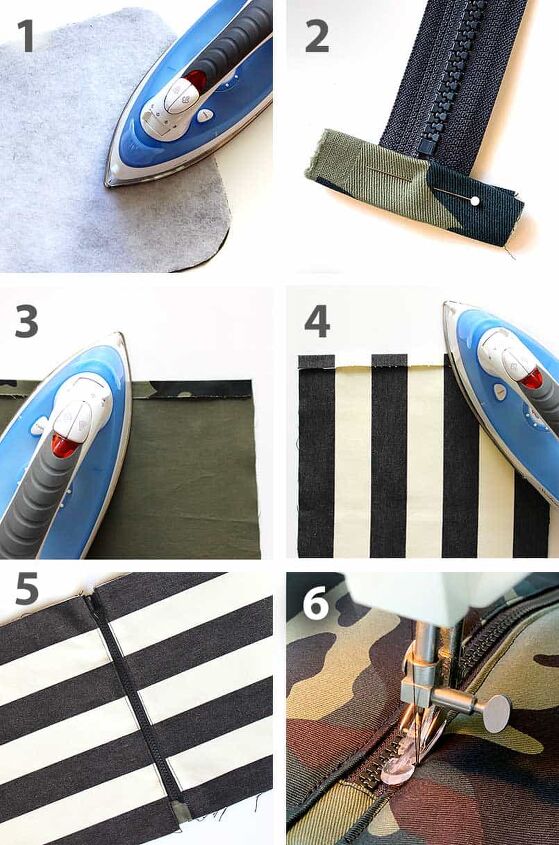
1 Cut out fabric pieces. Iron the wrong side of both purse (body) pieces of interfacing.
Leave the seam allowance across the top of both pieces free of interfacing. Or you can cut it off later if you forget, as I did!
2 With a small strip of the purse fabric, you will create a simple cover for the bottom of the zipper that should cover the “gap” at the bottom under where the zipper closure is.
Iron both sides of the strip inward towards one another to create the cover, leaving a small margin in between. Press with an iron. For an exact measurement, refer to the size of your zipper.
Next, fold the strip in half and press. Encase the bottom end of the zipper and pin. Stitch across horizontally to secure the zipper.
3 On both purse fabric pieces, fold the seam allowance over to the wrong side. Press.
4 Now, using the lining fabric, fold the seam allowance over to the wrong side. Press.
Begin to Sew
5 Sew lining fabric to the UNDERSIDE of the zipper. (The zipper pull should be on the flip side)
6 Now, sew the purse fabric to the TOPSIDE of the zipper. (The zipper pull should be on this side)
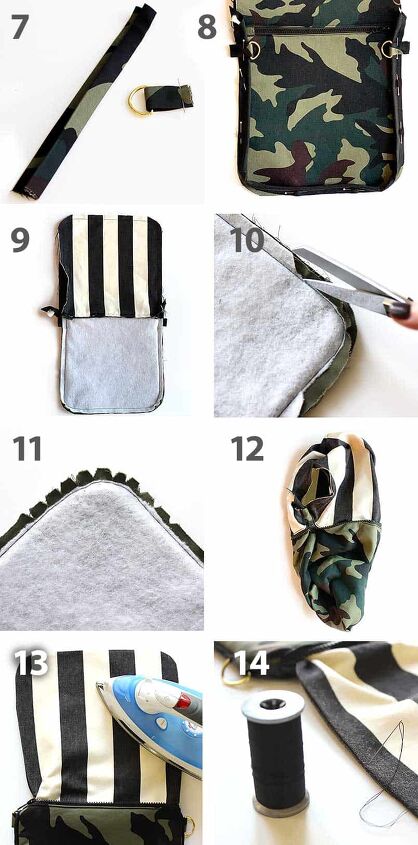
7 If using D-rings, next, we’ll create a simple strip of fabric to connect the D-ring to the purse. Fit to your D-ring measurements.
First, fold one side in, then fold the other side in, folding once, then twice on itself, enclosing the raw edge. Be careful not to make it too thick and bulky. Press.
You do not need to stitch on this strip (I didn’t), but you can if you are the “more is more” type.
8 Pin the cording and the D-ring to the purse’s two sides and bottom edge. One side of the purse only. Baste close to the edge of the purse to secure it.
It may be easier to baste the cording first, then baste the D-rings loop next. Next, stitch in place.
9 Open the zipper up all the way. (This will allow you to turn the whole purse right side out later.)
Align both purse fabric pieces, right side to right side. Pin.
Next, align both lining fabric pieces from the right side to the right side. Pin. Stitch around the outer edge of the purse using your chosen seam allowance. Leave a 3-4 inch opening on the lining end to be able to turn.
NOTE: Unlike my photos, I would suggest leaving the opening at the bottom of the lining, but anywhere will work. I did it on the side, so there was a lot going on in that area.
Trim interfacing close to the seam, in the seam allowance, AND trim the seam allowances down. This will reduce bulk and help you get a smooth finish outside your bag.
Finishing Steps
10 Trim interfacing close to the seam, within the seam allowance, AND trim the seam allowances down.
This will reduce bulk and help you get a smooth finish outside your bag.
11 Clip curves. Cut small V-shaped notches along all the curves of your bag. Be careful not to cut into the stitches or the seam allowance.
12 At the opening, turn your purse right side out. Gently push out the curved corners.
13 Press. Use a pressing cloth if your fabric is sensitive. Iron well as you continue to open up the fabric. Smooth the curves and straightaways while steaming the wrinkles away.
14 Finally, sew the opening in the lining using a hand or machine stitch.
Beginner Sewing Steps
If you choose to forgo the lining. First, don’t cut out the lining fabric. 😁 Instead, follow the instructions, but skip steps 4 and 5.
Purchase or make a binding tape to sew to cover the raw edges inside of your purse. This will prevent fraying and create a nice clean finish.
Not putting in the zipper? Follow the instructions, but skip steps 5 and 6. Topstitch the top edge of the bag together. You may consider hand sewing in a snap or magnet closure to secure it.
Passing on the interfacing? Use the tutorial as it is however, skip step 1.
Skipping the cording? Utilize the instructions as they are, but skip step 8.
Forget the D-rings? Go by the instructions in the tutorial but skip steps 7 and 8.

Please let me know if you try this project in the comment box below. Or if you share a picture, please tag me @bebraveandbloom or
Happy Sewing!
xo,
Cindy
Explore More
START HERE for my blog home page
The author may collect a small share of sales from the links on this page.


Comments
Join the conversation