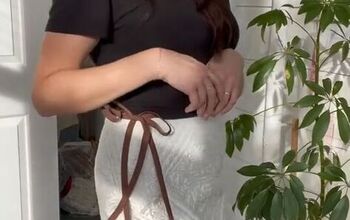
Sewing Tutorial: Upcycle a Men's Shirt Into a Cute 2-Piece Set

Today, I’m going to upcycle a men’s shirt into a ladies top and skirt outfit. I thrifted this size 2XL shirt which was just large enough for me.
Make sure the lower part of the shirt fits comfortably over your hips and thighs.
This is suitable for a confident beginner to intermediate sewist.
Best fabric scissors!
Tools and materials:
- Oversized men’s shirt
- 7-8 inch (18 - 20 cm) zipper
- Hook and eye fastening
- Seam ripper
- Fabric marker
- Measuring tape
- Ruler
- Pins
- Scissors
- Sewing machine
1. Separate the shirt
Lay the shirt flat and line up the sleeves and side seams.
Draw a line across the shirt between the fourth and fifth buttons down from the collar.
Check the length from the shoulder to the line. Mine is 15 inches (45 cm) and this will be the finished length of my top.
Cut along the line and put the lower part of the shirt aside.
2. Shape the top
Turn the top wrong side out. Fold it in half lengthways at the center front and pin the sleeves together.
Measure 10 inches (25 cm) down the top edge of the sleeve from the armhole.
Draw a line across the sleeve parallel with the pattern lines and draw a second line 2 inches (5 cm) down from the first for the sleeve hem.
Cut along the second line.
Mark a point 12 inches (30 cm), or the length of your bust point, from the shoulder.
Measure one quarter of your bust measurement plus a half inch (1.25 cm) allowance across the shirt from the center front at this point and at the lower edge and connect with a straight line.
Measure the excess from the side seam to the line around the armhole.
Mark the same distance from the sleeve seam and extend the line to the sleeve hem.
Cut along the lines through all layers.
Open out the top and pin and sew the side and sleeve seams together.
Turn in the seam allowances to hide the raw edges and top stitch.
3. Hem the sleeves
Turn the bottom edge of the sleeve to the wrong side by half an inch (1.2 cm).
Measure 2 inches (5 cm) from the fold and turn it up again.
Repeat on the other sleeve and sew the upper folds in place.
4. Bind the waist
Turn the top right side out.
Remove the cuffs from the leftover sleeves.
Cut strips 2 inches (5 cm) wide from the remaining fabric.
Join the pieces into a length that will fit around the lower edge of your shirt and tie in the front.
Starting and finishing about 6 inches (15 cm) from the ends, pin and sew the strip to the waist with the wrong sides facing.
Turn in and press the upper and lower edges of the ties and the lower edge of the waistband by half an inch (1.2 cm).
Fold the ties in half lengthways and turn the bottom edge of the waistband over the raw edge and topstitch in place.
5. Draft the skirt
Turn the bottom section of the skirt wrong side out with the buttons at one edge.
Mark a quarter of your waist measurement from the fold at the waist edge and add 1.5 inches (4 cm) for darts and seam allowance.
Measure a quarter your hip measurement at the hip line and add a half inch (1.2 cm) seam allowance.
Join the marks with a curved line.
Taper a line from half an inch (1.2 cm) at the fold for the front waist.
Cut out the skirt front.
Place the folded front on the remaining section. Cut out the side edge.
Allow an extra inch (2.5 cm) at the center back for the zip and cut it parallel with the center front.
Match the side seams and trim the front and back at the waist edge.
Measure 4 inches (10 cm) from the center front and back for the darts.
Sew 4 inch (10 cm) long darts on each piece.
6. Insert the zipper
Place the two back sections together with the right sides facing.
Mark the length of the zipper opening on the center back edges.
Join the center back seam, using a looser tension for the zipper section.
Open the seam allowance.
Pin the zipper right side down on the seam allowance, centered over the stitching line.
Topstitch on the right side, a quarter inch (0.6 cm) from the seam and across the bottom of the zipper.
Open the seam from the waist edge to the bottom of the zipper teeth.
7. Assemble the skirt
Place the front and back together with the right sides facing and join the side seams.
Make a binding for the waist edge as before, to your waist measurement plus 1 inch (2.5 cm).
Pin one edge to the inside of the waist.
Double fold the raw edge and topstitch it to the right side of the waist.
Attach a hook and eye to the waistband above the zipper.
DIY shirt and skirt set
If you prefer a more fitted style you could insert elastic in the top waistband, but I like this cool, loose look.
I have lots of upcycling ideas for clothes but I’d love to hear yours too. Please drop me a comment below.
Next, check out my Easy Upcycled Denim Skirt Tutorial.
Enjoyed the project?
Suggested materials:
- Oversized men’s shirt
- 7 - 8 inch (18 - 20 cm) zipper
- Hook and eye fastening
- Seam ripper
- Fabric marker
- Measuring tape
- Ruler
- Pins
- Scissors
- Sewing machine
The author may collect a small share of sales from the links on this page.


Comments
Join the conversation
Love this! You did a beautiful job, and so creative! I'm too old for it, but you look adorable! Thanx for sharing!